
Configure Qolsys panel camera image uploads for alarms and local disarms
GoSafer Security Knowledge Base
This operational reference is organized for GoSafer Security customers and staff. Alarm.com product names are retained where required for technical accuracy.
Overview
Qolsys panel camera images uploads for local disarms and alarms can be configured using the Alarm.com website and app.
| Platform | Customer Website |
|---|---|
| Content type | How-to / Configuration |
| Source last updated | 2025-06-04 |
Procedure
Step-by-step guide: Screenshots and videos are placed with the instruction they illustrate.
Qolsys panels with a panel camera (i.e., IQ Panel 2 and IQ Panel 4) can upload the panel camera images for local disarms and alarms. Panel camera images can be configured using the GoSafer Security customer portal (powered by Alarm.com).
Captured images are saved in the Images event gallery and count towards the monthly image upload limit. For more information about viewing the event gallery, see View the Images Gallery.
Important: The panel must be connected to Wi-Fi to upload panel images to the Alarm.com app and GoSafer Security customer portal (powered by Alarm.com).
To configure panel camera images:
This can only be configured using the GoSafer Security customer portal (powered by Alarm.com). If you are unable to see the option to configure panel camera images, contact your service provider.
- Log in to the GoSafer Security customer portal (powered by Alarm.com).
- Click Automation.
- Click Rules, if not selected already.
- To enable/disable panel camera disarm and/or alarm images, click the toggle switch for the Panel Camera Alarm Image Uploads and/or Panel Camera Disarm Image Uploads automation rules.
In the following example, alarm image uploads are enabled and disarm image uploads are disabled:
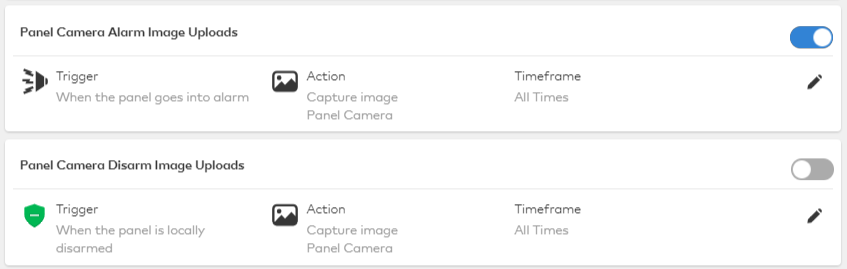
IQP2 panel camera rules
- To configure recipient notifications:
- Click Edit for the automation rule to configure.
- Click Add.
- Select any recipients to be notified from the Address Book dropdown. If the intended recipient is not listed, click New to add a new recipient address.
- Once desired recipients are selected, click Close.
- Click Save.
Source and support
For GoSafer Security assistance, visit gosafersecurity.com.
Original Alarm.com reference: https://answers.alarm.com/Customer/Website_and_App/System_Management/System_Usage/Configure_Qolsys_panel_camera_image_uploads_for_alarms_and_local_disarms
Always verify safety, installation, compatibility, and current UI details against the original manufacturer documentation before operational use.
No comments to display
No comments to display