
Configure the chime settings for an Alarm.com Video Doorbell and Alarm.com Chime
GoSafer Security Knowledge Base
This operational reference is organized for GoSafer Security customers and staff. Alarm.com product names are retained where required for technical accuracy.
Overview
The chime settings for Alarm.com Video Doorbells and Chimes can be configured using the Alarm.com app and GoSafer Security customer portal (powered by Alarm.com).
| Platform | App + Web |
|---|---|
| Content type | How-to / Configuration |
| Source last updated | 2025-12-08 |
Procedure
Step-by-step guide: Screenshots and videos are placed with the instruction they illustrate.
The chime settings for Alarm.com Video Doorbells and Chimes can be configured using the Alarm.com app and GoSafer Security customer portal (powered by Alarm.com).
Adjust the chime sound and volume
The chime sound and volume can be changed to different tones using the Alarm.com app and GoSafer Security customer portal (powered by Alarm.com).
To adjust the chime sound and volume using the Alarm.com app:Icn Chevron Up
- Log in to the Alarm.com app.
- Tap Manage Devices.
- Tap More options.
- Tap Device Settings.
- In the Chime Sound dropdown menu, select a chime sound.
- To adjust the chime volume, drag the Chime Volume slider to the desired volume.
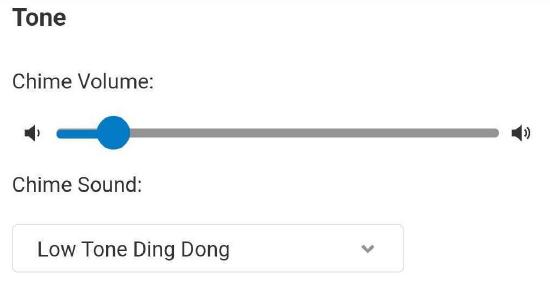
chime sound and volume W115C app
- To adjust the chime volume, drag the Chime Volume slider to the desired volume.
- Tap Test Chime Tone to test the selected chime sound.
- Tap Save.
To adjust the chime sound and volume using the GoSafer Security customer portal (powered by Alarm.com):Icn Chevron Up
- Log in to the GoSafer Security customer portal (powered by Alarm.com).
- Click Settings.
- Click Manage Devices.
- Click More options.
- Click Device Settings.
- In the Chime Sound dropdown menu, select a chime sound.
- To adjust the chime volume, drag the Chime Volume slider to the desired volume.
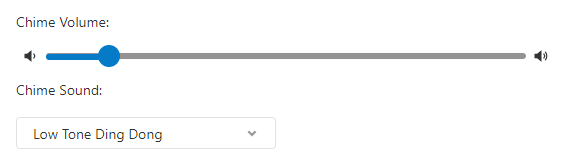
chime sound and volume W115C
- To adjust the chime volume, drag the Chime Volume slider to the desired volume.
- Click Test Chime Tone to test the selected chime sound.
- Click Save.
Enable or disable the chime LED
The chime LED is enabled by default, but can be disabled using the Alarm.com app and GoSafer Security customer portal (powered by Alarm.com).
To enable or disable the chime LED using the Alarm.com app:Icn Chevron Up
- Log in to the Alarm.com app.
- Tap Manage Devices.
- Tap More options.
- Tap Device Settings.
- In Light, tap the Chime LED toggle switch to disable or enable the chime LED.
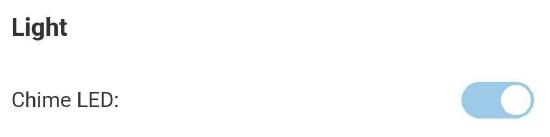
Chime LED button app
- Tap Save.
To enable or disable the chime LED using the GoSafer Security customer portal (powered by Alarm.com):Icn Chevron Up
- Log in to the GoSafer Security customer portal (powered by Alarm.com).
- Click Settings.
- Click Manage Devices.
- Click More options.
- Click Device Settings.
- In Light, click the Chime LED toggle switch to disable or enable the chime LED.

Chime LED button website
- Click Save.
Adjust the chime type
Configure an Alarm.com Video Doorbell's chime type so it matches the chime it is connected to. This setting can be adjusted using the Alarm.com app or GoSafer Security customer portal (powered by Alarm.com). Additionally, the ADC-VDB755P on firmware version 03008+ and ADC-VDB775 on firmware version 04023+ can adjust their chime type using the doorbell button.
To adjust the chime type using the Alarm.com app:Icn Chevron Up
- Log in to the Alarm.com app.
- Tap Video or Doorbell Video Call.
- Tap Settings.
- Tap to select the desired video doorbell.
- Tap Audio.
- Using the Chime Type dropdown menu, select the appropriate chime type.
- If using both a wired chime and an Alarm.com Chime, select the chime type of the wired chime.
- If using only an Alarm.com Chime, select None (or only using wireless chime).
- Tap Save.
To adjust the chime type using the GoSafer Security customer portal (powered by Alarm.com):Icn Chevron Up
- Log in to the GoSafer Security customer portal (powered by Alarm.com).
- Click Video.
- Click Settings.
- Select the desired video device.
- Click Audio.
- Using the Chime Type dropdown menu, select the appropriate chime type.
- If using both a wired chime and an Alarm.com Chime, select the chime type of the wired chime.
- If using only an Alarm.com Chime, select None (or only using wireless chime).
- Click Save.
To adjust the chime type for the ADC-VDB755P using the doorbell button:Icn Chevron Up
- Press and hold the doorbell button for about 60-65 seconds.
- The device LED will alternate yellow and white if the initial chime type is digital or none. Let go of the doorbell button during this period to set the chime type to mechanical.
- The device LED will alternate blinking blue and white if the initial chime type is set to mechanical. Let go of the doorbell button during this period to set the chime type to digital.
To adjust the chime type for the ADC-VDB775 using the doorbell button:Icn Chevron Up
To set the chime type to mechanical:
- Press and hold the doorbell button for about 60-65 seconds, until the LED is alternating yellow and white.
- Let go of the doorbell button during this period to set the chime type to mechanical.
To set the chime type to digital:
- Press and hold the doorbell button for about 65-70 seconds, until the LED is alternating blue and whilte.
- Let go of the doorbell button during this period to set the chime type to digital.
Configure the Indoor Chime setting for a wired chime
Users can configure a wired mechanical or digital chime to ring or not ring when the doorbell button is pressed using the Alarm.com app or GoSafer Security customer portal (powered by Alarm.com).
To configure the Indoor Chime using the Alarm.com app:Icn Chevron Up
- Log in to the Alarm.com app.
- Tap Doorbell Video Call or Video.
- Tap Settings.
- If there are multiple video doorbells on the account, tap to select the desired device.
- Tap Audio.
- Tap the Indoor Chime toggle switch to enable the indoor chime to ring.
Note: If the Chime Type is set to None (or only using wireless chime), this option will not be available. - Tap Save.
- Wait 2 minutes, and then test the video doorbell.
To configure the Indoor Chime using the GoSafer Security customer portal (powered by Alarm.com):Icn Chevron Up
- Log in to the GoSafer Security customer portal (powered by Alarm.com).
- Click Video.
- Click Settings.
- Select the desired device.
- Click Audio.
- Click the Indoor Chime toggle switch to enable the indoor chime to ring.
Note: If the Chime Type is set to None (or only using wireless chime), this option will not be available. - Click Save.
- Wait 2 minutes, and then test the video doorbell.
Configure the Outdoor Tone for the Video Doorbell
The Outdoor Tone setting determines whether or not a Video Doorbell will chime at the device itself when the doorbell button is pressed. Additionally, SkyBell Doorbell Cameras can adjust the Outdoor Tone volume. The Outdoor Tone can be configured using the Alarm.com app or GoSafer Security customer portal (powered by Alarm.com).
To configure the Outdoor Tone using the Alarm.com app:Icn Chevron Up
- Log in to the Alarm.com app.
- Tap Doorbell Video Call or Video.
- Tap Settings.
- Select the desired video doorbell.
- Tap Audio.
- In Audio Settings:
- Tap the Outdoor Tone toggle switch to enable the video doorbell to chime on a button press.
- Use the Outdoor Tone Volume slider to select the volume of the video doorbell outside chime.
Note: The Outdoor Tone Volume slider is only available for SkyBell Doorbell Cameras.
- Tap Save.
- Wait 2 minutes, and then test the video doorbell.
To configure the Outdoor Tone using the GoSafer Security customer portal (powered by Alarm.com):Icn Chevron Up
- Log in to the GoSafer Security customer portal (powered by Alarm.com).
- Click Video
- Click Settings
- Select the desired video doorbell.
- Click Audio.
- In Audio Settings:
- Click the Outdoor Tone toggle switch to enable the video doorbell to chime on a button press.
- Use the Outdoor Tone Volume slider to select the volume of the video doorbell outside chime.
Note: The Outdoor Tone Volume slider is only available for SkyBell Doorbell Cameras.
- Click Save.
- Wait 2 minutes, and then test the video doorbell.
Enable video doorbell notifications to an Alarm.com Chime
Alarm.com Chimes use the local network to ring when a video doorbell button is pressed. If there are multiple Alarm.com Chimes on the account, by default, they all ring when the video doorbell button is pressed.
A video doorbell can be configured to ring an Alarm.com Chime using the Alarm.com app or GoSafer Security customer portal (powered by Alarm.com).
To enable video doorbell notifications to an Alarm.com Chime using the Alarm.com app: Icn Chevron Up
- Log in to the Alarm.com app.
- Tap Doorbell Video Call or Video.
- Tap Settings.
- Select the desired video doorbell.
- In Settings, tap General.
- Tap the Alarm.com Chime Notifications toggle switch to enable.
To enable video doorbell notifications to an Alarm.com Chime using the GoSafer Security customer portal (powered by Alarm.com): Icn Chevron Up
- Log in to the GoSafer Security customer portal (powered by Alarm.com).
- Click Video.
- Click Settings.
- Select the desired video doorbell.
- Click General.
- Click the Alarm.com Smart Notifications toggle switch to enable.
- Click Save.
Configure automation rules for Alarm.com Chimes
Utilize the New Rules Builder for greater customization and awareness. Accounts with multiple video doorbells can create rules for each device to play unique chime tones. Additionally, users can create time-bound chime rules, like silencing their Smart Chime every day during their child's nap time. Sensor Triggered Alerts allow you to create automation rules for certain security sensor events that will trigger your Alarm.com Chime's tone.
Compatibility requirements
- A service package that includes Video monitoring
- One of the following compatible Alarm.com Chimes:
- ADC-W114C on firmware version 2018+
- ADC-W115C on firmware version 2.0.7+
- For doorbell Button Pressed automation rules:
- One of the following compatible doorbell cameras:
- SkyBell Doorbell Camera (ADC-VDB101/102/105/106/105x/106x)
- ADC-VDB750
- ADC-VDB755P
- ADC-VDB770
- ADC-VDB780B
- ADC-VDB775
- The Audio for non-Doorbell Cameras Video monitoring add-on
- Doorbell camera button press notifications must be enabled. For more information, see Enable doorbell camera notifications to Alarm.com Chimes.
- One of the following compatible doorbell cameras:
- For Sensor Triggered Alerts:
- An IQ Panel 4, IQP4 Hub, or IQP4 NS on software version 4.6.2+
- One of the following compatible security sensors programmed to the security panel:
Sensor type Event type Contact sensor Sensor Opened
Sensor ClosedMotion sensor Motion Detected
Motion Inactive (Idle)Garage Door sensor Sensor Opened
Sensor ClosedGate sensor Sensor Opened
Sensor Closed
To configure an automation rule for an Alarm.com Chime
Button Pressed and Sensor Triggered Alert automation rules for Alarm.com Chimes can be configured using the GoSafer Security customer portal (powered by Alarm.com) and Alarm.com app.
Important: For Sensor Triggered Alerts, verify the security panel and chime are both online before saving the rule. If either device is offline when the rule is saved, the rule will appear to be functional but may not work as expected.
Using the Alarm.com app:
- Log in to the Alarm.com app.
- Tap Icn Menu.
- Tap Automation.
- Tap Icn Add.
- Tap New Rule.
- Tap When to select devices to trigger the rule.
- For Doorbell Button Pressed automation rules:
- Tap Doorbell.
- In Select Device(s), select the desired doorbell(s). Button Pressed will automatically be selected for the Status.
- Tap Done.
- For Sensor Triggered Alert automation rules:
- Tap Contact Sensor.
- In Select Device(s), select the desired contact sensor(s).
- In Select Status, select the sensor status(es) that will trigger the automation rule.
Important: While it is possible to select the Sensor Left Open status as the trigger for a Sensor Triggered Alert and save the rule, this trigger type is not supported. Sensor Triggered Alerts for contact sensors are only compatible with Sensor Opened and Sensor Closed events. - Tap Done.
- For Doorbell Button Pressed automation rules:
- Tap Then to select devices to be triggered.
- Tap to select Smart Chime.
- In Select Chime(s), tap to select the desired chime(s).
- In Action, tap the Adjust Volume toggle switch to allow the automation rule to utilize a different volume level than the chime's programmed state if desired.
- Drag the Chime Volume slider to the desired volume for the automation rule.
- Using the Ringtone dropdown menu, select the desired sound for the automation rule.
- Tap Done.
- In Type Rule Name Here, enter a name for the rule.
- If desired, configure when the rule will run:
- Tap Run at All Times to edit when the rule will run.
- Select one of the following options:
- At All Times for the rule will be carried out any time of day.
- Only during the following times to determine the specific days and times the rule will be carried out.
- Tap to select the days of the week the rule will be active.
- Using the Starting at dropdown menu, select the start time for this rule.
- Using the Ending at dropdown menu, select the end time for this rule.
- Tap Done.
- Verify the rule is configured with the desired settings.
- Tap Save.
Using the GoSafer Security customer portal (powered by Alarm.com):
- Log in to the GoSafer Security customer portal (powered by Alarm.com).
- Click Automation.
- Click Add New Rule.
- Click New Rules Builder.
- Click When to select devices to trigger the rule.
- For Doorbell Button Pressed automation rules:
- Click Doorbell.
- In Select Device(s), select the desired doorbell(s). Button Pressed will automatically be selected for the Status.
- Click Done.
- For Sensor Triggered Alerts:
- Click Contact Sensor.
- In Select Device(s), select the desired contact sensor(s).
- In Select Status, select the sensor status(es) that will trigger the automation rule.
Important: While it is possible to select the Sensor Left Open status as the trigger for a Sensor Triggered Alert and save the rule, this trigger type is not supported. Sensor Triggered Alerts for contact sensors are only compatible with Sensor Opened and Sensor Closed events. - Click Done.
- For Doorbell Button Pressed automation rules:
- Click Then to select devices to be triggered.
- Click to select Smart Chime.
- In Select Chime(s), click to select the desired chime(s).
- In Action, click the Adjust Volume toggle switch to allow the automation rule to utilize a different volume level than the chime's programmed state if desired.
- Drag the Chime Volume slider to the desired volume for the automation rule.
- Using the Ringtone dropdown menu, select the desired sound for the automation rule.
- Click Done.
- In Type Rule Name Here, enter a name for the rule.
- If desired, configure when the rule will run:
- Click Run at All Times to edit when the rule will run.
- Select one of the following options:
- At All Times for the rule will be carried out any time of day.
- Only during the following times to determine the specific days and times the rule will be carried out.
- Click to select the days of the week the rule will be active.
- Using the Starting at dropdown menu, select the start time for this rule.
- Using the Ending at dropdown menu, select the end time for this rule.
- Click Done.
- Verify the rule is configured with the desired settings.
- Click Save.
Note: When saving a rule for an Alarm.com Chime, allow a few minutes for the chime tune to change. A pop-up appears: [Rule name] is saved. It may take a few minutes to update the configuration of the Alarm.com Chime.
Configure an Alarm.com Chime to work with multiple doorbells or Chimes
For systems with multiple doorbells:
If the user wants a unique Chime sound for each doorbell, each doorbell should have its own Chime automation rule created for the Chime with different tones.
For systems with multiple chimes:
If the user wants Chimes to be triggered by only one doorbell each, lower the default tone volume to 0% and only making one automation rule for that doorbell is the preferred way to configure this setup.
Default tone
The default tone setting for an Alarm.com Chime is configured during installation of the Chime. By default, any doorbell already on the account (or added at a later date) will play the default tone for the Chime upon a doorbell button-press, unless the default tone volume is lowered to 0%. It is possible to configure the default tone and volume for each Chime as desired. For the steps to configure the default tone, see Adjust the chime sound and volume.
If a Chime automation rule is configured for a doorbell, that rule will control the tone for button-press events from that doorbell instead of using the default tone.
Troubleshooting
If an Alarm.com Video Doorbell, wired chime, or Alarm.com Chime are not ringing correctly, verify the following information.
If the indoor chime is not ringing correctly:Icn Chevron Up
- Verify the type of chime you have installed (e.g., mechanical chime, digital chime, tube chime, no chime, etc.).
- If you have a mechanical door chime, verify the mechanical plungers in the chime hit their plates normally to ring the chime.
- Verify the video doorbell's chime type is configured correctly on Alarm.com. For the steps to complete this process, proceed to Adjust the chime type.
- For wired mechanical or digital chimes, verify the Indoor Chime setting is enabled. For the steps to complete this process, proceed to Configure the Indoor Chime setting for a wired chime.
- For wireless Alarm.com Chimes:
- Verify the doorbell has video doorbell notifications enabled to send to the chime. If they were already enabled, disable and re-enable them. For the steps to complete this process, proceed to Enable video doorbell notifications to an Alarm.com Chime.
- Verify the firmware for the Alarm.com Video Doorbell and Chime are up to date. For assistance with verifying and updating the firmware for an Alarm.com Video Doorbell or Chime, contact your service provider.
- Power cycle the Alarm.com Chime and your network router (if possible).
- Verify your network's router settings. If the setup includes multiple Alarm.com Chimes, or the video doorbell is being connected to your home network instead of the Alarm.com Chime, additional router settings, such as Multicast Packet Forwarding/Filtering or Wi-Fi Client Isolation, may need to be adjusted.
- For more information about and help with changing router settings, refer to the router manual, router manufacturer, or your Internet Service Provider.
- Verify the original doorbell button works. If the chime is still not ringing after verifying the preceding settings, connect the original doorbell button back to the chime and verify that it still operates properly.
If the Alarm.com Video Doorbell itself is not ringing correctly:
Icn Chevron Up
- Verify the Outdoor Tone setting is enabled. For the steps to complete this process, see Configure the Outdoor Tone setting.
- Verify the video doorbell is receiving enough power.
Frequently asked questions
How do I silence the chime outside of my recording rules?
Icn Chevron Up
You can silence the chime by setting the default tone volume to zero. For the steps to set a chime's default tone volume to zero, see Adjust the chime sound and volume.
Can a doorbell have multiple rules?
Icn Chevron Up
Yes. A single doorbell can have multiple rules at a time.
Can a single rule apply to multiple doorbells?
Icn Chevron Up
Yes. You can apply a rule to multiple doorbells at a time.
Can I create rules on multiple chimes?
Icn Chevron Up
Yes, you can select multiple chimes of the same model to ring for a single doorbell button press rule.
Example: Multiple W115Cs can be selected to ring for a single rule, but it is not possible to have a W115C and a different type of chime on the same rule.
When creating a new rule using the New Rules Builder, users can select multiple chimes. However, after saving and completing the unified flow, the devices will be separated, and a unique rule will be generated for each chime model selected. To view the rules saved for each chime device, visit the Device Settings.
Source and support
For GoSafer Security assistance, visit gosafersecurity.com.
Original Alarm.com reference: https://answers.alarm.com/Customer/Website_and_App/Video/Video_Settings/Configure_the_chime_settings_for_an_Alarm.com_Video_Doorbell_and_Alarm.com_Chime
Always verify safety, installation, compatibility, and current UI details against the original manufacturer documentation before operational use.
No comments to display
No comments to display