# View live video
**GoSafer Security Knowledge Base**
*This operational reference is organized for GoSafer Security customers and staff. Alarm.com product names are retained where required for technical accuracy.*
## Overview
Live video from cameras and video devices can be viewed from the app and website.
Platform
App + Web
Content type
How-to / Configuration
Source last updated
2026-03-26
## Procedure
**Step-by-step guide:** Screenshots and videos are placed with the instruction they illustrate.
Live video from cameras and video devices can be viewed using the Alarm.com app and GoSafer Security customer portal (powered by Alarm.com).
### View live video
### Alarm.com app
1. Log in to the Alarm.com app.
2. Tap **Video**.
3. Tap the desired video to start streaming.
### GoSafer Security customer portal (powered by Alarm.com)
1. Log in to the GoSafer Security customer portal (powered by Alarm.com).
2. Click **Video**. The video starts streaming automatically.
**Note**: Live video from SkyBell Doorbell Cameras can only be viewed using the Alarm.com app.
### **Live video functionality**
### **Mobile device compatibility**
Streaming live video is available on the Alarm.com app. The Alarm.com app is available on iOS and Android.
**Note**: iPhones and iPads should use the Alarm.com app to display live video. Most mobile browser versions are not able to view live video.
### **Web browser compatibility on computers**
{{companyname} video features are available on the most recent versions of Edge, Firefox, Safari, and Chrome on both Windows and Macintosh computers.
**Note**: For SkyBell Doorbell Cameras, live video can only be streamed using the Alarm.com app. Saved clips can be viewed using both the GoSafer Security customer portal (powered by Alarm.com) and Alarm.com app.
### Device-specific considerations
### ADC-V731B
If a user is viewing the live video stream for an ADC-V731B, the camera will not be able to trigger Video Analytics rules.
### ****How video devices are listed****
Cameras are listed alphabetically in the Alarm.com app and GoSafer Security customer portal (powered by Alarm.com).
### Streaming methods and timeout expectations
WebRTC is one type of technology that Alarm.com uses to establish a connection between a camera and a customer device. It is supported by all major browsers and is widely used in real-time communication applications, including Google Meet and Microsoft Teams.
### Compatibility requirements
WebRTC end-to-end streaming requires one of the following video devices with firmware 0.6.7.852+ when using the GoSafer Security customer portal (powered by Alarm.com), or firmware 0.6.6.770+ when using the Alarm.com app:
- 1080p Indoor Wi-Fi Camera (ADC-V516)
- 1080p Indoor Wi-Fi Camera (ADC-V523/523X)
- 4MP Indoor Wi-Fi camera with Integrated Spotlight (ADC-V530)
- 1080p Outdoor Wi-Fi Camera (ADC-V723/723X)
- 1080p Outdoor Wi-Fi Camera with Two-Way Audio (ADC-V724/724X)
- 4MP Outdoor Spotlight Camera (ADC-V730/VC730P)
- 1080p Mini-Bullet Camera (ADC-VC727P)
- Pro Series 1080p Dome PoE Camera (ADC-VC827P)
- Pro Series 4MP Bullet PoE Camera with Varifocal Lens (ADC-VC728PF)
- Pro Series 4MP Varifocal Turret Camera (ADC-VC838PF)
- Pro Series 1080p Dome PoE Camera with Varifocal Lens (ADC-VC847PF)
- 4MP Outdoor Camera Floodlight (ADC-V729/V729AC/VC729P)
- Prism Series 8MP Varifocal Bullet PoE Camera (ADC-VC7398PA)
- Prism Series 8MP Varifocal Dome PoE Camera (ADC-VC8498PA)
- Prism Series 8MP Fixed Lens Dome PoE Camera (ADC-VC8498P)
- Prism Series 5MP Fixed Lens Dome PoE Camera (ADC-VC8295P)
- Alarm.com Premium Video Doorbell Camera (ADC-VDB775)
- 4MP Indoor/Outdoor Battery Camera with Two-Way Audio and Integrated Spotlight (ADC-V731B)
**Note**: To conserve battery, the ADC-V731B uses a Relayed connection that times out after 15 minutes regardless of the settings used.
### WebRTC connection types
There are three different types of WebRTC connections used with Alarm.com devices, depending on the network conditions between the camera and the customer's device. The types of connection are as follows (in the order in which they are attempted):
1. WebRTC Direct connection
2. WebRTC Relayed connection
3. WebRTC Proxy connection
Each type of WebRTC connection provides a slightly different customer experience which is described in the following sections. Understanding how each connection type affects the customer experience is important.
**Note**: There are different icons for each streaming method in the GoSafer Security customer portal (powered by Alarm.com), and it may take a few minutes to configure the WebRTC live stream and for the icon to appear. The WebRTC streaming method icon does not appear when using *Log In with Access* without video access.
### WebRTC Direct connection
WebRTC Direct connection is a peer-to-peer connection in which a direct connection has been established between a camera and a customer's viewing device (e.g., mobile phone or laptop).
Because the streams don't have to go through an intermediary server, this type of connection allows users to stream for an unlimited amount of time. In other words, the streams won't time out unless an adverse network condition occurs and the connection is interrupted. This type of connection is attempted first and is successful roughly 60-70% of the time. A Direct connection is most likely to succeed in simple network environments, such as residential homes.
When WebRTC Direct streaming is active, Combined Shape will appear on the camera live stream. Mouse over the icon to display the message: *Continuous streaming connected*.
WebRTC End to End continuous stream connected
### Topology limitations
Connecting Alarm.com cameras downstream from a Stream Video Recorder (i.e., connected through the PoE ports or *Camera* port) may impact the ability to achieve a WebRTC Direct connection in certain configurations. If the cameras are connected upstream from the SVR (i.e., on the same network), they should be capable of maintaining a WebRTC Direct connection. To attempt to force a WebRTC Direct connection, proceed to [To force a WebRTC Direct connection stream](https://answers.alarm.com/Customer/Website_and_App/Video/Live_Video/View_live_video#To_force_a_WebRTC_Direct_connection_stream:-33834).
Compatible third-party cameras should be able to achieve WebRTC Direct streaming whether they are installed downstream or upstream from the Stream Video Recorder.
### WebRTC Relayed connection
A WebRTC Relayed connection is used when a Direct connection between the camera and the customer's viewing device (e.g., mobile phone or laptop) cannot be established. This typically occurs due to network conditions such as firewalls, certain Network Address Translation (NAT) configurations, or other connectivity restrictions. To resolve this, WebRTC will relay the video and audio stream through an intermediary server on a public network. With this method, a time out period of 15 minutes is enforced for live view. This type of streaming is attempted second and makes up roughly 30% of total streams.
When WebRTC Relayed connection streaming is active, Schedule will appear on the camera live stream. Mouse over the icon to display the message, *Stream will time out in 15 minutes*.
WebRTC Relayed stream will time out in 15 minutes
### WebRTC Proxy connection
WebRTC Proxy connection means that attempts to establish a Direct or Relayed connection have failed. Like a Relayed connection, a Proxy connection relays media through an intermediary server and has a time out period of 3 minutes. This type of connection accounts for roughly 5% of total streams.
Currently, customers do not have audio access to their camera while on a Proxy connection. However, Remote Video Monitoring (RVM) operators have audio access and can have Two-Way Audio conversations.
For cameras that support WebRTC Direct or Relayed connections but are streaming over WebRTC Proxy, Combined Shape Off will appear in the feed. Mouse over the icon to display the message, *Unable to connect to continuous streaming*.
Webrtc Proxy Unable To Connect To Continuous Streaming Icon
For cameras that do not support WebRTC Direct or Relayed connections, and can only stream over proxy, no icon will appear on the stream.
Webrtc Proxy Without Icon
### Change connection types
In instances where a Direct connection is desired and was not initially successful, customers can attempt to force a Direct connection.
### To force a WebRTC Direct connection stream:
1. Log in to the GoSafer Security customer portal (powered by Alarm.com).
2. Click **Video**.
3. On the *Live Video* or *SVR Timeline* pages, mouse over a camera live stream.
4. Click on the stream-type indicator icon Combined Shape Off or Schedule.
5. In *Camera Connection*, click **Try Direct Connection**.
Relayed connection popup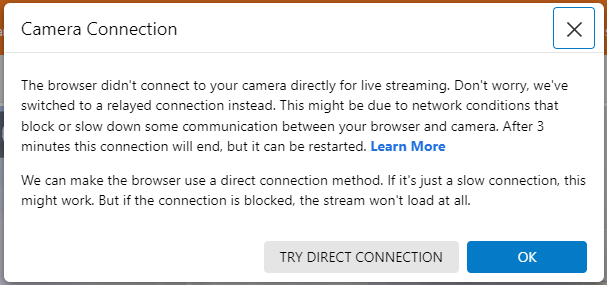Proxy connection popup
### **Live video stream time out**
In addition to the GoSafer Security customer portal (powered by Alarm.com) and Alarm.com app, continuous live-streaming video is available through these devices/platforms:
- Alarm.com video for TV
- Amazon Fire TV
- Apple TV
- Android TV
- For more information, see [Alarm.com video for TV](https://answers.alarm.com/Partner/Installation_and_Troubleshooting/Website_and_Apps/Alarm.com_Video_for_TV)
Note: When viewing third-party cameras using Alarm.com video for TV, the live stream will time out after 10 minutes regardless of the settings used.
- SVR playback with an external monitor
- For more information, see [Play back video locally using a TV](https://answers.alarm.com/Special:Search?query=title:%22Play+back+video+locally+to+a+TV*%22&type=wiki&path=Customer).
- Qolsys panels
- IQ Panel 4 and IQ4 Hub on firmware 4.6.1+ only for Two-Way Audio cameras
- All Qolsys panels for cameras without Two-Way Audio
**Important**: Alarm.com video for TV setups and Qolsys panels must be connected to the same LAN as the camera with *Speed up remote connection initiation* disabled on the camera.
### Speed Up Remote Connection Initiation
When Speed Up Remote Connection Initiation is enabled, the video loads faster while you are far away from the camera's location. This feature needs to be disabled to continuously stream from the Alarm.com for TV apps, and can be configured using the Alarm.com app or GoSafer Security customer portal (powered by Alarm.com).
### Alarm.com app
1. Log in to the Alarm.com app.
2. Tap Video.
3. Tap Settings.
4. Select the desired video device.
5. In *Settings*, tap **Video**.
6. Tap the *Speed Up Remote Connection Initiation* toggle switch to enable or disable the setting as desired.
7. Tap **Save**.
### GoSafer Security customer portal (powered by Alarm.com)
1. Log in to the GoSafer Security customer portal (powered by Alarm.com).
2. Click **Video**.
3. Click **Settings**.
4. Select the desired video device.
5. Click **Video**.
6. Click the *Speed Up Remote Connection Initiation* toggle switch to configure the setting as desired.
7. Click **Save**.
### **Digital zoom**
You can digitally zoom in and out on a live video feed using the Alarm.com app and GoSafer Security customer portal (powered by Alarm.com).
**Note**: Digital zoom is not available on saved clips.
### Alarm.com app
You can pinch to digitally zoom in/out on a live video feed and pan around when zoomed in, but the camera's video quality and optical zoom level will remain the same.
**Note**: This feature requires Alarm.com iOS app versions 4.1+ or Android app versions 4.2+.
1. Log in to the Alarm.com app.
2. Tap **Video**.
3. Tap the desired video.
- To zoom in, move two of your fingers apart while they are touching the live video feed.
- To zoom out, move two of your fingers together while they are touching the live video feed.
- For a quick reset to default zoom, double-tap the video.
### GoSafer Security customer portal (powered by Alarm.com)
You can use the video interface to digitally zoom in/out on a live video feed and pan around when zoomed in, but the camera's video quality and optical zoom level will remain the same.
**Note**: Some video devices have integrated digital or physical pan-tilt-zoom (PTZ) features and use a similar interface that allows you to save and apply preset orientations. For more information about presets and which cameras support them, see [Change a pan/tilt camera's position presets](https://answers.alarm.com/Customer/Website_and_App/Video/Video_Settings/Change_a_pan_tilt_camera's_position_presets).
1. Log in to the GoSafer Security customer portal (powered by Alarm.com).
2. Click **Video**.
3. Mouse over the desired video, then click Pan Tilt Video.
- To zoom in, click **Add**.
- To zoom out, click Minus.
- To pan, click Details, Down, Collapse, or Up.
- To reset to default, click Icn Target.
- Alternatively, use the scroll wheel to zoom and click and drag to pan while mousing over the video.
**Note**: On the Onboard 24/7 and SVR Timelines, this feature is unavailable when the live feed is paused on the GoSafer Security customer portal (powered by Alarm.com).
### Simultaneous viewers
The maximum number of simultaneous viewers of a video device is determined by the series of the video device.
****Note****: To determine the series of the video device, read the last two numbers on the camera model (i.e., 7****23****, 5****23****X, 6****22****).
### Viewer definition
A viewer is anything that requests streaming video from a video device. A viewer can be a local or remote streaming request. All of the following count as individual viewers:
- A user streaming live or locally recorded footage from the video device using the GoSafer Security customer portal (powered by Alarm.com) or Alarm.com app
- An SVR or CSVR streaming live video from the video device to a local display
- An SVR or CSVR recording footage from the video device
### Simultaneous viewers based on video device series
**Camera series**
**Maximum simultaneous viewers**
'10 Series
5
'20 Series
10
'21 Series
10
'22 Series
10
'23 Series
5
'24 Series
5
'25 Series
6
'26 Series
4
'36 Series
4
Pro Series
5
Prism Series
5
ADC-V729/V729AC/VC729P
5
ADC-VDB750
2\*
ADC-VDB770
2\*
ADC-VDB780B
2\*
ADC-VDB755P
5
SkyBell Doorbell Camera (ADC-VDB101/102/105/106/105x/106x)
2
ADC-V515
5
ADC-V516
5
ADC-V730
5
ADC-VDB775
5
ADC-V731B
3
**Note**: \*These video devices can support up to 2 viewers, but 1 viewer is the recommended use.
For more information about simultaneous views for the SkyBell Doorbell Camera, see [How many users can view the SkyBell Doorbell Camera stream simultaneously?](https://answers.alarm.com/Partner/Installation_and_Troubleshooting/Video_Devices/SkyBell_Doorbell_Cameras/How_many_users_can_view_the_SkyBell_Doorbell_Camera_stream_at_once).
### Multi-camera live view and group management for mobile
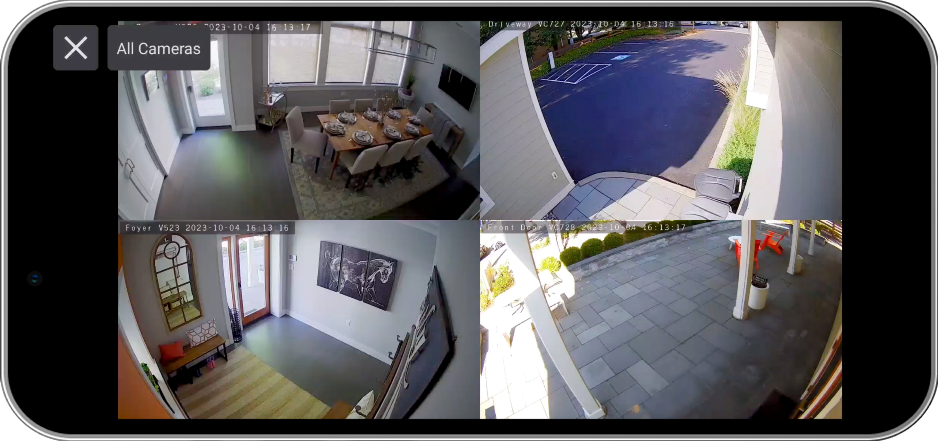multi camera live view feed
Multi-camera live view for mobile allows customers to view up to 4 live streams simultaneously when using the Alarm.com app.
**Note**: Multi-camera live view is only available on the Alarm.com app through the Video Card. While doorbells can be added to groups and viewed on the GoSafer Security customer portal (powered by Alarm.com) together, this will not be seen on the Alarm.com app unless there are other video devices on the customer account.
### Multi-camera view layout options
After logging in to the Alarm.com app, tap Play Forwards in the *Video* card to begin the live streams.
- To change the live view:
- Tap a single camera to view the individual live stream. Tap Grid View to return to the multi-camera live view.
- Tap the *All Cameras* dropdown menu to select the desired camera group through the *Video* card on the home page and the expanded view.
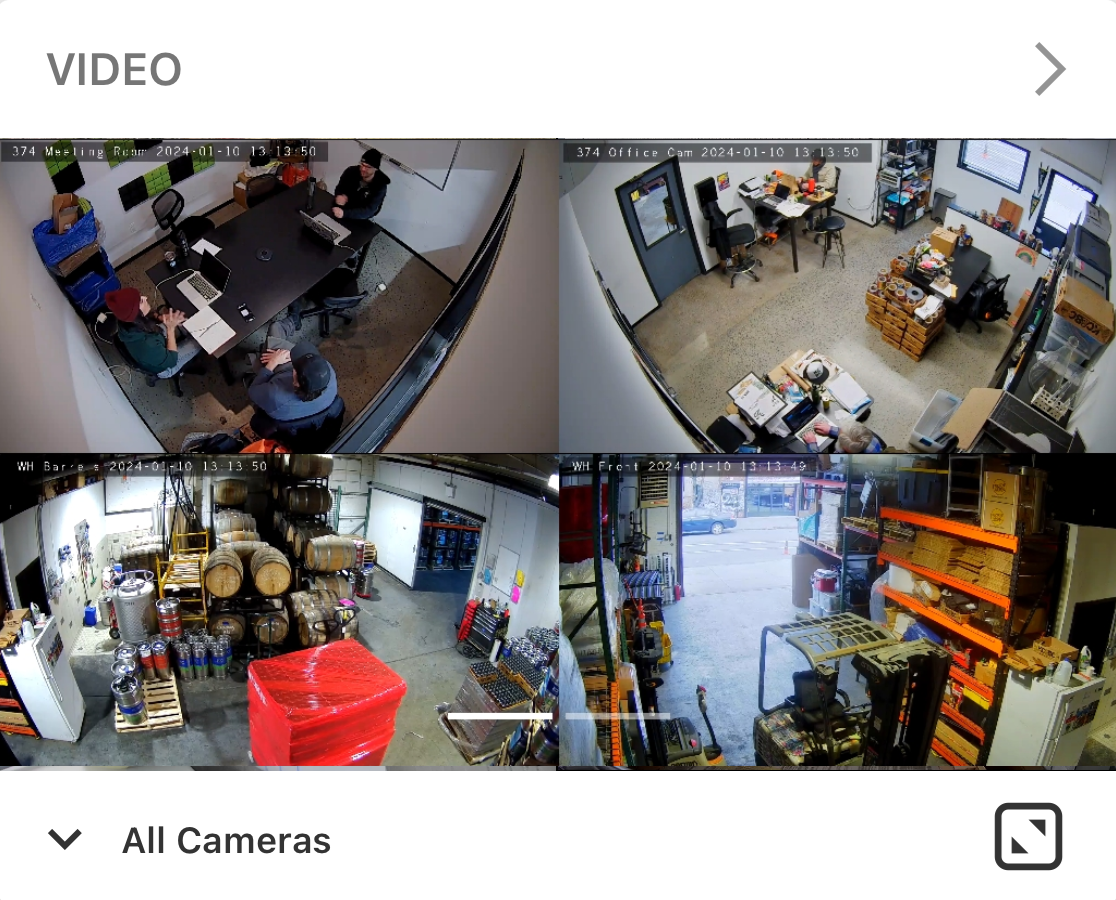multi camera feed all cameras drop down cropped
- Tap Minimize Video to expand or minimize the multi-camera live view.
- Swipe left/right to change the cameras and groups in both the expanded and minimized view.
### Video recording
For information about recording video clips, see [Take a video recording](https://answers.alarm.com/Customer/Website_and_App/Video/Live_Video/Take_a_video_recording).
### Camera groups
Create and edit camera groups from the *Manage Camera Groups* page, which includes a preview of each camera. For more information about camera groups, see [Create/edit a camera group](https://answers.alarm.com/Partner/Installation_and_Troubleshooting/Video_Devices/General_Video_Information/Create_edit_a_camera_group).
Camera groups allow you to customize the position in which the cameras appear on the *Video* page.
### Toggle high definition
Click Icn Video Layout Hd to toggle between high definition and non-HD. High definition offers the best quality resolution, but non-HD allows the user to reduce the quality if bandwidth is a concern.
### Search for cameras
Type a name into the camera search bar to find individual cameras. This is ideal for accounts with many cameras.
**Note**: The search bar only appears when the selected camera group has more than four cameras.
### Expand / Full screen
Using the Alarm.com app, view live video in full screen by tapping Video Full Screen (App).
Using the GoSafer Security customer portal (powered by Alarm.com), view live video in full screen by clicking Icn Screen Full, view in theater mode by clicking Icn Screen Theater, or view expanded live video by clicking Icn Video Fullscreen.
### ****Layout options****
**Note**: The live video streams will automatically resize to fit the screen.
Using the GoSafer Security customer portal (powered by Alarm.com), you can view up to 25 live video streams at a time.
- Auto is the default live video stream layout. Click Minus or Add to decrease or increase the amount of cameras displayed up to a 5+5 layout.
- To arrange live video streams with a preset layout, click Down and select the desired layout.
- Click View 3+1 to arrange streams in a 1+3 layout.
- Click View 1+5 to arrange streams in a 1+5 layout.
- Click View 1+7 to arrange streams in a 1+7 layout.
- Click View 2+8 to arrange streams in a 2+8 layout.
- Click View 4+2+4 to arrange streams in a 4+2+4 layout.
**Note**: Live video stream layouts will not display if you do not have enough cameras to fill it.
- If you have more than 25 cameras, click Collapse or Detailsto view additional stream pages.
Using the Alarm.com app, the live video streams are arranged in a grid based on screen size.
- Flick up or down to scroll between streams.
### **Swipe between live video feeds**
Users can swipe between different cameras on the Alarm.com app dashboard and when viewing feeds in landscape.
**Note**: This feature requires Alarm.com iOS app versions 4.5+ or Android app versions 4.5.1+.
1. Log in to the Alarm.com app.
2. On the *Video* card, swipe left/right between cameras.
3. Tap Play to play live video.
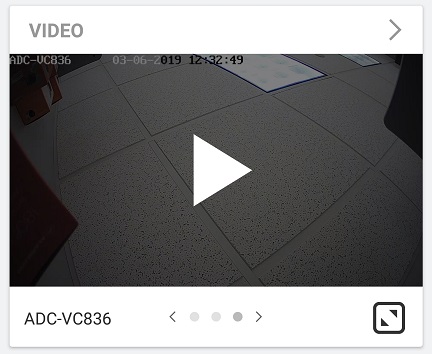Live video card
### **Two-Way Audio user features**
Two-Way Audio is compatible with Half-Duplex (i.e., only one communication channel can be used at a time like a walkie-talkie) and Full-Duplex (i.e., both communication channels can be used simultaneously like a telephone call) audio modes. For more information, see [What is the difference between Half-Duplex and Full-Duplex audio?](https://answers.alarm.com/Partner/Installation_and_Troubleshooting/Video_Devices/General_Video_Information/What_is_the_difference_between_Half-Duplex_and_Full-Duplex_audio).
### Talk or listen
Users can talk through or listen in to their cameras using the Alarm.com app and GoSafer Security customer portal (powered by Alarm.com).
**Note**: If no audio is heard, verify that mic permissions are enabled in your browser and that the correct speakers are being used. The audio is disabled if the microphone icon is grey and crossed out.
Expand all
### To talk or listen using the Alarm.com app:Icn Chevron Up
1. Log in to the Alarm.com app.
2. Swipe to select the desired video device.
3. Tap Play.
4. Press and hold Microphone to speak through the video device.
**Note**: For Full-Duplex devices, you do not need to hold the Microphone icon after pressing it.
5. Release Microphone to listen.
### To talk or listen using the Alarm.com app while in full screen:Icn Chevron Up
1. Log in to the Alarm.com app.
2. Tap Video.
3. Tap Play on the desired video device.
4. Tap Fullscreen.
5. Press and hold Microphone to speak through the video device.
**Note**: For Full-Duplex devices, you do not need to hold the Microphone icon after pressing it.
6. Release Microphone to listen.
### To talk or listen using the GoSafer Security customer portal (powered by Alarm.com):Icn Chevron Up
1. Log in to the GoSafer Security customer portal (powered by Alarm.com).
2. Click **Video**.
3. Click **Live View**.
4. Click and hold Microphone, or press and hold the spacebar.
**Note**: For Full-Duplex devices, you do not need to hold the Microphone icon after pressing it.
5. Release Microphone to listen.
**Note**: Two-way Audio is available through the GoSafer Security customer portal (powered by Alarm.com) in both Single Camera and Multi-Camera view.
### Mute or unmute incoming audio
Audio can be muted and unmuted using the Alarm.com app and GoSafer Security customer portal (powered by Alarm.com).
### **To mute or unmute incoming audio using the Alarm.com app:**Icn Chevron Up
1. Log in to the Alarm.com app.
2. Swipe to select the desired video device.
3. Tap Play.
4. Tap Sound Mute / Icn Sound to toggle audio.
### **To mute or unmute incoming audio using the GoSafer Security customer portal (powered by Alarm.com):**Icn Chevron Up
1. Log in to the GoSafer Security customer portal (powered by Alarm.com).
2. Click **Video**.
3. Mouse over the live video for the desired camera.
4. Tap Sound Mute / Icn Sound to toggle audio.
### Configure a camera's microphone and speaker
Enable or disable the microphone and speaker for individual cameras and adjust the speaker's Call Volume using the Alarm.com app and GoSafer Security customer portal (powered by Alarm.com).
### To configure a camera's microphone and speaker using the Alarm.com app:Icn Chevron Up
1. Log in to the Alarm.com app.
2. Tap Video.
3. Tap Settings.
4. In *Video Devices*, select the desired camera.
5. In *Settings*, tap Audio.
6. In *Audio Settings*:
- Tap the *Microphone / Speaker* toggle switch to enable or disable the microphone and speaker for the selected camera. The camera cannot record audio while its microphone and speaker are disabled.
- In *Call Volume*, tap or drag the slider to adjust the speaker's volume during Two-Way Audio calls.
7. Tap **Save**.
### To configure a camera's microphone and speaker using the GoSafer Security customer portal (powered by Alarm.com):Icn Chevron Up
1. Log in to the GoSafer Security customer portal (powered by Alarm.com).
2. Click **Video**.
3. Click **Settings**.
4. Select the desired camera.
5. Click Audio.
6. In *Audio Settings*:
- click the *Microphone / Speaker* toggle switch to enable or disable the microphone and speaker for the selected camera. The camera cannot record audio while its microphone and speaker are disabled.
- In *Call Volume*, click or drag the slider to adjust the speaker's volume during Two-Way Audio calls.
7. Click **Save**.
## Source and support
For GoSafer Security assistance, visit [gosafersecurity.com](https://gosafersecurity.com/).
Original Alarm.com reference: [https://answers.alarm.com/Customer/Website\_and\_App/Video/Live\_Video/View\_live\_video](https://answers.alarm.com/Customer/Website_and_App/Video/Live_Video/View_live_video)
Always verify safety, installation, compatibility, and current UI details against the original manufacturer documentation before operational use.