# Video Installation Wizard for the app
**GoSafer Security Knowledge Base**
*This operational reference is organized for GoSafer Security customers and staff. Alarm.com product names are retained where required for technical accuracy.*
## Overview
Users can add video devices to their own accounts using the app. The Video Installation Wizard gives the power to self-install video devices using an intuitive in-app wizard.
Platform
Mobile App
Content type
Troubleshooting
Source last updated
2025-06-04
## Procedure
**Step-by-step guide:** Screenshots and videos are placed with the instruction they illustrate.
**Important**: If you do not see the options outlined on this page, you may not have the required permissions to complete this action.
Please contact your service provider for more information.
Users can add video devices to their own accounts using the Alarm.com app. The Video Installation Wizard gives the power to self-install video devices using an intuitive in-app wizard.
### ****Video Installation Wizard considerations****
- The wizard supports all Alarm.com video cameras, SVRs, and doorbell cameras.
- Users may begin installing other video devices while other devices are actively being installed, speeding up the overall installation.
- Users may navigate away from the wizard to view other parts of the Alarm.com app during installation.
**Note**: Closing the app will cause the installation to fail. A warning message is given before closing the app.
### ****To access the Video Installation Wizard using the Alarm.com app:****
1. Log in to the Alarm.com app.
2. Tap Video.
3. Tap Settings.
4. Tap ****Add Device****.
5. In **Add Video Device**, perform any of the following:
- Tap the desired video device to be installed.
- Enter the video device MAC address in **Enter MAC Address**, or tap Scan barcode to scan a MAC address.
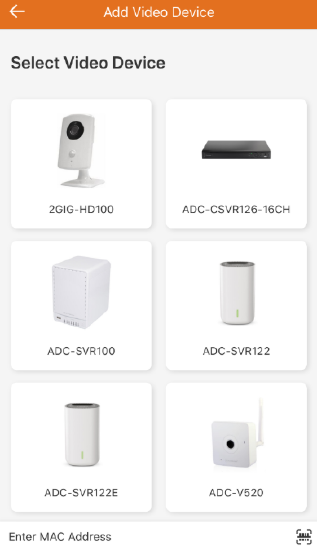Manual add video
- If video devices are already connected to the WiFi network, tap ****Install**** for the desired video device to be installed.
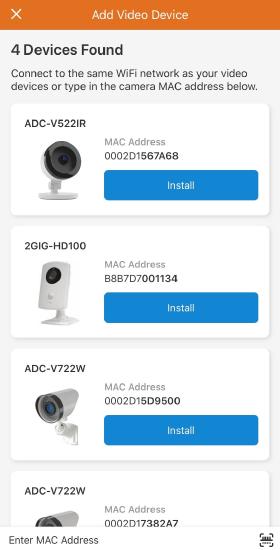Found devices
6. Follow the on-screen prompts for installing the video device.
### **Video Installation Wizard steps overview**
The wizard directs users through three major steps during the installation process:
### ****Introductory steps****
- Each installation starts with basic instructions to get the video device in place for installation and in the correct mode for connecting to the internet and account.
- The wizard determines for the user whether the device supports Access Point (AP) mode, which will be the preferred installation procedure. If AP mode is not supported, the user is seamlessly directed to use Ethernet mode or Wi-Fi Protected Setup (WPS) mode.
- The user names their device.
Introductory step examples:
### ****Installation****
- The wizard guides users through the installation process, which may consist of AP mode, Ethernet mode, or WPS mode depending on the device.
- For devices that support AP mode, the wizard allows the user to select a Wi-Fi network to connect to. The user can choose a network from a list of networks the video device finds, manually type in a network, or copy from another video device already on the account. After the device is connected, it begins communicating with the account.
- For devices that support Ethernet or WPS mode, the user is presented with a list of possible devices to install.
- If the users's phone is on the same network but the device is not in the list of available devices, the user can review troubleshooting instructions.
- If the user's phone is not on the same network, they can find the video device by typing or scanning the MAC address.
### Installation step examples:
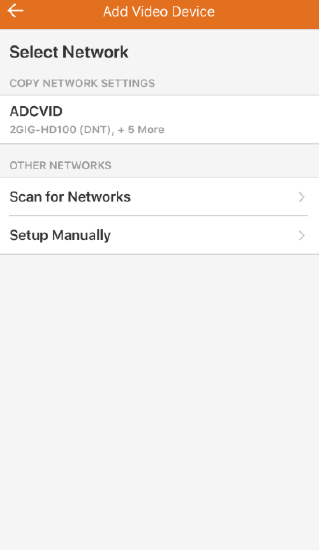Network selection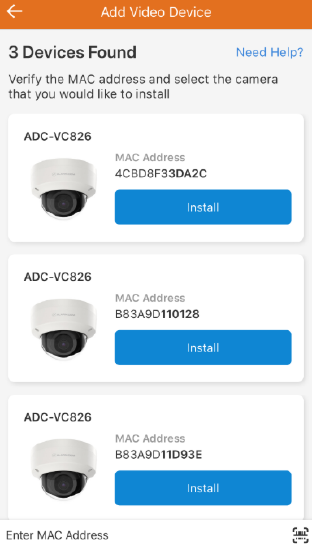Videos for install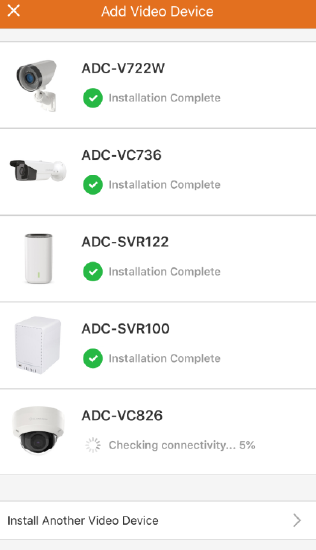Devices Installed
### ****Post-installation configuration****
- After the device is successfully connected to the account, the user is be prompted to set up essential functionality for the device. The post-installation steps vary by video device and may include:
- All video and doorbell cameras - Peek-In
- Configuration of recording schedules/rules
- Doorbell Camera - Preview, Enable Push Notification for Calls, Recording Schedules
- Call Out Button Configuration
### Post-Installation configuration example:
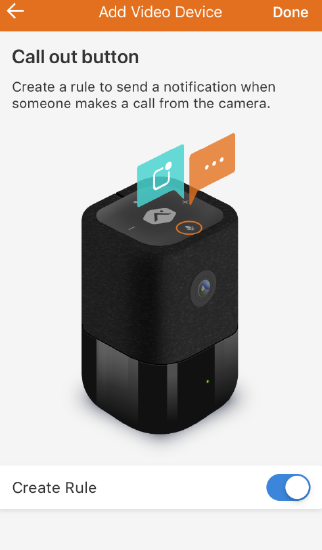Call out rule
If there is trouble enrolling a camera, contact your service provider for additional troubleshooting. For more information about contacting your service provider, see [Contact your service provider](https://answers.alarm.com/Customer/Website_and_App/User_Management/Web_App_Users/Contact_your_service_provider).
## Source and support
For GoSafer Security assistance, visit [gosafersecurity.com](https://gosafersecurity.com/).
Original Alarm.com reference: [https://answers.alarm.com/Customer/Website\_and\_App/Video/Video\_Settings/Video\_Installation\_Wizard\_for\_the\_app](https://answers.alarm.com/Customer/Website_and_App/Video/Video_Settings/Video_Installation_Wizard_for_the_app)
Always verify safety, installation, compatibility, and current UI details against the original manufacturer documentation before operational use.