# How can a user code only be given access at certain times?
**GoSafer Security Knowledge Base**
*This operational reference is organized for GoSafer Security customers and staff. Alarm.com product names are retained where required for technical accuracy.*
## Overview
Some systems allow for scheduled or temporary user access that will give specified users access to the system at certain times. If you do not see the following options, your system may not be compatible with scheduled or temporary user codes. For further questions, contact your service provider.
Platform
App + Web
Content type
How-to / Configuration
Source last updated
2025-06-04
## Procedure
**Step-by-step guide:** Screenshots and videos are placed with the instruction they illustrate.
Some systems allow for scheduled or temporary user access that will give specified users access to the system at certain times.
If you do not see the following options, your system may not be compatible with scheduled or temporary user codes. For further questions, contact your service provider.
### **Scheduled panel user code access**
Scheduled user codes allow a user to have access to the system during a specified timeframe every week.
**Example**: A scheduled user code can be given access to the system for every Monday and Wednesday between 8:00 AM to 4:00 PM.
### Restrict a user code to a specific time period
### To restrict a user code to a specific time period using the Alarm.com app:Icn Chevron Up
1. Log in to the Alarm.com app.
2. Tap Menu.
3. Tap **Users**.
4. Tap to select the user to restrict.
5. Verify the user has *Panel Access* enabled, and a valid *Access Code*.
6. In *Access Information*, tap **Access Period**.
7. Tap **Restricted schedule**.
8. In *Weekly Schedule*, configure the days and time to restrict the user's access to the system.
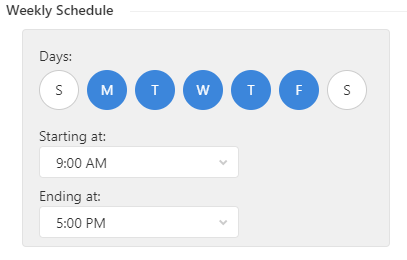weekly schedule
9. Tap **Save**.
### To restrict a user code to a specific time period using the GoSafer Security customer portal (powered by Alarm.com):Icn Chevron Up
1. Log in to the GoSafer Security customer portal (powered by Alarm.com).
2. Click **Users**.
3. Click More options for the user that will be restricted.
4. Click Edit .
5. Verify the user has panel access enabled with a valid access code.
6. In *Access Information*, click **Access Period**.
7. Click **Restricted Schedule**.
8. In *Weekly Schedule*, configure the days and time to restrict the user's access to the system.
weekly schedule
9. Click **Save**.
### **Temporary panel user code access**
Temporary user codes have access to the system during only a specified start and end time.
**Example**: A temporary user code can be given access to the system for January 7, 2019, from 8:00 AM until January 10, 2019, at 4:00 PM. The code can arm and disarm the system at any time between the specified time period.
### Add a temporary user code
### To add a temporary user code using the Alarm.com app:Icn Chevron Up
1. Log in to the Alarm.com app.
2. Tap Menu.
3. Tap **Users**.
4. Tap to select the user to restrict.
5. Verify the user has *Panel Access* enabled, and a valid *Access Code*.
6. In *Access Information*, tap **Access Period**.
7. Tap **Temporary Access**.
8. Select the start and end date/time that the user will have access to the system.
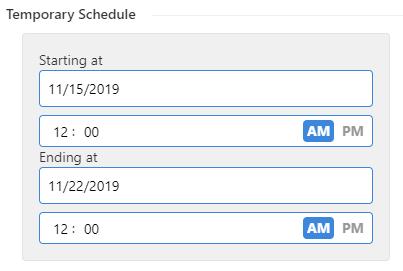temporary schedule
9. Tap **Save**.
### To add a temporary user code using the GoSafer Security customer portal (powered by Alarm.com):Icn Chevron Up
1. Log in to the GoSafer Security customer portal (powered by Alarm.com).
2. Click **Users**.
3. Click More options for the user that will be restricted.
4. Click Edit .
5. Verify the user has panel access enabled with a valid access code.
6. In *Access Information*, click **Access Period**.
7. Click **Temporary Access**.
8. Select the start and end date/time that the user will have access to the system.
temporary schedule
9. Click **Save**.
## Source and support
For GoSafer Security assistance, visit [gosafersecurity.com](https://gosafersecurity.com/).
Original Alarm.com reference: [https://answers.alarm.com/Customer/Website\_and\_App/User\_Management/System\_Users/How\_can\_a\_user\_code\_only\_be\_given\_access\_at\_certain\_times](https://answers.alarm.com/Customer/Website_and_App/User_Management/System_Users/How_can_a_user_code_only_be_given_access_at_certain_times)
Always verify safety, installation, compatibility, and current UI details against the original manufacturer documentation before operational use.