# Getting started with configuring Access Control User Access
**GoSafer Security Knowledge Base**
*This operational reference is organized for GoSafer Security customers and staff. Alarm.com product names are retained where required for technical accuracy.*
## Overview
An Access Control account can be configured on the GoSafer Security customer portal (powered by Alarm.com) or Alarm.com app by following the guides below. Note: For information about installing Access Control hardware, contact your service provider.
Platform
App + Web
Content type
Troubleshooting
Source last updated
2022-10-07
## Procedure
**Step-by-step guide:** Screenshots and videos are placed with the instruction they illustrate.
An Access Control account can be configured on the GoSafer Security customer portal (powered by Alarm.com) or Alarm.com app by following the guides below.
**Note**: For information about installing Access Control hardware, contact your service provider.
Expand all
### Access Control System Overview Icn Dropdown Arrow
Smarter Access Control is a powerful, cloud-based access solution designed for small and medium-sized businesses. Businesses can now take advantage of powerful user management software, remote door control, and scan-to-add card serial detection all from the user-friendly GoSafer Security customer portal (powered by Alarm.com) and Alarm.com app.
Smarter Access Control can be installed as a standalone system or as an integrated solution with other intrusion and video offerings. With easy-to-create access plans and simple user management, you can automate your system using rules to reduce hassle and set up notifications so you always know who comes in and when.
### **System Overview**
The most commonly used Access Control features are available on the *Home* page and *User Access* tab of the GoSafer Security customer portal (powered by Alarm.com) and Alarm.com app.
### **Home page**
The *Home* page provides quick access to real-time door control, Scenes, and account activity.
Real-time door control allows you to lock, unlock, and temporarily buzz open doors. Navigate to the *Access Points* (called *Doors* in standalone Access Control systems) card on the home screen to control your doors.
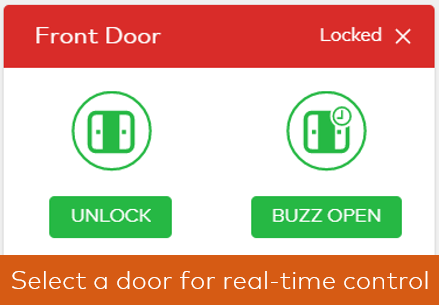Select a door
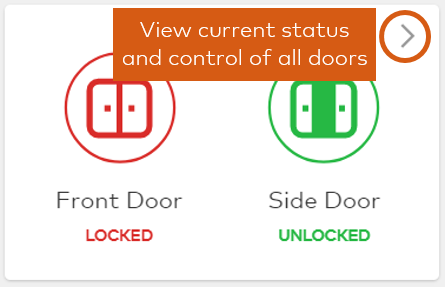View current status
### **User Access tab**
The *User Access* tab is where the configuration of the system takes place. Sub-tabs are available for *Access Plans*, *Users*, *Access Points*, and *Manage Logins*.
### Add an Access Control Access Plan Icn Dropdown Arrow
Access Plans allow users to have access to specific doors at specific times. Access Plans can be managed using the Alarm.com app and GoSafer Security customer portal (powered by Alarm.com). For more information, see [Add an Access Plan](https://answers.alarm.com/Customer/Website_and_App/Commercial/Access_Control/Getting_started_with_configuring_Access_Control_User_Access#Add_an_Access_Plan-11038).
Advanced filters can be used to locate a specific user or subset of users. For more information, see [Search for users with filters](https://answers.alarm.com/Customer/Website_and_App/Commercial/Access_Control/Getting_started_with_configuring_Access_Control_User_Access#Search_for_users_with_filters-11038).
**Note**: Changes to User Access will be sent to the system after 2 minutes of inactivity on the page.
**Note**: To view a list of all Access Plans, click List using the GoSafer Security customer portal (powered by Alarm.com) or tap **Actions**, then **List Layout** using the Alarm.com app.
### **Access Plan**
An Access Plan consists of the following:
**Timetable**
Select the times the users in the plan can be granted entry to an access control door.
**Note**: Timetables can contain a maximum of 12 time blocks.
**Users**
Select which users will be allowed access to which access points and when.
**Access Points**
Select which doors will be part of the Access Plan. Panel, partition, and Z-Wave locks access can also be selected.
**Note**: Panel and Z-Wave lock access do not follow the timetable, and users will be able to use either 24/7.
Access Points
**Schedules**
Each day can have the same timetable or a unique schedule. Begin creating timetables by selecting one day of the week – the *Edit Time Block* window will appear. Choose the start and stop times, then schedules can be copied across other days using the *Edit Time Block* window if desired.
**Note**: Although you have the option of extending a timetable beyond a 24-hour period, it is a best practice to set the time block for the same day.
**Managing holidays**
Plans can also be paused on days when the business will not be open or employees do not need to access the business.
1. Navigate to the *User Access* page.
2. Click **Manage Holidays**.
3. Name the holiday, select its date from the calendar, then click **Save**.
4. Select which Access Plans you would like to pause on that date, then click **Save**.
### **Best practices**
- Identify Access Points and access credentials (badges or pin codes) before adding users and Access Plans to the account.
- Quickly add new badges by scanning at a card reader using the Alarm.com app.
- Focus each Access Plan on a common theme, such as employee type, door (access point), or schedule.
- Each user must have the correct credential type for all Access Points in the plans they are added to. Before creating an Access Plan, verify that each user has the correct access credentials.
### **Add an Access Plan**
Access Plans can be created from the *User Access* section of the Alarm.com app or GoSafer Security customer portal (powered by Alarm.com).
Expand all
### **To add an Access Plan using the Alarm.com app:**Icn Chevron Down
**Note**: These instructions apply to single-system Access Plans. For information about Enterprise Access Plans, see [What is an Enterprise Access Plan?](https://answers.alarm.com/Partner/Installation_and_Troubleshooting/Access_Control/Access_Control_User_Interface/Access_Control_Enterprise/What_is_an_enterprise_access_plan).
1. Log in to the Alarm.com app.
2. Tap Icn Menu.
3. Tap ****User Access****.
4. Tap ****Actions****, then select ****Add New Plan****.
5. Select an icon and enter a name for the Access Plan, then tap ****Next****.
6. Tap ****Add Users****.
7. Select which users to add to the plan, then tap ****Save****.
8. Tap ****Add Access Points****.
9. Select which Access Points to include in the plan, then tap ****Save****.
10. Tap ****Add Schedule****.
11. Select a schedule to apply to the plan, then tap ****Save****.
12. Review the finalized Access Plan, then tap ****Save****.
### **To add an Access Plan using the GoSafer Security customer portal (powered by Alarm.com):**Icn Chevron Down
**Note**: These instructions apply to single-system Access Plans. For information about Enterprise Access Plans, see [What is an Enterprise Access Plan?](https://answers.alarm.com/Partner/Installation_and_Troubleshooting/Access_Control/Access_Control_User_Interface/Access_Control_Enterprise/What_is_an_enterprise_access_plan).
1. Log in to the GoSafer Security customer portal (powered by Alarm.com).
2. Click ****User Access****.
3. Click ****Add New Plan****.
4. Select an icon and enter a name for the Access Plan, then click ****Next****.
5. Click ****Add Users****.
6. Select which users to add to the plan, then click ****Save****.
7. Click ****Add Access Points****.
8. Select which Access Points to include in the plan, then click ****Save****.
9. Click ****Add Schedule****.
10. Select a schedule to apply to the plan, then click ****Save****.
11. Review the finalized Access Plan, then click ****Save****.
### **Search for users with filters**
Filters can be used to search for a specific user or subset of users using the Alarm.com app or GoSafer Security customer portal (powered by Alarm.com).
The following advanced search filters are available to locate users:
- Credentials
- Search for users that have a badge, pin, or mobile credential.
- Search by card credential number in the search bar to locate the card owner.
- Contact Information
- Search for users that have a mobile number or email address.
- Access Periods
- Search for users that have an expired credential or a future credential start date.
- User Statuses
- Search for users that are paused.
- Search for users that use the extended unlock time feature.
- Search for users that are Anti-Passback exempt.
- Search for users that are a Mobile Credential user.
- Access Points
- Search for users that have access to the selected Access Point (i.e., Access Control door, panel partition, or Z-Wave lock).
- User Groups
- Search for users that are part of a specific User Group.
- Access Plans
- Search for users that are part of a specific Access Plan.
- User Information
- Search for users that have specific user information.
### **To search for users with filters using the Alarm.com app:**Icn Chevron Up
1. Log in to the Alarm.com app.
2. Tap Icn Menu.
3. Tap User Access.
4. Tap **Access Plans**.
5. Tap Users.
6. Tap Icn Chevron Down.
7. Select the desired filters.
8. Once the desired filters are selected, tap out of the current dropdown to update the list.
### **To search for users with filters using the GoSafer Security customer portal (powered by Alarm.com):**Icn Chevron Up
1. Log in to the GoSafer Security customer portal (powered by Alarm.com).
2. Click User Access.
3. Click Users.
4. Click Filter.
5. Select the desired filters.
6. Once the desired filters are selected, click out of the current dropdown to update the list.
### Assign an Access Control card or PIN to a user Icn Dropdown Arrow
A card, fob, or PIN code can be assigned to a user using the Alarm.com app or GoSafer Security customer portal (powered by Alarm.com).
For information about assigning an Access Control card, fob, or PIN for an Enterprise user, see [Add Access Control Users with access to multiple locations](https://answers.alarm.com/Partner/Installation_and_Troubleshooting/Access_Control/Access_Control_User_Interface/Access_Control_Enterprise/Add_Access_Control_Users_with_access_to_multiple_locations).
****Important****: Access Control hardware must be programmed and doors added to the account before cards, fobs, or pins can be added to users. For more information, contact your service provider.
### **To assign a card, fob, or PIN to a user using the Alarm.com app:**Icn Chevron Up
**Note**: When adding new user credentials, changes made to new or existing users go into effect 2 minutes after the last user credential change is made. When revoking a user's access, the change goes into effect immediately after saving.
1. Log in to the Alarm.com app.
2. Tap Icn Menu.
3. Tap **User Access**.
4. Tap ****Down**** next to *Access Plans*.
5. Tap **Users**.
6. Tap **Add** or tap More options followed by Icn Edit next to edit an existing user.
7. Tap ****Add Credential****, then tap ****Access Badge**** or ****PIN**** to set the user's required credentials. A badge can be assigned by manually entering the badge number or by scanning it. A PIN can be assigned by entering the desired code.
**Note**: If there are already credentials associated with the user, tap ****Add**** to add more.
8. In Access Plans, tap **Manage Access** to select the desired Access Plans the user will be a part of. Alternatively, you can navigate back to the *Access Plans* page and add the user to the desired plan.
### **To assign a card, fob, or PIN to a user using the GoSafer Security customer portal (powered by Alarm.com):**Icn Chevron Up
**Note**: When adding new user credentials, changes made to new or existing users go into effect 2 minutes after the last user credential change is made. When revoking a user's access, the change goes into effect immediately after saving.
1. Log in to the GoSafer Security customer portal (powered by Alarm.com)
2. Click **User Access**.
3. Click **Users**.
4. Click **Add User** or click More options followed by Icn Edit next to edit an existing user.
5. Click ****Add Credential**** followed by ****Access Badge**** or ****PIN**** to set the user's required credentials. A badge can be assigned by manually entering the badge number or by scanning it. A PIN can be assigned by entering the desired code.
**Note**: If there are already credentials associated with the user, click ****Add**** to add more.
6. In Access Plans, click **Manage Access** to select the desired Access Plans the user will be a part of. Alternatively, you can navigate back to the *Access Plans* page and add the user to the desired plan.
### Add Access Control users in bulk (optional) Icn Dropdown Arrow
Access Control users have the ability to upload users in bulk using a CSV file with appropriate column headers.
******Important******: Access Plan User Management must be enabled on the account to download users in bulk. If you are missing this option or would like more information, contact your service provider.
The default supported column headers are:
- First Name
- Last Name
- Email (optional)
- PIN Code (optional)
- Access Card 1 (optional)
- Access Card 2 (optional)
- User Group (optional)
- Access Start Date (MM/DD/YYYY) (optional)
- Access End Date (MM/DD/YYYY) (optional)
- Mobile Credential (optional)
- Action (Create, Edit, or Delete) - (optional)
**Note**: The default action is *Create*.
If any users have one or more of the additional user information listed below, the Bulk User Download Template and Download Users CSV file will be updated to include a column for that user information.
- Department
- Desk number
- Employee ID
- Extension number
- Hire Date
- Job title
- Location (i.e., HQ, Boston Office, Remote)
- Hot stamp (i.e., the unique identifier printed on the Access Control credential)
- Time type (i.e., Full time, Part time, contractor)
- Office number
- Company name
- Termination date
**Note**: If updating an existing user using the Bulk Enrollment process, this will not overwrite or remove that user's current card credentials. Instead, it will add the new credential to the user alongside the previous, meaning both will be associated with that user's profile.
### **To add Access Control users in bulk:**
**Note**: Due to the way Microsoft Excel handles values, any PIN code or card number starting with 0 will not display that leading zero by default. For more information about what this means and how to get around this issue, see [Why does the Bulk User CSV file show a 3-digit PIN code?](https://answers.alarm.com/Partner/Installation_and_Troubleshooting/Access_Control/Access_Control_User_Interface/Access_Control_Subscriber_Interface/Why_does_the_Bulk_User_CSV_file_show_a_3-digit_PIN_code).
1. Log in to the GoSafer Security customer portal (powered by Alarm.com).
2. Click **User Access**.
3. Click **Users**.
4. Click to expand **More**.
5. Click **Bulk User Management**.
6. Once a CSV file has been created that matches the required file format, click **Browse**.
7. Select the CSV file.
8. Click **Submit**.
**Note**: Depending on how many users are included in the spreadsheet, it may take some time for them to appear on the GoSafer Security customer portal (powered by Alarm.com) and Alarm.com app.
Access Control File Format
### **How does the Mobile Credentials feature work with Bulk User Management?**
When using Mobile Credentials on an Access Control account, a new column will be added to the Bulk User Management form.
- For users with *Yes* in the Mobile Credential column, a valid email in the CSV, and no mobile credential currently assigned:
- A Mobile Credential invite will be sent to the user's email.
- For users with *Yes* in the Mobile Credential column and are already assigned a Mobile Credential:
- No action is taken.
- For users with *Yes* in the Mobile Credential column and an invalid email or no email in the CSV:
- A warning is displayed that an invite will not be sent.
- For users with *No* in the Mobile Credential column and are already assigned a Mobile Credential:
- Their Mobile Credential will be deleted.
- For users with *No* in the Mobile Credential column and no Mobile Credential assigned:
- No action is taken.
### Frequently asked questions
### What can prevent users from being uploaded in bulk?
There are various factors that can prevent users from being uploaded in bulk:
- Attempting to create a user that already exists
- Attempting to delete a user that does not exist
- Attempting to edit a user that does not exist
- Uploading a file that contains exact first/last name duplication
- The .csv file contains duplicate credentials or PINs
- The upload is trying to create a user with a credential or pin that is already owned by an existing user at the same level
- The upload edits a credential or PIN of an existing user to match another user on the same level
- The headers are configured or spelled incorrectly
**Note**: A .csv template can be downloaded at the top of the *Bulk User Management* page.
- Data exists outside of the supported columns
### Create rules and automation schedules Icn Dropdown Arrow
The Smarter Access Control solution offers Access Plans, rules based on card swipes and other situations, schedules, and automation based on other devices.
### **Access Plans**
Access Plans allow you to schedule when and which users can access specific Access Control doors. You can also select which users have panel or Z-Wave lock access. For more information about configuring an Access Plan, see [Add an Access Control Access Plan](https://answers.alarm.com/Customer/Website_and_App/Commercial/Access_Control/Getting_started_with_configuring_Access_Control_User_Access#s11038).
**Note**: Security system and Z-Wave access cannot be scheduled on an Access Control account. Access Plans will continue to be followed while the door controller is without network connectivity.
### **Rules**
### **Disarm on card swipe or PIN entry**
**Important**: The account must be using an LTE module to use this rule.
*Disarm on card swipe or PIN entry* is a rule that disarms your security system when valid credentials are presented at the door of your choice. This rule can be configured to work on specific days of the week and times or can be set to function at all times. For information about configuring this rule, see [How can I have my panel disarm when I scan my Access Control keycard or enter my PIN?](https://answers.alarm.com/Customer/Website_and_App/Commercial/Access_Control/How_can_I_have_my_panel_disarm_when_I_scan_my_Access_Control_keycard_or_enter_my_PIN).
**Important**: The **disarm on card swipe or PIN entry** rule will not function if the door controller is without network connectivity.
### **First card unlocks door**
*First card unlocks door* is a rule that can be used to unlock any door indefinitely when valid credentials are presented at the door of your choice. The selected door then remains unlocked until a locking schedule occurs or someone triggers the door to lock. This rule can be configured to work on specific days of the week and times or can be set to function at all times. For information about configuring this rule, see [Create a First Card Unlock rule](https://answers.alarm.com/Partner/Installation_and_Troubleshooting/Access_Control/Access_Control_User_Interface/Access_Control_Subscriber_Interface/Create_a_First_Card_Unlock_rule).
**Note**: The **first card unlocks door** rule will continue to function while the door controller is without network connectivity.
### **Arm on double card swipe**
**Note**: This rule is only available on accounts where an LTE module is being used. Certain readers may have a built-in delay when double swiping cards. This is to help prevent false double card swipes.
*Arm on double card swipe* is a rule that arms your security system when valid credentials are presented at the door of your choice. This rule can be configured to work on specific days of the week and times or can be set to function at all times. For more information about configuring this rule, see [How can I have my panel arm when I scan my Access Control keycard?](https://answers.alarm.com/Customer/Website_and_App/Commercial/Access_Control/How_can_I_have_my_panel_arm_when_I_scan_my_Access_Control_keycard).
**Important**: The **arm or disarm on double card swipe** rule will not function if the door controller is without network connectivity.
### ****Lock or unlock on double card swipe****
**Lock or Unlock on double card swipe** is a rule that arms the locks or unlocks a specific access control door when valid credentials are presented. This rule can be configured to work on specific days of the week and times or can be set to function at any time. For information on configuring this rule, see [Create a Double Swipe to Lock/Unlock rule](https://answers.alarm.com/Partner/Installation_and_Troubleshooting/Access_Control/Access_Control_User_Interface/Access_Control_Subscriber_Interface/Create_a_Double_Swipe_to_Lock_Unlock_rule).
**Note**: The **lock or unlock on double card swipe** rule will continue to function while the access controller is without network connectivity.
### ****First person in****
The **First person in** rule can be used to unlock any door indefinitely when valid credentials are presented at a selected door. The selected door then remains unlocked until a locking schedule occurs or someone triggers the door to lock. This rule can be configured to work on specific days of the week and times or can be set to function at any time. For information on configuring this rule, see [Create a First Person In rule](https://answers.alarm.com/Partner/Installation_and_Troubleshooting/Access_Control/Access_Control_User_Interface/Access_Control_Subscriber_Interface/Create_a_First_Person_In_rule).
**Note**: The **first person in** rule will continue to function while the door controller is without network connectivity.
### ****Arm panel to lock or disarm to unlock Access Control doors****
The Arm Panel to Lock or Disarm to Unlocks Access Control Doors rule allows customers to automatically trigger selected Access Control doors to lock or unlock when the panel is armed/disarmed, saving time and providing peace of mind when closing the business each day. For information about configuring this rule, see [Create an Arm Panel to Lock or Disarm to Unlock Access Control Doors rule](https://answers.alarm.com/Customer/Website_and_App/Commercial/Access_Control/Create_an_Arm_Panel_to_Lock_or_Disarm_to_Unlock_Access_Control_Doors_rule).
**Important**: The **arm panel to lock or disarm to unlock Access Control doors** rule will not function if the access controller is without network connectivity.
### **Schedules**
**Note**: If the option to set business hours is not available, contact your service provider.
Lock/Unlock schedules allow users to configure doors to lock or unlock on specific days of the week and times, or can be set to follow the business hours previously set up on the account.
For information about configuring lock/unlock schedules, see [Add an Access Control locking or unlocking schedule](https://answers.alarm.com/Partner/Installation_and_Troubleshooting/Access_Control/Access_Control_User_Interface/Access_Control_Subscriber_Interface/Add_an_Access_Control_locking_or_unlocking_schedule)[. ](https://answers.alarm.com/Partner/Installation_and_Troubleshooting/Access_Control/Access_Control_User_Interface/Access_Control_Subscriber_Interface/Add_an_Access_Control_locking_or_unlocking_schedule)
For information about configuring business hours, see [Enable/configure business hours](https://answers.alarm.com/Customer/Website_and_App/Commercial/Commercial_Management/Enable_configure_business_hours).
For information about how to configure Holiday Schedules that will pause locking/unlocking schedules and specific Access Plans, see [Create an Access Control holiday schedule](https://answers.alarm.com/Customer/Website_and_App/Commercial/Access_Control/Getting_started_with_configuring_Access_Control_User_Access#s11915).
**Note**: The lock or unlock schedules will continue to function while the door controller is without network connectivity.
### **Scenes**
Access Control doors can be added to any new or existing scene. This allows you to create unique scenes to open or close your business that triggers your security system, doors, locks, lights, and thermostats. For information about configuring scenes, see [Can I add Access Control doors to a scene?](https://answers.alarm.com/Partner/Installation_and_Troubleshooting/Access_Control/Access_Control_User_Interface/Access_Control_Subscriber_Interface/Can_I_add_Access_Control_doors_to_a_scene).
**Important**: Scenes that include door actions will not function if the door controller is without network connectivity.
### ****Video****
The following are the Access Control event-triggered rules and SVR event markers:
- **Door is accessed by** allows users to create recording rules to capture videos of a user’s activity and specific doors.
- **Door denies access** allows users to create recording rules to capture videos of failed access events and specific doors.
- **Door is forced open** allows users to create recording rules to capture videos of specific doors that report as being forced open.
- **Door is held open** allows users to create recording rules to capture videos of specific doors that report as being held open.
**Important**: Video rules triggered by door actions will not function if the door controller is without network connectivity.
### ****Doorbell****
Access Control doors can be locked, unlocked, and buzzed open using the doorbell live view interface.
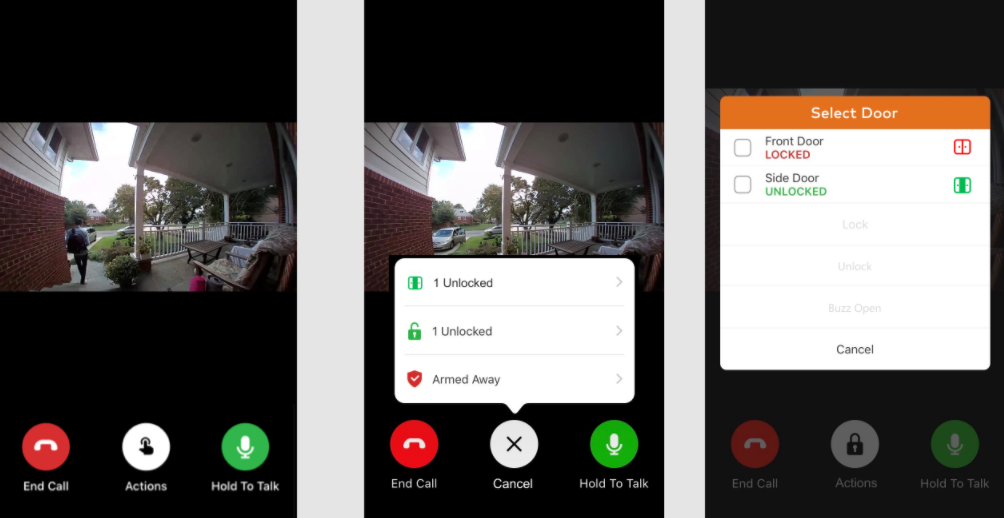Access Control Doorbell Interaction
### Create an Access Control holiday schedule Icn Dropdown Arrow
The *Holiday Schedules* feature allows users to pause all automation rules and lock/unlock schedules for Access Control doors on selected dates. By configuring Holiday Schedules, customers can choose to pause specific Access Plans within their account to prevent user entry on holidays.
### Features
- This feature is available for single system accounts.
- When an Access Plan is set to Paused on the *Manage Holidays* page, the paused plans will not grant access on holidays.
- For security panels or Z-Wave locks, access will remain active even if the Access Plan is paused on a holiday.
Note: Access plans will remain active on the holiday unless paused.
Holiday Schedules only affect automation rules limited to Access Control doors, such as *First Person In*, *First Card Unlock*, *Double Swipe to Lock/Unlock*, and scheduled door locking/unlocking. Automation rules involving other device types (e.g., *Swipe to Disarm* for alarm panels) will not be paused for holidays.
### **Create an Access Control holiday schedule**
Access Control holiday schedules can be created using the Alarm.com app and GoSafer Security customer portal (powered by Alarm.com).
**Note**: For locations within an Enterprise group, holiday schedules can only be created at the single system level.
Expand all
### To create an Access Control holiday schedule using the Alarm.com app:Icn Chevron Down
1. Log in to the Alarm.com app.
2. Tap ****Menu****.
3. Tap **User Access**.
4. Tap **Actions**.
5. In *Actions*, tap **Manage Holidays**.
6. Tap **Add**.
7. In the *Name* field, enter the desired name for the holiday.
8. In *Date*, select the date of the holiday.
9. Tap Save.
10. In *Access Plans to Pause*, tap to select either option for any Access Plans:
- **Active** for plans to still have access during holidays.
- **Paused** for plans that should not have access on holidays.
11. Tap **Save**.
### To create an Access Control holiday schedule using the GoSafer Security customer portal (powered by Alarm.com):Icn Chevron Down
1. Log in to the GoSafer Security customer portal (powered by Alarm.com).
2. Click **User Access**.
3. Click **Access Plans**.
4. Click **Actions**, then click **Manage Holidays**.
5. Click **Add**.
6. In the *Name* field, enter the desired name for the holiday.
7. Click Date, then select the date of the holiday.
8. Click Save.
9. In *Access Plans to Pause*, click to select either option for any Access Plans:
- **Active** for plans to still have access during holidays.
- **Paused** for plans that should not have access on holidays.
10. Click **Save**.
### Create Access Control notifications Icn Dropdown Arrow
Standard and commercial notifications are available to create for Access Control.
### **System Event notifications**
This notification can alert customers for two event types:
- Malfunction (loss of communication)
- This will alert users when the controller is unable to communicate with Alarm.com.
- Tamper
- This will alert users when the access controller reports a tamper.
### **To create malfunction and/or tamper notifications using the GoSafer Security customer portal (powered by Alarm.com):**
1. Log in to the GoSafer Security customer portal (powered by Alarm.com).
2. Click **Notifications**.
3. Click **New Notification**.
4. Click **System Event**.
5. Enter a name for the notification.
6. Click to select the events to be notified for.
- For malfunction notifications, click to select the *A device is in malfunction* checkbox.
- For tamper notifications, click to select the *Someone tries to tamper with a device* checkbox.
7. Click **Add**, then select the recipients to be notified.
8. Click **Save**.
### **Access notifications**
This will send a notification when specific people enter an access-controlled door during a specified timeframe.
### **To create Access notifications using the GoSafer Security customer portal (powered by Alarm.com):**
1. Log in to the GoSafer Security customer portal (powered by Alarm.com).
2. Click **Notifications**.
3. Click **New Notification**.
4. Click **Business**.
5. Click **Access**.
6. Enter a name for the notification.
7. In *When*, click to select which doors will trigger the notification.
8. In *Is Accessed by*, click to select which users will trigger the notification.
9. In *During this time frame*, click to select the time frame the notification will be active.
10. In *Recipients*, click **Add** to select the desired recipients to be notified, then click **Close**.
11. Click **Save**.
### **Unauthorized Access Attempt notifications**
This will send a notification when somebody tries to use a badge with an inactive card.
### **To create Unauthorized Access Attempt notifications using the GoSafer Security customer portal (powered by Alarm.com):**
1. Log in to the GoSafer Security customer portal (powered by Alarm.com).
2. Click **Notifications**.
3. Click **New Notification**.
4. Click **Business**.
5. Click **Unauthorized Access Attempt**.
6. Enter a name for the notification.
7. In *Send a notification when somebody tries to badge in with an inactive card at the following doors*, click to select which doors will trigger the notification.
8. In *During this time frame*, click to select the time frame the notification will be active.
9. In *Recipients*, click **Add** to select the desired recipients to be notified, then click **Close**.
10. Click **Save**.
### **Door Forced Open notifications**
This will send a notification when a door has been opened without badging in or triggering a request-to-exit device.
**Note**: This notification will only appear for accounts where an access door has been programmed to use a door sensor.
### **To create Door Forced Open notifications using the GoSafer Security customer portal (powered by Alarm.com):**
1. Log in to the GoSafer Security customer portal (powered by Alarm.com).
2. Click **Notifications**.
3. Click **New Notification**.
4. Click **Business**.
5. Click **Door Forced Open**.
6. Enter a name for the notification.
7. In *When*, click to select which doors will trigger the notification.
8. In *During this time frame*, click to select the time frame the notification will be active.
9. In *Recipients*, click **Add** to select the desired recipients to be notified, then click **Close**.
10. Click **Save**.
### **Door Held Open notifications**
This will send a notification when a door has been propped open.
**Note**: This notification will only appear for accounts where an access door has been programmed to use a door sensor.
### **To create Door Held Open notifications using the GoSafer Security customer portal (powered by Alarm.com):**
1. Log in to the GoSafer Security customer portal (powered by Alarm.com).
2. Click **Notifications**.
3. Click **New Notification**.
4. Click **Business**.
5. Click **Door Held Open**.
6. Enter a name for the notification.
7. In *When*, click to select which doors will trigger the notification.
8. In *During this time frame*, click to select the time frame the notification will be active.
9. In *Recipients*, click **Add** to select the desired recipients to be notified, then click **Close**.
10. Click **Save**.
### **Door Left Unlocked notifications**
This will send a notification when any door is left unlocked at a specified time.
**Note**: This notification will only appear for accounts where an access door has been programmed to use a door sensor.
### **To create Door Left Unlocked notifications using the GoSafer Security customer portal (powered by Alarm.com):**
1. Log in to the GoSafer Security customer portal (powered by Alarm.com).
2. Click **Notifications**.
3. Click **New Notification**.
4. Click **Business**.
5. Click **Door Left Unlocked**.
6. Enter a name for the notification.
7. In *When any of these doors*, click to select which doors will trigger the notification.
8. Using the *Are not locked at* dropdowns, click to select the time when the doors should be locked.
9. In *During this time frame*, click to select the time frame the notification will be active.
10. In *Recipients*, click **Add** to select the desired recipients to be notified, then click **Close**.
11. Click **Save**.
### ****Door Activity notifications****
This will send a notification when any door is locked or unlocked.
**Note**: This notification will only appear for accounts where an access door has been programmed to use a door sensor.
### ****To create Door Activity notifications using the GoSafer Security customer portal (powered by Alarm.com):****
1. Log in to the GoSafer Security customer portal (powered by Alarm.com).
2. Click ****Notifications****.
3. Click ****New Notification****.
4. Click ****Business****.
5. Click ****Door Activity****.
6. Enter a name for the notification.
7. In **When**, click to select which doors will trigger the notification.
8. In **Is**, click to select whether the door being locked or unlocked will trigger the notificatoin.
9. In **During this time frame**, click to select the time frame the notification will be active.
10. In *Recipients*, click **Add** to select the desired recipients to be notified, then click **Close**.
11. Click ****Save****.
### ****User Access Start/Expire notifications****
This will send a notification when a user's access credentials are about to start or expire with the option to manage access.
### ****To create User Access Start/Expire notifications using the GoSafer Security customer portal (powered by Alarm.com):****
1. Log in to the GoSafer Security customer portal (powered by Alarm.com).
2. Click ****Notifications****.
3. Click ****New Notification****.
4. Click ****Business****.
5. Click ****User Access Start/Expire****.
6. Enter a name for the notification.
7. In **When a user's access is about to**, click to select either ****Start**** or ****Expire****.
8. Using the **Notify** dropdown menu, select when to notify the user 1 day before, 2 days before, or 3 days before.
9. In *Recipients*, click **Add** to select the desired recipients to be notified, then click **Close**.
10. Click ****Save****.
### Generate a User Summary Report for Access Control Icn Dropdown Arrow
The User Summary Report for Access Control provides a list of all users alongside relevant information such as credentials, credential start date, credential end date (where applicable), user information, Access Group, and Access Plans. The report can be delivered on a daily, weekly, or monthly basis.
**Note**: This report is available on all accounts with Access Control, at least one Access Plan with users and doors added, and the **Commercial Reports** service package add-on. For more information, contact your service provider.
### ****To generate a User Summary Report for Access Control:****
1. Log in to the GoSafer Security customer portal (powered by Alarm.com).
2. Click ****Activity****.
3. Click ****Reports****.
4. Click ****New Report****.
5. Click to select ****User Summary Report****.
6. In the *Report Name* field, enter the desired name for the report.
7. In **Include User Credentials**, select ****Yes**** or ****No****.
8. In **Timeframe**, select ****Yesterday****, ****Last 7 Days****, or ****Previous Month****.
9. In **Delivery Schedule**, click to select ****Include a CSV version of the report**** if desired.
10. In *Recipients,* click ********Add******** to choose who will receive the report.
11. Click the entries in ********************************Address Book******************************** to be notified, or click ****************************************************************New**************************************************************** to add a new ****Address Book**** entry.
12. Click ********Close********.
13. Verify the report is configured with the correct settings.
14. Click ********Save********.
### Knowledge Base resources Icn Dropdown Arrow
For more Knowledge Base articles about Access Control, including the ones presented in this guide, see [Access Control](https://answers.alarm.com/Customer/Website_and_App/Commercial/Access_Control).
## Source and support
For GoSafer Security assistance, visit [gosafersecurity.com](https://gosafersecurity.com/).
Original Alarm.com reference: [https://answers.alarm.com/Customer/Website\_and\_App/Commercial/Access\_Control/Getting\_started\_with\_configuring\_Access\_Control\_User\_Access](https://answers.alarm.com/Customer/Website_and_App/Commercial/Access_Control/Getting_started_with_configuring_Access_Control_User_Access)
Always verify safety, installation, compatibility, and current UI details against the original manufacturer documentation before operational use.