# Enable Two Factor Authentication
**GoSafer Security Knowledge Base**
*This operational reference is organized for GoSafer Security customers and staff. Alarm.com product names are retained where required for technical accuracy.*
## Overview
Two Factor Authentication adds an extra layer of security to protect access to your system.
Platform
App + Web
Content type
How-to / Configuration
Source last updated
2025-06-04
## Procedure
**Step-by-step guide:** Screenshots and videos are placed with the instruction they illustrate.
****Note****: Two Factor Authentication can be referred to as 2FA, Multi-Factor Authentication, or MFA.
Two Factor Authentication adds an extra layer of security to protect access to your system. This makes it harder for potential intruders to gain access to your system, so your system and your property are even more secure. Whenever you sign into your system from a new or untrusted device, you will have to enter both your password and a code sent to your mobile phone.
### ********Enable or disable Two Factor Authentication********
Two Factor Authentication can be enabled or disabled using the Alarm.com app and GoSafer Security customer portal (powered by Alarm.com).
****Note****: If Two Factor Authentication is enabled, all active sessions on the Alarm.com app and GoSafer Security customer portal (powered by Alarm.com) will end. Two Factor Authentication will be required to log back in.
Expand all
### ********To enable or disable Two Factor Authentication for a login using the Alarm.com app:******** Icn Chevron Down
**Note**: If you have changed your phone number or email address, see [If you change your cell carrier, phone number, or email address](https://answers.alarm.com/Customer/Website_and_App/User_Management/Web_App_Users/What_is_Two_Factor_Authentication#If_you_change_your_cell_carrier.2C_phone_number.2C_or_email_address:).
1. Log in to the Alarm.com app.
2. Tap Menu.
3. Tap ********Login Information********.
4. Tap ********Two Factor Authentication********.
5. To disable Two Factor Authentication, tap **Disable** and then tap **Confirm**.
**Note**: Two Factor Authentication may be required or suggested by your service provider. For additional assistance, contact your service provider.
6. To enable Two Factor Authentication, select ********Text Message********, ********Email********, or ****Authentication app****.
**Note**: It is recommended to set up Two Factor Authentication using multiple methods. If multiple methods cannot be enabled, contact your service provider
- To enable Two Factor Authentication for text message:
1. Tap **Text Message**.
2. Tap **Next**.
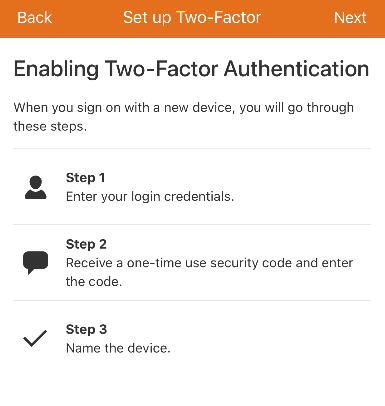Mobile Two Factor Authentication Enable
3. In ****Mobile Number****, enter the mobile number to receive the Two Factor Authentication confirmation code.
4. Using the ****Country**** dropdown menu, select either ********USA******** or ********Canada********.
5. Using the *Provider* dropdown menu, select the cellular carrier of the mobile phone number that will receive the Two Factor Authentication confirmation code.
**Note**: The *Provider* dropdown menu displays the full list of Two Factor Authentication compatible cellular carriers.
- If the carrier is not listed, select **Other**.
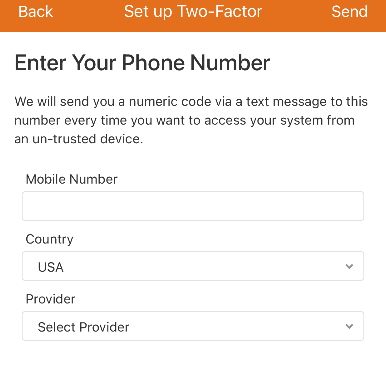Mobile Two Factor Authentication Phone Number
**Note**: This displays the full list of Two Factor Authentication compatible cellular carriers.
6. Tap ********Send******** to send the verification code to the mobile number entered.
7. In ****Verification Code****, enter the code that is provided in a text message to the mobile number entered.
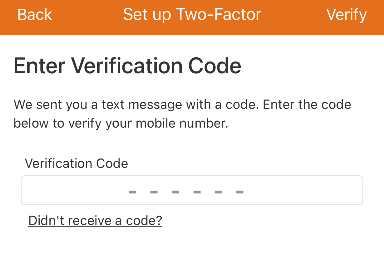Mobile Two Factor Authentication Verification Code
8. Tap ********Verify********.
- To enable Two Factor Authentication for email:
1. Tap **Email**.
2. In *Send Verification Code*, verify the correct email is displayed. For more information about how to update the email address, see [Change an email address](https://answers.alarm.com/Customer/Website_and_App/User_Management/Web_App_Users/Change_an_email_address).
3. Tap **Send**.
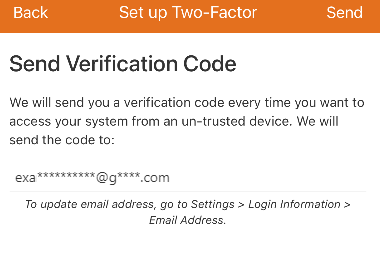Mobile Two Factor Authentication Email
4. In *Verification Code*, enter the code that is provided in the received email.
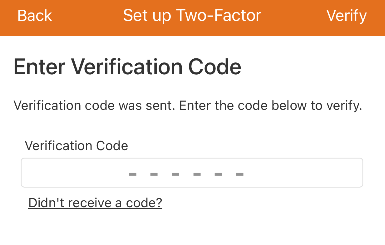Mobile Two Factor Authentication Email Code
5. Tap **Verify**.
- To enable Two Factor Authentication using an authentication app:
**Important**: An authenticator app is required to complete this process and the steps may vary based on the authenticator app in use.
1. Tap **Authentication App**.
2. Generate an authentication code:
**Note**: The **Duo** authenticator app may experience unexpected behavior and it is recommended to use an alternative authenticator app.
- Use an authenticator app to scan the QR code or manually enter the code provided on the Alarm.com app or GoSafer Security customer portal (powered by Alarm.com) into the authenticator app.
3. In the **Enter Code** field, enter the code that is generated on the authenticator app to verify the device.
4. Click **Next**.
7. In *Device Name*, enter the desired name for the device that will be trusted.
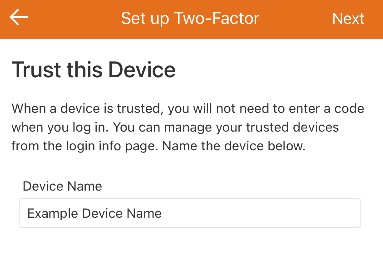Mobile Two Factor Authentication Trust this Device
8. Tap **Next**.
9. In *Linked Devices*, tap **Trust** next to any additional devices that can be trusted.
10. Tap **Done**.
### To enable or disable Two Factor Authentication for a login using the GoSafer Security customer portal (powered by Alarm.com):Icn Chevron Down
**Note**: If you have changed your phone number or email address, see [If you change your cell carrier, phone number, or email address](https://answers.alarm.com/Customer/Website_and_App/User_Management/Web_App_Users/What_is_Two_Factor_Authentication#If_you_change_your_cell_carrier_or_no_longer_have_access_to_the_phone_number_or_email_address:).
1. Log in to the GoSafer Security customer portal (powered by Alarm.com).
2. Click Settings.
3. Click Login Information.
4. Click Two Factor Authentication.
5. To disable Two Factor Authentication, click **Disable**.
**Note**: Two Factor Authentication may be required or suggested by your service provider. For additional assistance, contact your service provider.
6. To enable Two Factor Authentication, select **Text Message**, **Email**, or **Authentication app**.
**Note**: It is recommended to set up Two Factor Authentication using multiple methods. If multiple methods cannot be enabled, contact your service provider.
- To enable Two Factor Authentication for text message:
1. Click **Text Message**.
2. Click Next.
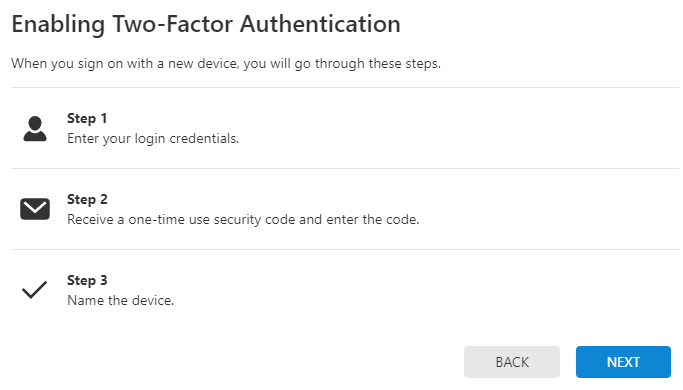Two Factor Authentication GoSafer Security customer portal
3. In **Mobile Number**, enter the mobile number to receive the Two Factor Authentication confirmation code.
4. Using the *Country* dropdown menu, select either **USA** or **Canada**.
5. Using the *Provider* dropdown menu, select the cellular carrier of the mobile phone number that will receive the Two Factor Authentication confirmation code.
**Note**: The *Provider* dropdown menu displays the full list of Two Factor Authentication compatible cellular carriers.
- If the carrier is not listed, select **Other**.
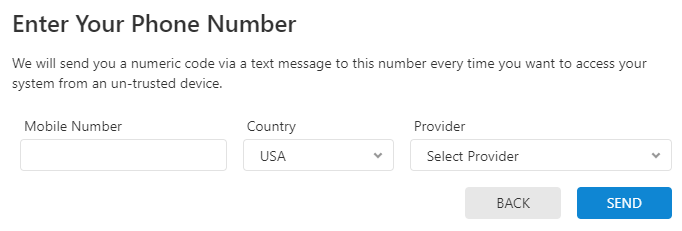Two Factor Authentication Phone Number
6. Click **Send** to send a verification code to the mobile number.
7. In *Verification Code*, enter the code that is provided in a text message to the mobile number.
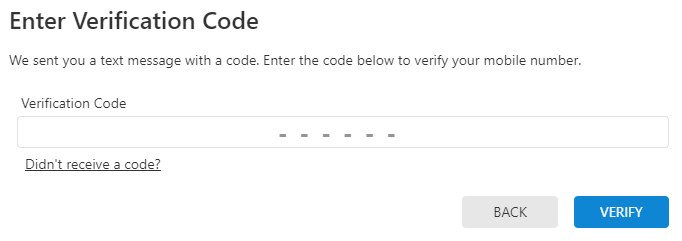Two Factor Authentication Verification Code
8. Click **Verify**.
- To enable Two Factor Authentication for email:
1. Click **Email**.
2. In *Send Verification Code*, verify the correct email is displayed. For more information about how to update the email address, see [Change an email address](https://answers.alarm.com/Customer/Website_and_App/User_Management/Web_App_Users/Change_an_email_address).
3. Click **Send**.
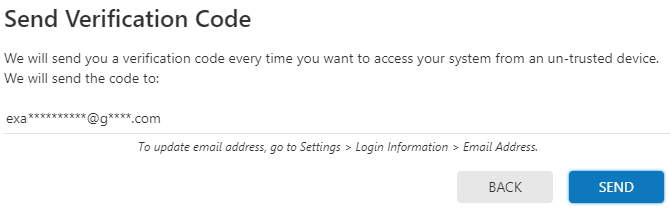Two Factor Authentication Email Code
4. In *Verification Code*, enter the code that is provided in the received email.
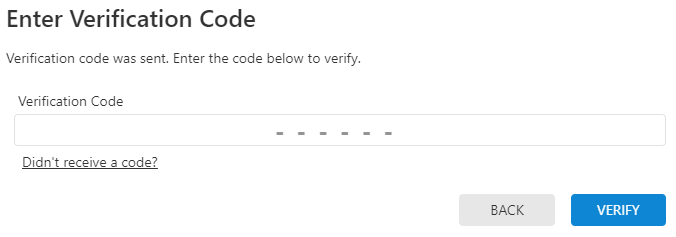Two Factor Authentication Email Code Sent
5. Click **Verify**.
- To enable Two Factor Authentication using an authentication app:
**Important**: A mobile device with an authenticator app is required to complete this process and the steps may vary based on the authenticator app in use.
1. Click **Authentication App**.
2. Generate an authentication code:
**Note**: The **Duo** authenticator app may experience unexpected behavior and it is recommended to use an alternative authenticator app.
- Use a mobile device with an authenticator app to scan the QR code or manually enter the code provided on the Alarm.com app or GoSafer Security customer portal (powered by Alarm.com) into the authenticator app.
3. In the **Enter Code** field, enter the code that is generated on the authenticator app to verify the device.
4. Click **Next**.
7. In *Device Name*, enter the desired name for the device that is accessing the account.
- If the device is trusted, click to select **Trust This Device**.
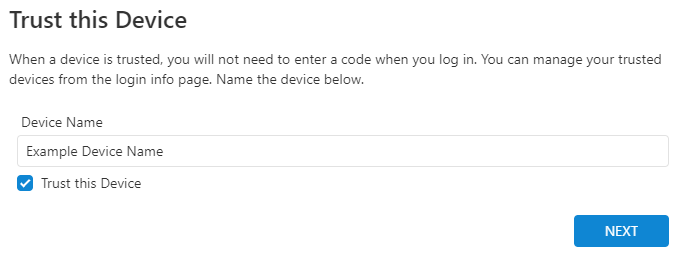Two Factor Authentication Trust Device
8. Click **Next**.
9. In *Linked Devices*, click **Trust** next to any additional devices that can be trusted.
10. Click **Done**.
### ****************To manage trusted devices using the Alarm.com app:****************Icn Chevron Down
1. Log in to the Alarm.com app.
2. Tap Menu.
3. Tap ********Login Information********.
4. Tap ********Two Factor Authentication********.
5. Tap ****Details**** next to the device name.
6. Make the desired changes:
- To rename the device, enter the desired device name, then tap **Save**.
- To delete the device, click **Delete Trusted Device**, then tap **Confirm**.
### ****************To manage trusted devices using the GoSafer Security customer portal (powered by Alarm.com):****************Icn Chevron Down
1. Log in to the GoSafer Security customer portal (powered by Alarm.com).
2. Click Settings.
3. Click Login Information.
4. Click Two Factor Authentication.
5. Click ****Details**** next to the device name.
6. Make the desired changes:
- To rename the device, enter the desired device name, then click **Save**.
- To delete the device, click **Delete Trusted Device**, then click **Confirm**.
### If you change your cell carrier or no longer have access to the phone number or authenticator app:
If you change your cell carrier or no longer have access to the phone number or authenticator app, Two-Factor Authentication can be reset using email. For more information, see [Reset Two-Factor Customer](https://answers.alarm.com/Customer/Website_and_App/User_Management/Web_App_Users/Enable_Two_Factor_Authentication#Reset_Two_Factor_Authentication).
If email Two Factor Authentication is set up and you no longer have access to your email address, contact your service provider for assistance with resetting your Two-Factor Authentication configuration.
### Reset Two Factor Authentication
Two Factor Authentication can be reset using the Alarm.com app or GoSafer Security customer portal (powered by Alarm.com).
### To reset Two Factor Authentication:Icn Chevron Down
1. Log in to the Alarm.com app or GoSafer Security customer portal (powered by Alarm.com).
2. In *Enter Verification Code*, click or tap Down next to Don't have access to your device?.
3. Select to reset Two-Factor Authentication or to contact your service provider:
- If you have access to your email address associated with the login:
1. In *Option 1: Reset Two-Factor Authentication*, tap or click **************Reset 2FA************** to send a reset link to the email address associated with the login.
- If you do not have access to your email address associated with the login:
1. In *Option 2: Contact your Service Provider*, use the contact information listed to contact your service provider.
Note: The ability to reset your own Two-Factor Authentication configuration is only available to users using SMS or an authenticator application.
## Source and support
For GoSafer Security assistance, visit [gosafersecurity.com](https://gosafersecurity.com/).
Original Alarm.com reference: [https://answers.alarm.com/Customer/Website\_and\_App/User\_Management/Web\_App\_Users/Enable\_Two\_Factor\_Authentication](https://answers.alarm.com/Customer/Website_and_App/User_Management/Web_App_Users/Enable_Two_Factor_Authentication)
Always verify safety, installation, compatibility, and current UI details against the original manufacturer documentation before operational use.