# Configure a Video Analytics rule
**GoSafer Security Knowledge Base**
*This operational reference is organized for GoSafer Security customers and staff. Alarm.com product names are retained where required for technical accuracy.*
## Overview
Video Analytics continuously scans your property and notifies you when a person, vehicle, or animal is detected. Advanced detection rules enhance perimeter security by alerting you when someone's …
Platform
App + Web
Content type
How-to / Configuration
Source last updated
2025-06-04
## Procedure
**Step-by-step guide:** Screenshots and videos are placed with the instruction they illustrate.
**Feature Notice**: Business Activity Analytics (BAA) uses the monitoring capability of Video Analytics to help business owners understand traffic patterns and improve their business operations. For more information about BAA, see [Business Activity Analytics (BAA) Setup](https://answers.alarm.com/Partner/Installation_and_Troubleshooting/Website_and_Apps/Commercial/Business_Activity_Analytics_(BAA)/Business_Activity_Analytics_(BAA)_Setup).
### **Overview**
Video Analytics continuously scans your property and notifies you when a person, vehicle, or animal is identified. Advanced detection rules enhance perimeter security by alerting you when someone's coming or going, or even loitering on your property.
With Video Analytics, you'll get enhanced notifications with thumbnail images showing people, vehicles, and animals. You can also use advanced detection rules to draw virtual tripwires across your driveway and virtual fenced-in zones on your property. Receive email and text notifications whenever:
- A vehicle pulls into the driveway/parking lot or a person walks up to an entrance
- Anyone loiters in a specific zone of a property
- A person or vehicle is identified outside a business after-hours
- A pet jumps up on the sofa or enters an off-limits flowerbed
- A child leaves the yard or someone drives off at night
Video Analytics can spot what’s important, even if there’s a lot going on.
### ****Requirements****
The following video devices are compatible with Video Analytics:
- 1080p Indoor Wi-Fi Camera (ADC-V515)
- 1080p Indoor Wi-Fi Camera (ADC-V523/523X)
- Indoor Fixed w/IR (ADC-V522IR)
- Outdoor Wireless (ADC-V722W)
- 1080p Outdoor Wi-Fi Camera (ADC-V723/723X)
- 1080p Outdoor Wi-Fi Camera with Two-Way Audio (ADC-V724/724X)
- 180° HD Camera (ADC-V622)
- Indoor/Outdoor Mini Bullet (ADC-VC726)
- Indoor/Outdoor Dome (ADC-VC826)
- Indoor/Outdoor Bullet Camera (ADC-VC736)
- Indoor/Outdoor Turret Camera (ADC-VC836)
- Pro Series 1080p Dome PoE Camera (ADC-VC827P)
- Pro Series 1080p Dome PoE Camera with Varifocal Lens (ADC-VC847PF)
- Pro Series 4MP Bullet PoE Camera with Varifocal Lens (ADC-VC728PF)
- Pro Series 4MP Varifocal Turret Camera (ADC-VC838PF)
- 4MP Outdoor Floodlight Camera **(**ADC-V729/V729AC/VC729P)
**Note**: Alarm.com doorbells use another version of Video Analytics. For more information, see [Configure a Video Analytics rule for a doorbell camera](https://answers.alarm.com/Customer/Website_and_App/Video/Recording_Video/Configure_a_Video_Analytics_rule_for_an_Alarm.com_doorbell_camera).
For information about these cameras and the requirements to use Video Analytics, contact your service provider.
### **Video tutorials for creating a Video Analytics rule**
Use a Tripwire rule to capture movement through a specified area. Use a Ground Zone rule to capture an object lingering in a specified area.
Expand all
### **To create a Tripwire rule using the GoSafer Security customer portal (powered by Alarm.com):**Icn Chevron Down
### **To create a Ground Zone rule using the GoSafer Security customer portal (powered by Alarm.com):**Icn Chevron Down
### **To use Video Analytics to control lights using the GoSafer Security customer portal (powered by Alarm.com):**Icn Chevron Down
### **Camera setup**
### ****Camera placement****
1. Position the camera so that targets can be fully seen inside the camera’s field of view and not farther than 25 feet away (15 feet at night).
2. The camera should be positioned 8-16 feet above the ground, angled downward between 30°-60° with a level horizon line.
**Note**: This recommended angle should provide for an ideal field of view while avoiding clouds and trees. Video Analytics is designed to work with an angled-down perspective; not horizontal, and not top-down.
**Important**: The camera should be mounted in such a way that a vehicle’s headlights do not shine directly into the camera, affecting exposure and IR settings.
3. Verify that the camera is clearly facing the ground or floor of the area being monitored.
**Note**: Video Analytics operates by tracking a target’s feet or a vehicle’s wheels.
4. Be aware of any bright lights (i.e., motion-triggered flood lights) near the camera that may attract insects or affect exposure and IR settings.
5. If the camera is repositioned, recreate all of the rules.
### ****Camera location****
Video Analytics detects objects and classifies them as people, animals, and vehicles. Position the camera with a clear view over an area of interest.
Successful camera positions include:
- Overlooking a driveway
- Overlooking a front porch monitoring or wherever packages are dropped off
- An area of interest around a yard, where kids or animals are sometimes seen
- Indoor entryways, exit ways, or hallways of interest
Avoid:
- Areas with constant or uninteresting motion (e.g., roads with regular vehicle movement, trees constantly swaying in the wind, etc.)
- Pointing cameras out a window, as screen interference and reflections cause Video Analytics performance issues
### **Create a rule with Video Analytics**
Up to three Video Analytics rules per camera can be configured using the GoSafer Security customer portal (powered by Alarm.com) or Alarm.com app. Each rule includes either one Ground Zone or one Trip Wire.
**Note**: If you are planning to create Privacy Zones on your camera, it is recommended to configure the Privacy Zones before creating a Video Analytics rule. For more information, see [Configure Privacy Zones](https://answers.alarm.com/Partner/Installation_and_Troubleshooting/Video_Devices/General_Video_Information/Configure_Privacy_Zones_for_video_devices).
### Add the Video Analytics rule
A Video Analytics rule can be created using the Alarm.com app and GoSafer Security customer portal (powered by Alarm.com).
### **To create a rule using the Alarm.com app:**Icn Chevron Up
1. Log in to the Alarm.com app.
2. Tap **Video**.
3. Tap Settings.
4. Tap **Recording Rules**.
5. Tap Add**.
6. Tap **Video Analytics**.
### **To create a rule using the GoSafer Security customer portal (powered by Alarm.com):**Icn Chevron Up
1. Log in to the GoSafer Security customer portal (powered by Alarm.com).
2. Click **Video**.
3. Click **Recording Rules**.
4. Click **Add New Rule**.
5. Click to select **Video Analytics**.
### **Rule selection**
1. Click to select the desired camera. If the camera needs to be calibrated, you are directed to the *Calibrate* page. For more information about camera calibration, see [Calibrate a device for Video Analytics](https://answers.alarm.com/Customer/Website_and_App/Video/Video_Settings/Calibrate_a_device_for_Video_Analytics).
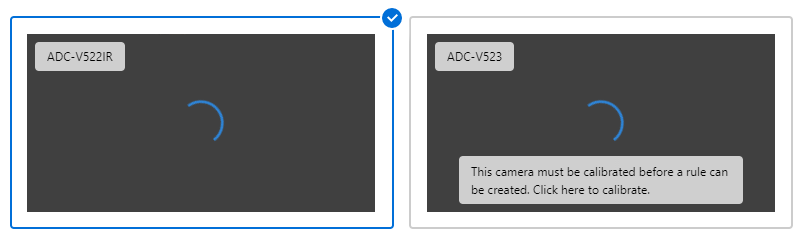select video device
2. Click to select the rule type.
- Use a *Tripwire* rule when you expect a target to cross through the camera’s field of view or when objects enter or exit an area (e.g., a car pulling into or backing out of a driveway).
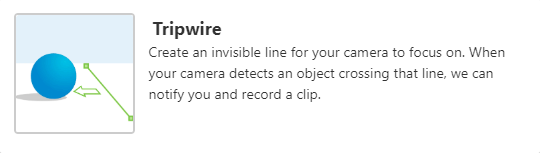Tripwire select
- Use a *Ground Zone* rule when you expect a target to loiter in the camera’s field of view (e.g., a person delivering a package on your front porch).
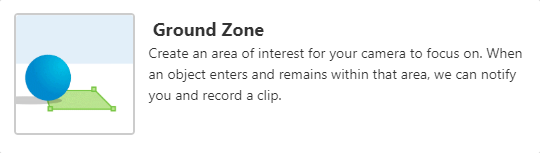Ground Zone select
3. All Video Motion Detection (VMD) schedules associated with a camera must be deleted before setting up a Video Analytics rule. When prompted with this warning, click ****OK**** to continue.
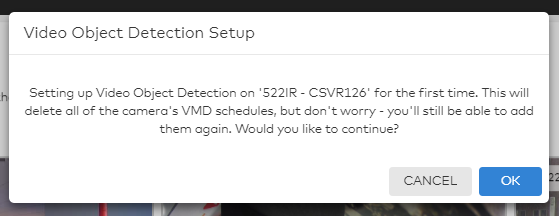Delete VMD schedules
4. Click **Next**.
### **Select the camera scene**
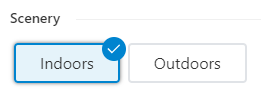
1. In *Scenery*, click to select **Indoors** or **Outdoors** based on where the camera is installed. The camera should be marked outdoors if it will be exposed to rain, snow, spider webs, or moving trees and set to indoors if in a controlled outdoor environment (e.g., a screened-in porch).
**Note**: This selection must be the same across all recording rules associated with a specific camera.
Indoors vs outdoors
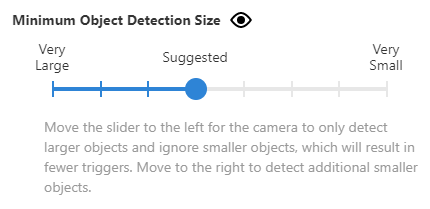
2. Use the *Minimum Object Detection Size* slider to adjust how small an object can be and still trigger a recording. It is recommended to keep this at its suggested value upon initial rule creation. **Very Large** captures the fewest recordings only of the largest objects, and **Very Small** captures the most recordings including large and small objects.
Minimum object detection selection
**Note**: The Minimum Object Detection Size does not appear for cameras that are calibrated. For more information about the calibration process, see [Calibrate a device for Video Analytics](https://answers.alarm.com/Customer/Website_and_App/Video/Video_Settings/Calibrate_a_device_for_Video_Analytics).
### Configure the Video Analytics rule
Once the rule type and scene are selected, you can configure the rule settings.
### To configure a Ground Zone rule:Icn Chevron Up
1. In the *Rule Name* field, enter a name for the recording rule.
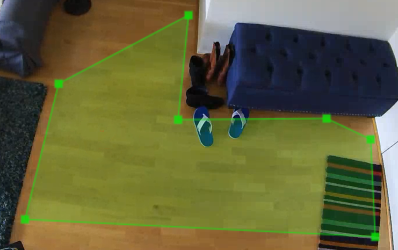
2. Click and drag the corners of the shape to cover only the ground where the target’s feet will be. To clear the current area of interest and restart, click **Clear ground zone** to create a new area of interest with up to 28 points.
- Click and hold inside the shape to move the shape itself.
Configure rule Ground Zone 2
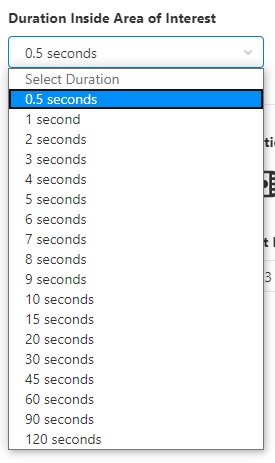
3. Using the *Duration Inside Area of Interest* dropdown menu, select the desired time an object needs to stay inside the Ground Zone to trigger a recording.
Duration Inside Area of Interest
### To configure a Tripwire rule:Icn Chevron Up
1. In the *Rule Name* field, enter a name for the recording rule.
2. Click and drag the Tripwire to cover only the ground where the target's feet cross. The arrow determines which direction the object must be moving to trigger a recording. To clear the current Tripwire and restart, click **Clear Tripwire**.
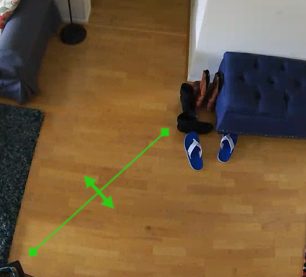Configure rule Trip wire 2
3. Customize the direction of movement to be recorded:
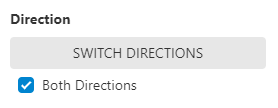Direction switch or both
- In *Direction*, click **Switch directions** to switch the direction of the movement to capture.
- Click to select Both Directions to record when an object crosses the Tripwire regardless of which direction it is moving.
### **To ensure rule accuracy**
- Avoid drawing Tripwires or Ground Zones over objects that might move by themselves (e.g., trees, bushes, or other objects that move in the wind).
- Only draw the rule where the feet or wheels of an object should cross.
- Do not increase the size of the loiter zone or tripwire to cover the whole of the target.
- Do not include furniture, walls, trees, or other structures in the rule/selection.
Bad ground zone example
Good ground zone example
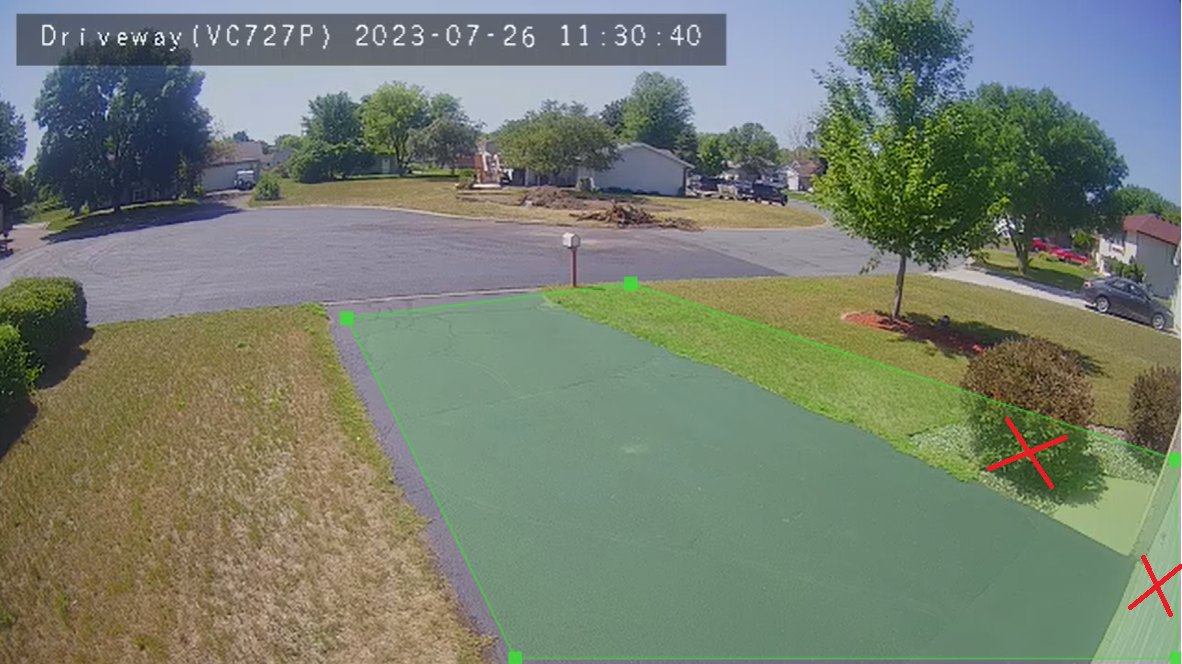Ground Zone Example Bad
Including the bush and garage door in the ground zone can make it difficult for the Video Analytics to positively classify subjects. In this case, reduce the size of the ground zone to only cover the driveway.
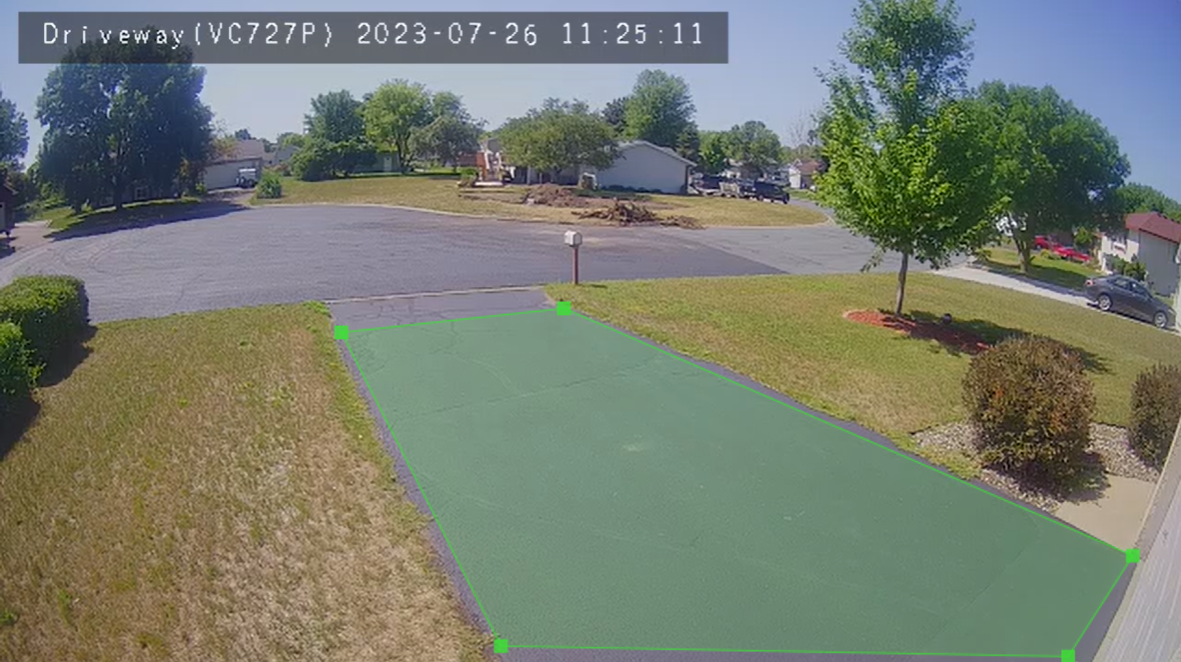Ground Zone Example Good
This is a properly drawn ground zone that only covers the driveway, and excludes the bush and garage door.
- Create up to three Video Analytics rules to capture separate areas of interest (e.g., a camera that monitors two entrances might need two tripwire rules, each one covering one of the entrances).
- After observing what the rule detects over a few days, consider adjusting either the *Minimum Object Detection Size* slider or recalibrating the camera.
**Note**: Certain video devices have a calibration process that replaces the Minimum Object Detection Size setting. Minimum Object Detection Size will not appear on this page for those cameras. For more information about the calibration process, see [Calibrate a device for Video Analytics](https://answers.alarm.com/Customer/Website_and_App/Video/Video_Settings/Calibrate_a_device_for_Video_Analytics).
- When adjusting the *Minimum Object Detection Size* slider:
- Increasing the minimum object size can reduce false detection.
- Decreasing the minimum object size can detect smaller targets.
### **Rule scheduling and notifications**
1. Using the *Set Minimum Delay Between Clips* dropdown menu, select the desired timeframe. This setting determines how long the camera must wait after beginning a clip to trigger another recording.
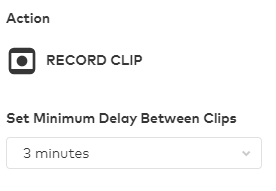Minimum delay
2. In *The Rule will run...*, click to select **At all times** or **Only during the following times**.
- If **Only during the following times** is selected:
1. Click to select the days of the week to record on.
2. Using the *Begin* dropdown menu, select the time for the recording rule to start.
3. Using the *End* dropdown menu, select the time for the recording rule to stop.
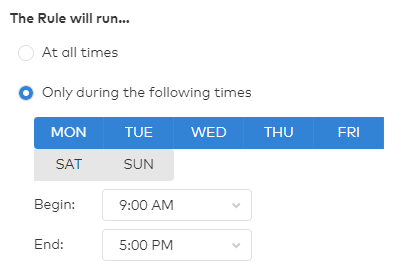Rule scheduling
3. In *Except when...*, click to select any available exceptions that turn the rule off regardless of the schedule. Options depending on the equipment include: the panel is armed away, the panel is armed stay, and Geo-Device is inside a specified Geo-Fence.
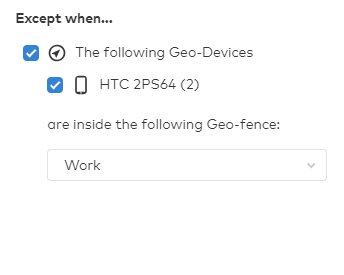Rule scheduling exceptions
****Important****: If the location has a security system with multiple partitions, Video Analytics rules will follow the arming settings of the first partition only.
4. In *Send notification for clips containing...*, click to select the types of clips that the user wants to be notified about. The camera records and uploads all motion it detects but only sends a notification to the user based on the selected notification options.
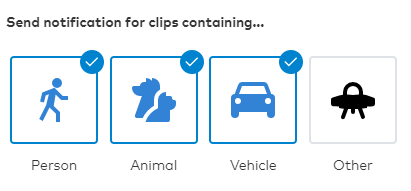Uploaded clips to be notified about
**Note**: Clips included in the *Other* category are when the camera detects an object but is unable to determine which type of object it is. For more information about how a clip is classified as *Other*, see [How does a Video Analytics clip get classified as Other?](https://answers.alarm.com/Partner/Installation_and_Troubleshooting/Video_Devices/General_Video_Information/How_does_a_Video_Analytics_clip_get_classified_as_Other).
5. Click to select the desired notification recipients. It is recommended to use push notifications to a phone using the dropdown option to attach a thumbnail. The timing of the notification is based on the notification type. For more information, see [How do Video Analytics notifications work?](https://answers.alarm.com/Partner/Installation_and_Troubleshooting/Video_Devices/General_Video_Information/How_do_Video_Analytics_notifications_work).
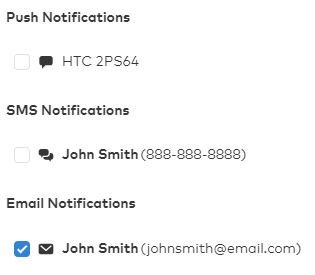Notification types
### **Create a light automation rule**
Camera-driven light automation rules require at least one light device enrolled on the account.
**Note**: Lights cannot be enabled during a time when the Video Analytics rule is not set to record (e.g., if a tripwire rule is drawn on a driveway and set to record only at night, lights cannot be set to turn on during the daytime because no clip would have been recorded).
1. Using the *Turn on selected lights for* dropdown menu, select how long the lights should turn on for.
2. Select which lights to be automated by the rule.
3. Select which events should turn on the lights when triggered.
4. Select a time frame for the rule to occur.
### **Perimeter Guard™**
Perimeter Guard™ sounds an alert and flashes the camera's status LED when unwanted visitors are detected.
For more information about Perimeter Guard™ and compatible video devices, see [Perimeter Guard™ for video devices](https://answers.alarm.com/Partner/Installation_and_Troubleshooting/Video_Devices/General_Video_Information/Perimeter_Guard_for_video_devices).
### Enable the alerts
- To enable the LED response:
1. In *Perimeter Guard™ - Light & Sound,* click the *Camera Status LED* toggle to enable the LED response.
2. Using the *Duration* dropdown menu, select how long the LED response lasts.
3. Using the *Set Minimum Delay Between Alerts* dropdown menu, select the desired amount of time the camera should not start a new alert after a previous alert has completed.
- To enable the Camera Audio Alert (only available on cameras using the Two-Way Audio feature):
1. In *Perimeter Guard™ - Light & Sound,* click the Camera Audio Alert toggle to enable the Audio Alert.
2. Using the *Audio Sound* dropdown menu, select the type of sound the camera makes.
3. Adjust the volume using the *Volume* slider.
### Set the alert delay
- Using the *Set Minimum Delay Between Alerts* dropdown menu, select the desired amount of time the camera should not start a new alert after a previous alert has completed.
### Package Alerts for the ADC-VDB770
You can be the first to know when a package is delivered to your home or business with Package Alerts for the Alarm.com Video Doorbell (ADC-VDB770). Using Video Analytics, the ADC-VDB770 can identify when a visitor leaves a parcel on your doorstep—notifying you immediately.
Package Alerts can be configured to notify you right when a delivery is made, remind you if the box is not picked up, or alert you if it goes missing.
For more information about Package Alerts, see [Package](https://answers.alarm.com/Customer/Website_and_App/Video/Video_Settings/Package_Alerts_for_the_Alarm.com_Video_Doorbell_(ADC-VDB770)) [Alerts](https://answers.alarm.com/Customer/Website_and_App/Video/Video_Settings/Package_Alerts_for_the_Alarm.com_Video_Doorbell_(ADC-VDB770)) [for](https://answers.alarm.com/Customer/Website_and_App/Video/Video_Settings/Package_Alerts_for_the_Alarm.com_Video_Doorbell_(ADC-VDB770))[the](https://answers.alarm.com/Customer/Website_and_App/Video/Video_Settings/Package_Alerts_for_the_Alarm.com_Video_Doorbell_(ADC-VDB770))[Alarm.com Video Doorbell (ADC-VDB770)](https://answers.alarm.com/Customer/Website_and_App/Video/Video_Settings/Package_Alerts_for_the_Alarm.com_Video_Doorbell_(ADC-VDB770)).
### **View saved video clips**
### **To view saved video clips using the Alarm.com app:**Icn Chevron Up
1. Log in to the Alarm.com app.
2. Tap Video.
3. Tap **Saved**.
4. Any clips with a valid person, vehicle, or animal classification appear here by default.
5. Clips classified as other are hidden by default.
- To view clips classified as other:
1. Tap Filter.
2. In *Object Detection*, tap to select **Other**.
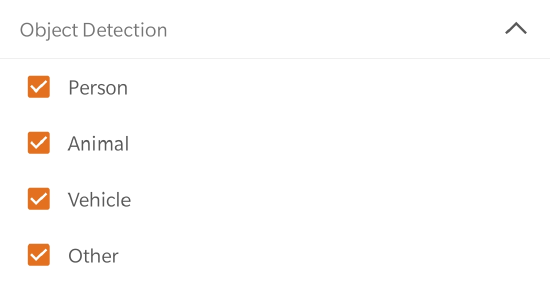App select other category
3. Tap ****Check****.
### **To view saved video clips using the GoSafer Security customer portal (powered by Alarm.com):**Icn Chevron Up
1. Log in to the GoSafer Security customer portal (powered by Alarm.com).
2. Click **Video**.
3. Click **Saved Video Clips**.
4. Any clips with a valid person, vehicle, or animal classification appear here by default. Clips classified as other are hidden by default.
- To view clips classified as other:
1. Click **Filter**.
2. In *Object Detection*, click to select **Other**.
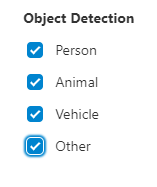Object detection selection
3. Click **Apply**.
## Source and support
For GoSafer Security assistance, visit [gosafersecurity.com](https://gosafersecurity.com/).
Original Alarm.com reference: [https://answers.alarm.com/Customer/Website\_and\_App/Video/Video\_Settings/Configure\_a\_Video\_Analytics\_rule](https://answers.alarm.com/Customer/Website_and_App/Video/Video_Settings/Configure_a_Video_Analytics_rule)
Always verify safety, installation, compatibility, and current UI details against the original manufacturer documentation before operational use.