User Management
GoSafer Security procedures and references for User Management.
- User Management
- Can I add user codes through the customer mobile application?
- Change a system user code
- Create a system user code
- Create/edit a duress code remotely
- Delete a system user code
- How can a user code be given access to specific security panel partitions?
- How can a user code only be given access at certain times?
- System Users
- View user codes
- Why is the website saying the user code is invalid?
- Add a mobile phone number to receive SMS notifications
- Android Quick Access Device Controls
- App settings transfer
- Best practices when changing phones
- Can I create multiple logins for my account?
- Can logins have access to only specific system partitions?
- Change a login name
- Change a phone number
- Change an email address
- Change how the Welcome card appears on the website
- Change language preference
- Change or reset a password
- Change security questions
- Change the name of a mobile device
- Configure a number passcode for the app
- Contact your service provider
- Create a secondary login
- Delete a login
- Do the app and website update in real time?
- Enable Two Factor Authentication
- Export panel slot numbers for a single location
- How can I set up Touch ID or Face ID for iOS?
- How can I set up fingerprint scanning on Android?
- How do I change the language of the customer app?
- How do I change the language of the website?
- How do I find mobile app version on my device?
- Is the Alarm.com iOS Today View Widget a supported feature?
- Is there a limit to how many logins can be created for a customer account?
- Launch the app or website tour
- Log all devices out of the website and app
- Manage login permissions for secondary logins
- Rearrange Home page of website or app
- Safety Button widget
- Saved Clips widget for iOS
- Transfer app settings from a previously connected device to a new device
- Unable to log in to the Customer Website or app
- View upcoming appointments
- Web/App Users
- What are the login name and password requirements?
- What can I do if I can't find the password reset email?
- What is Two Factor Authentication?
- iOS Alarm.com System Control widget
- iOS Live Activities for In-Progress Device Commands
- iPhone's Home Screen Quick Actions feature for the Alarm.com app
User Management
GoSafer Security Knowledge Base
This operational reference is organized for GoSafer Security customers and staff. Alarm.com product names are retained where required for technical accuracy.
Overview
This GoSafer Security section brings together resources for User Management, including setup, configuration, everyday use, and troubleshooting. Choose the related page that matches your device, feature, or task, and follow the current manufacturer guidance linked on that page.
| Platform | App + Web |
|---|---|
| Content type | How-to / Configuration |
| Source last updated | 2022-01-24 |
Procedure
Source and support
For GoSafer Security assistance, visit gosafersecurity.com.
Original Alarm.com reference: https://answers.alarm.com/Customer/Website_and_App/User_Management
Always verify safety, installation, compatibility, and current UI details against the original manufacturer documentation before operational use.
Can I add user codes through the customer mobile application?
GoSafer Security Knowledge Base
This operational reference is organized for GoSafer Security customers and staff. Alarm.com product names are retained where required for technical accuracy.
Overview
The article answers the question, 'Can I add user codes through the customer mobile application?' And provides the resource for doing so.
| Platform | Mobile App |
|---|---|
| Content type | How-to / Configuration |
| Source last updated | 2024-12-11 |
Procedure
For more information, see Create a system user code.
Source and support
For GoSafer Security assistance, visit gosafersecurity.com.
Original Alarm.com reference: https://answers.alarm.com/Customer/Website_and_App/User_Management/System_Users/Can_I_add_user_codes_through_the_customer_mobile_application
Always verify safety, installation, compatibility, and current UI details against the original manufacturer documentation before operational use.
Change a system user code
GoSafer Security Knowledge Base
This operational reference is organized for GoSafer Security customers and staff. Alarm.com product names are retained where required for technical accuracy.
Overview
Existing system user codes can be updated from the website or app.
| Platform | App + Web |
|---|---|
| Content type | How-to / Configuration |
| Source last updated | 2025-09-16 |
Procedure
To change a system user code using the Alarm.com app
- Log in to the Alarm.com app.
- Tap [Menu].
- Tap Users.
- Tap to select the user to update.
- Tap [Access Code].
In Access Code, enter the new user code.
- Tap Save.
To change a system user code using the GoSafer Security customer portal (powered by Alarm.com)
- Log in to the GoSafer Security customer portal (powered by Alarm.com).
- Click Users.
- Click [More Options] on the desired user.
- Click [Edit] to edit user information.
- Click [Access Code].
In Access Code, enter the desired user code.
A new access code can also be generated by clicking Generate Code.
- Click to select which devices and features the user will have access to.
- Click Save to send the changes to the system.
Source and support
For GoSafer Security assistance, visit gosafersecurity.com.
Original Alarm.com reference: https://answers.alarm.com/Customer/Website_and_App/User_Management/System_Users/Change_a_system_user_code
Always verify safety, installation, compatibility, and current UI details against the original manufacturer documentation before operational use.
Create a system user code
GoSafer Security Knowledge Base
This operational reference is organized for GoSafer Security customers and staff. Alarm.com product names are retained where required for technical accuracy.
Overview
New system user codes can be created using the app or the website.
| Platform | App + Web |
|---|---|
| Content type | How-to / Configuration |
| Source last updated | 2025-06-04 |
Procedure
Step-by-step guide: Screenshots and videos are placed with the instruction they illustrate.
New system user codes can be created using the Alarm.com app or GoSafer Security customer portal (powered by Alarm.com).
Important: User codes cannot be edited while the security system is armed. Verify the security system is disarmed before attempting to edit a user code remotely.
Create new system user codes
The following processes will allow for user codes to be set with a manually entered user code. For more information about creating a randomly generated user code, see Generate and share system user codes.
To create new system user codes for single systems using the Alarm.com app:Icn Chevron Up
- Log in to the Alarm.com app.
- Tap Menu.
- Tap Users.
- Tap Add.
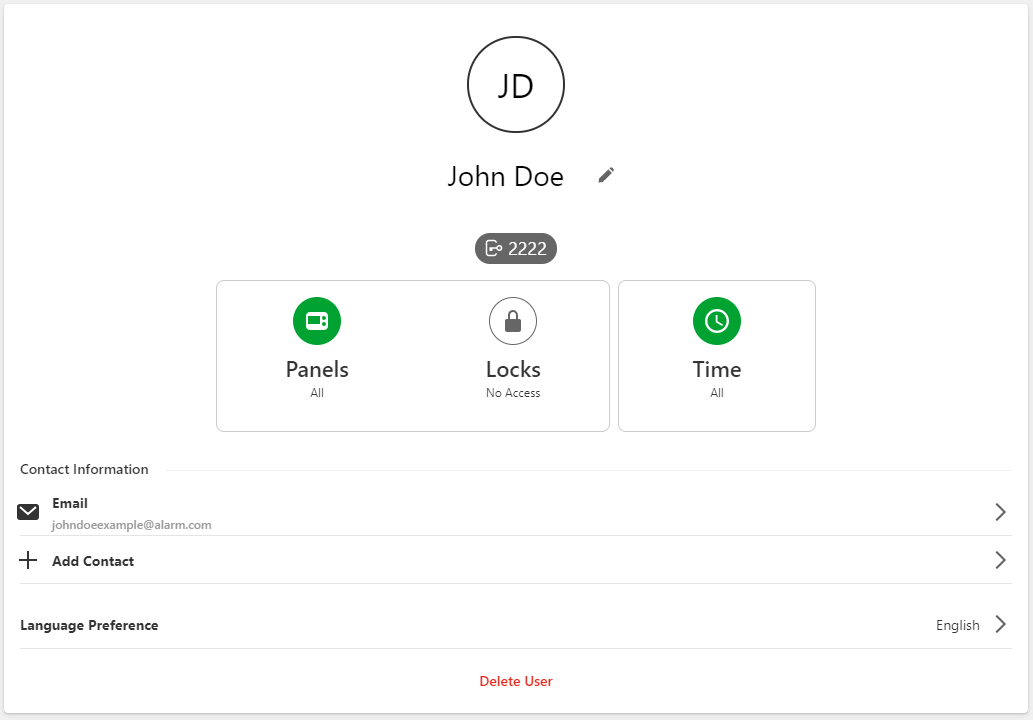
- Enter the user's first and last name, and then tap Create.
- In Access Code, enter the user's desired code.
- Tap the toggle switch for the devices (i.e., panel partitions and locks) to enable/disable access for the user's code.
- Tap Save. Allow a few minutes for the new user code to be active at the panel.
- To add user contact information, tap Add Contact.
- Then tap either:
- Mobile Number. Enter the mobile number, and select the Country and Carrier using the dropdown menus.
- Email Address. Enter the email address, and select the Email Format using the dropdown menu.
- Tap Save to add the new contact information.
- Then tap either:
Allow a few minutes for new user codes to be active at the panel. If the new user code does not work at the panel or you have additional questions, contact your service provider.
If this video is blocked by the publisher's privacy settings, open it on the original Alarm.com article.
To create new system user codes for single systems using the GoSafer Security customer portal (powered by Alarm.com):Icn Chevron Up
- Log in to the GoSafer Security customer portal (powered by Alarm.com).
- Click Users.
- Click Add User.
- Enter the user's first and last name, and then click Create.
- In Access Code, enter the user's desired code.
- Click the toggle switch for the devices (i.e., panel partitions and locks) to enable/disable access for the user's code.
- Click Save. Allow a few minutes for the new user code to be active at the panel.
- To add user contact information, click Add Contact.
- Then click either:
- Mobile Number to add a mobile number. Then enter the mobile number and select the Country and Carrier using the dropdown menus.
- Email Address to add an email address. Then enter the email address and select the Email Format using the dropdown menu.
- Click Save to add the new contact information.
- Then click either:
Allow a few minutes for new user codes to be active at the panel. If the new user code does not work at the panel or you have additional questions, contact your service provider.
If this video is blocked by the publisher's privacy settings, open it on the original Alarm.com article.
Source and support
For GoSafer Security assistance, visit gosafersecurity.com.
Original Alarm.com reference: https://answers.alarm.com/Customer/Website_and_App/User_Management/System_Users/Create_a_system_user_code
Always verify safety, installation, compatibility, and current UI details against the original manufacturer documentation before operational use.
Create/edit a duress code remotely
GoSafer Security Knowledge Base
This operational reference is organized for GoSafer Security customers and staff. Alarm.com product names are retained where required for technical accuracy.
Overview
Duress codes can be managed remotely using the website or app.
| Platform | App + Web |
|---|---|
| Content type | How-to / Configuration |
| Source last updated | 2025-06-04 |
Procedure
Create/edit duress codes remotely
Duress codes can be managed remotely using the Alarm.com app or GoSafer Security customer portal (powered by Alarm.com).
To create/edit duress codes using the Alarm.com app
- Log in to the Alarm.com app.
- Tap [Menu].
- Tap Users.
- Tap to expand More.
If there is not a current duress code
- Tap Add Duress User in More Options.
In the Duress Code Name field, enter the name of the duress code.
- Tap Create.
In Access Code, enter the desired duress code or tap Generate Code to generate a random code.
In Security Panels, select the panel partitions to apply the duress code to.
- Tap Save.
If there is an existing duress code
- Tap Edit Duress User in More Options.
- Tap [Access Code].
In Access Code, update the duress code as desired.
In Security Panels, select the panel partitions to apply the duress code to.
- Tap Save.
To create/edit duress codes using the GoSafer Security customer portal (powered by Alarm.com)
- Log in to the GoSafer Security customer portal (powered by Alarm.com).
- Click Users.
- Click to expand More.
If there is not a current duress code
- Click Add Duress User.
In Duress Code Name, enter a name for the duress code.
- Click Create.
In Access Code, enter the desired user code.
A new access code can also be generated by clicking Generate Code.
- Click to select which devices and features the user will have access to.
- Click Save.
If there is an existing duress code
- Click Edit Duress User in More Options.
- Click [Access Code].
In Access Code, update the duress code as desired.
In Security Panels, select the panel partitions to apply the duress code to.
- Click Save.
Source and support
For GoSafer Security assistance, visit gosafersecurity.com.
Original Alarm.com reference: https://answers.alarm.com/Customer/Website_and_App/User_Management/System_Users/Create%2F%2Fedit_a_duress_code_remotely
Always verify safety, installation, compatibility, and current UI details against the original manufacturer documentation before operational use.
Delete a system user code
GoSafer Security Knowledge Base
This operational reference is organized for GoSafer Security customers and staff. Alarm.com product names are retained where required for technical accuracy.
Overview
Deleting unused system user codes helps keep the system secure.
| Platform | App + Web |
|---|---|
| Content type | How-to / Configuration |
| Source last updated | 2025-06-04 |
Procedure
To delete a system user using the Alarm.com app
- Log in to the Alarm.com app.
- Tap [Menu].
- Tap Users.
- Tap [More Options] for the user to be deleted
- Tap [Delete] Delete.
- Tap Delete to confirm that you want to delete the user and all of the addresses associated with it.
To delete a system user using the GoSafer Security customer portal (powered by Alarm.com)
- Log in to the GoSafer Security customer portal (powered by Alarm.com).
- Click Users.
- Click [More Options] for the user to be deleted
- Click [Delete] Delete.
- Click Delete User to confirm that you want to delete the user and all of the addresses associated with it.
To delete multiple system users using the GoSafer Security customer portal (powered by Alarm.com)
Important: This feature is only available for Commercial accounts.
- Log in to the GoSafer Security customer portal (powered by Alarm.com).
- Click Users.
- Click More.
- Click Bulk Actions.
- Click to select the desired users to be deleted.
- Click [Delete].
In Confirm Bulk User Deletion, click Delete.
To remove a user's security system access using the Alarm.com app
- Log in to the Alarm.com app.
- Tap [Menu].
- Tap Users.
- Tap [More Options] for the user to be deleted.
- Tap [Edit] Edit.
- Tap Panels.
On the Device Access page, tap the toggle switch to disable the access points that the user code should no longer have access to.
- Tap Save.
To remove a user's security system access using the GoSafer Security customer portal (powered by Alarm.com)
- Log in to the GoSafer Security customer portal (powered by Alarm.com).
- Click Users.
- Click [More Options] for the user to be deleted.
- Click [Edit] Edit.
- Click Panels.
On the Device Access page, click the toggle switch to disable the access points that the user code should no longer have access to.
- Click Save.
Source and support
For GoSafer Security assistance, visit gosafersecurity.com.
Original Alarm.com reference: https://answers.alarm.com/Customer/Website_and_App/User_Management/System_Users/Delete_a_system_user_code
Always verify safety, installation, compatibility, and current UI details against the original manufacturer documentation before operational use.
How can a user code be given access to specific security panel partitions?
GoSafer Security Knowledge Base
This operational reference is organized for GoSafer Security customers and staff. Alarm.com product names are retained where required for technical accuracy.
Overview
A user code can be given access to particular panel partitions of a single system if desired.
| Platform | App + Web |
|---|---|
| Content type | How-to / Configuration |
| Source last updated | 2025-06-04 |
Procedure
To give new users access to specific partitions using the Alarm.com app
- Log in to the Alarm.com app.
- Tap [Menu].
- Tap Users.
- Tap [Add].
- Enter the user's first and last name, and then tap Create.
In Access Code, enter the user's desired code.
In Security Panels, tap to toggle the desired system partitions for access.
- Tap Save. Allow a few minutes for the new user code to be active at the panel.
To add user contact information, tap Add Contact.
Then tap either
Mobile Number. Enter the mobile number, and select the Country and Carrier using the dropdown menus.
Email Address. Enter the email address, and select the Email Format using the dropdown menu.
- Tap Save to add the new contact information.
To give new users access to specific partitions using the GoSafer Security customer portal (powered by Alarm.com)
- Log in to the GoSafer Security customer portal (powered by Alarm.com)
- Click Users.
- Click Add User.
- Enter the user's first and last name in the First Name and Last Name fields.
- Click Create.
To update the language preference
- Click Language Preference.
- Click to select the user's language preference.
- Click Save.
To add contact information, Click Add Contact. Then click to select either
Mobile Number to add the user's phone number. This allows the user to be set up with SMS text notifications to their phone.
In Mobile Number (SMS) enter the user's phone number.
Using the Country dropdown menu, select the country the mobile number is from.
Using the Carrier dropdown menu, select the cellular provider of the mobile number. If the provider is not listed but the user wants to receive SMS text notifications, see Create text (SMS) notifications when a cell carrier is not an option.
- Click Save.
Note: SMS (text notifications) is only available in the United States and Canada. It is recommended to use push notifications for accounts outside the United States and Canada.
Email Address to add the user's email address. This allows the user to be set up with email notifications.
In Email Address enter the user's email address.
Using the Email Format dropdown menu, select the format the user would like to receive email notifications (i.e., HTML, Email Format, or Plain Text).
- Click Save.
- Click Panels.
In Security Panels, click to toggle the desired system partitions for access.
- Click Save. The user code is sent only to the partitions the user has been given access to.
To give existing users access to specific partitions using the Alarm.com app
- Log in to the Alarm.com app.
- Tap [Menu].
- Tap Users.
- Tap to select the desired user.
- Tap Panels.
In Security Panels, tap to toggle the desired system partitions for access.
- Tap Save. The user code is sent only to the partitions that the user code has been given access.
To give existing users access to specific partitions using the GoSafer Security customer portal (powered by Alarm.com)
- Log in to the GoSafer Security customer portal (powered by Alarm.com).
- Click Users.
- Click the desired user to be edited.
- Click Panels.
In Security Panels, click to toggle the desired system partitions for access.
- Click Save. The user code is sent only to the partitions the user has been given access to.
Source and support
For GoSafer Security assistance, visit gosafersecurity.com.
Original Alarm.com reference: https://answers.alarm.com/Customer/Website_and_App/User_Management/System_Users/How_can_a_user_code_be_given_access_to_specific_security_panel_partitions
Always verify safety, installation, compatibility, and current UI details against the original manufacturer documentation before operational use.
How can a user code only be given access at certain times?
GoSafer Security Knowledge Base
This operational reference is organized for GoSafer Security customers and staff. Alarm.com product names are retained where required for technical accuracy.
Overview
Some systems allow for scheduled or temporary user access that will give specified users access to the system at certain times. If you do not see the following options, your system may not be compatible with scheduled or temporary user codes. For further questions, contact your service provider.
| Platform | App + Web |
|---|---|
| Content type | How-to / Configuration |
| Source last updated | 2025-06-04 |
Procedure
Step-by-step guide: Screenshots and videos are placed with the instruction they illustrate.
Some systems allow for scheduled or temporary user access that will give specified users access to the system at certain times.
If you do not see the following options, your system may not be compatible with scheduled or temporary user codes. For further questions, contact your service provider.
Scheduled panel user code access
Scheduled user codes allow a user to have access to the system during a specified timeframe every week.
Example: A scheduled user code can be given access to the system for every Monday and Wednesday between 8:00 AM to 4:00 PM.
Restrict a user code to a specific time period
To restrict a user code to a specific time period using the Alarm.com app:Icn Chevron Up
- Log in to the Alarm.com app.
- Tap Menu.
- Tap Users.
- Tap to select the user to restrict.
- Verify the user has Panel Access enabled, and a valid Access Code.
- In Access Information, tap Access Period.
- Tap Restricted schedule.
- In Weekly Schedule, configure the days and time to restrict the user's access to the system.
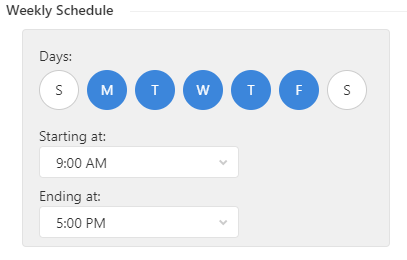
weekly schedule
- Tap Save.
To restrict a user code to a specific time period using the GoSafer Security customer portal (powered by Alarm.com):Icn Chevron Up
- Log in to the GoSafer Security customer portal (powered by Alarm.com).
- Click Users.
- Click More options for the user that will be restricted.
- Click Edit .
- Verify the user has panel access enabled with a valid access code.
- In Access Information, click Access Period.
- Click Restricted Schedule.
- In Weekly Schedule, configure the days and time to restrict the user's access to the system.
weekly schedule
- Click Save.
Temporary panel user code access
Temporary user codes have access to the system during only a specified start and end time.
Example: A temporary user code can be given access to the system for January 7, 2019, from 8:00 AM until January 10, 2019, at 4:00 PM. The code can arm and disarm the system at any time between the specified time period.
Add a temporary user code
To add a temporary user code using the Alarm.com app:Icn Chevron Up
- Log in to the Alarm.com app.
- Tap Menu.
- Tap Users.
- Tap to select the user to restrict.
- Verify the user has Panel Access enabled, and a valid Access Code.
- In Access Information, tap Access Period.
- Tap Temporary Access.
- Select the start and end date/time that the user will have access to the system.
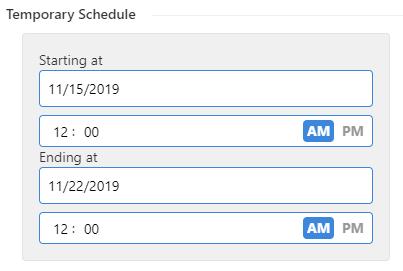
temporary schedule
- Tap Save.
To add a temporary user code using the GoSafer Security customer portal (powered by Alarm.com):Icn Chevron Up
- Log in to the GoSafer Security customer portal (powered by Alarm.com).
- Click Users.
- Click More options for the user that will be restricted.
- Click Edit .
- Verify the user has panel access enabled with a valid access code.
- In Access Information, click Access Period.
- Click Temporary Access.
- Select the start and end date/time that the user will have access to the system.
temporary schedule
- Click Save.
Source and support
For GoSafer Security assistance, visit gosafersecurity.com.
Original Alarm.com reference: https://answers.alarm.com/Customer/Website_and_App/User_Management/System_Users/How_can_a_user_code_only_be_given_access_at_certain_times
Always verify safety, installation, compatibility, and current UI details against the original manufacturer documentation before operational use.
System Users
GoSafer Security Knowledge Base
This operational reference is organized for GoSafer Security customers and staff. Alarm.com product names are retained where required for technical accuracy.
Overview
This GoSafer Security section brings together resources for System Users, including setup, configuration, everyday use, and troubleshooting. Choose the related page that matches your device, feature, or task, and follow the current manufacturer guidance linked on that page.
| Platform | App + Web |
|---|---|
| Content type | Troubleshooting |
| Source last updated | 2022-01-24 |
Procedure
Source and support
For GoSafer Security assistance, visit gosafersecurity.com.
Original Alarm.com reference: https://answers.alarm.com/Customer/Website_and_App/User_Management/System_Users
Always verify safety, installation, compatibility, and current UI details against the original manufacturer documentation before operational use.
View user codes
GoSafer Security Knowledge Base
This operational reference is organized for GoSafer Security customers and staff. Alarm.com product names are retained where required for technical accuracy.
Overview
User codes for residential accounts can be viewed using the Customer app and GoSafer Security customer portal.
| Platform | App + Web |
|---|---|
| Content type | Reference |
| Source last updated | 2025-06-04 |
Procedure
View user codes using the Alarm.com app
- Log in to the Alarm.com app.
- Tap [Menu].
- Tap Users.
If your account is using Access Control, tap User Access, then tap Users.
- Tap More.
In More Options, tap Show user codes.
Note: To hide user codes, tap More, then tap Hide User Codes in More Options.
View user codes using the GoSafer Security customer portal (powered by Alarm.com)
- Log in to the GoSafer Security customer portal (powered by Alarm.com).
- Click Users.
If your account is using Access Control, click User Access, then click Users.
- Click More, then click Show user codes.
Note: To hide user codes, click More, then click Hide user codes.
Source and support
For GoSafer Security assistance, visit gosafersecurity.com.
Original Alarm.com reference: https://answers.alarm.com/Customer/Website_and_App/User_Management/System_Users/View_user_codes
Always verify safety, installation, compatibility, and current UI details against the original manufacturer documentation before operational use.
Why is the website saying the user code is invalid?
GoSafer Security Knowledge Base
This operational reference is organized for GoSafer Security customers and staff. Alarm.com product names are retained where required for technical accuracy.
Overview
The user code is invalid error message is caused by an existing code that may be in conflict with a code you wish to add. The following are the typical causes of this conflict.
| Platform | Customer Website |
|---|---|
| Content type | Troubleshooting |
| Source last updated | 2022-01-25 |
Procedure
Step-by-step guide: Screenshots and videos are placed with the instruction they illustrate.
The user code is invalid error message is caused by an existing code that may be in conflict with a code you wish to add. The following are the typical causes of this conflict.
Duplicate code
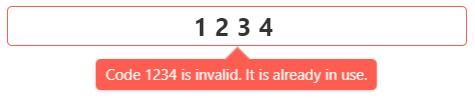
The preceding error appears when either:
- A different user has the same exact user code, so a different one should be selected.
- The panel’s duress code is the same as the user code being entered, so a different user code should be selected or the duress code should be changed.
Note: If the user does not have a preference, click Generate Code to generate a random available code for the user.
Five-button lock keypad
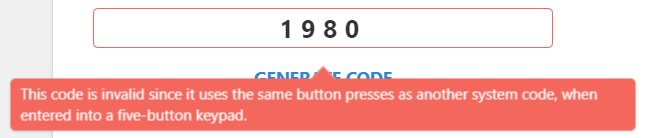
The preceding error appears when a Kwikset lock is attached to the system. Due to some Kwikset locks having two digits per button, there is an entry pattern limitation that decreases the number of possible codes on the system. For example, 1-3-5-7 has the same entry pattern as 2-4-6-8 so only one of these codes would be able to be used at a time. This limitation applies to all Kwikset locks regardless of physical button layout.
Note: This applies to all user codes on the account, not just user codes added to the lock.
Source and support
For GoSafer Security assistance, visit gosafersecurity.com.
Original Alarm.com reference: https://answers.alarm.com/Customer/Website_and_App/User_Management/System_Users/Why_is_the_website_saying_the_user_code_is_invalid
Always verify safety, installation, compatibility, and current UI details against the original manufacturer documentation before operational use.
Add a mobile phone number to receive SMS notifications
GoSafer Security Knowledge Base
This operational reference is organized for GoSafer Security customers and staff. Alarm.com product names are retained where required for technical accuracy.
Overview
Mobile phone numbers can be added to a user's contact information so that they can receive SMS notifications.
| Platform | Customer Website |
|---|---|
| Content type | How-to / Configuration |
| Source last updated | 2025-06-04 |
Procedure
To add a mobile phone number to a user's contact information
- Log in to the GoSafer Security customer portal (powered by Alarm.com).
- Click Users.
- Click [Edit] for the user to edit. If the user is not listed, click Add User to add a new user.
- Verify User Information is correct.
In Contact Information, click Add.
- Click Mobile Number (SMS).
- Enter the user's phone number, select the country of the phone number, and select the phone's cellular provider.
- Click Save.
Note: If you do not have the option to save, you may not have the required login permissions. If you are not seeing the preceding options to add a mobile number, contact your service provider.
For more information about how to configure notifications, see Notifications.
Source and support
For GoSafer Security assistance, visit gosafersecurity.com.
Original Alarm.com reference: https://answers.alarm.com/Customer/Website_and_App/User_Management/Web_App_Users/Add_a_mobile_phone_number_to_receive_SMS_notifications
Always verify safety, installation, compatibility, and current UI details against the original manufacturer documentation before operational use.
Android Quick Access Device Controls
GoSafer Security Knowledge Base
This operational reference is organized for GoSafer Security customers and staff. Alarm.com product names are retained where required for technical accuracy.
Overview
Android Quick Access Device Controls provides Android users with seamless control of their smart devices from the Quick Settings panel.
| Platform | Mobile App |
|---|---|
| Content type | How-to / Configuration |
| Source last updated | 2025-06-04 |
Procedure
Can I control devices while my device is locked?
Yes. Android devices using version 13+ allow certain device types to be controlled without unlocking the device. The ability to control devices while the device is locked is enabled by default and allows non-secure actions to be controlled from the lock screen.
Caution: Enabling control for secure actions (e.g., controlling locks, garage doors, etc) may create security vulnerabilities for their property.
To enable or disable Device Controls from the lock screen
- Log in to the Alarm.com app.
- Tap [More Options].
- Tap Device Controls.
- Tap to select the desired linked system (if applicable).
Use the toggle switches to enable or disable control for the desired devices from the lock screen.
Can I use Quick Access Device Controls alongside linked systems or Enteprise systems?
Yes. Logins with access to multiple systems can enable Quick Acess Device Controls with up to five systems or up to 5 Enterprise systems.
Source and support
For GoSafer Security assistance, visit gosafersecurity.com.
Original Alarm.com reference: https://answers.alarm.com/Customer/Website_and_App/User_Management/Web_App_Users/Android_Quick_Access_Device_Controls
Always verify safety, installation, compatibility, and current UI details against the original manufacturer documentation before operational use.
App settings transfer
GoSafer Security Knowledge Base
This operational reference is organized for GoSafer Security customers and staff. Alarm.com product names are retained where required for technical accuracy.
Overview
The Mobile App Settings Transfer Wizard allows users to maintain consistent service, even when changing over to a new device. Users can easily transfer existing notification and Alarm.com Places location settings to new mobile phones or tablets using the transfer wizard. The wizard also helps users properly remove old devices from their accounts, when applicable, to ensure a smooth transition.
| Platform | App + Web |
|---|---|
| Content type | How-to / Configuration |
| Source last updated | 2025-06-04 |
Procedure
Step-by-step guide: Screenshots and videos are placed with the instruction they illustrate.
The Mobile App Settings Transfer Wizard allows users to maintain consistent service, even when changing over to a new device. Users can easily transfer existing notification and Alarm.com Places location settings to new mobile phones or tablets using the transfer wizard. The wizard also helps users properly remove old devices from their accounts, when applicable, to ensure a smooth transition.
Considerations
- The Passcode, Touch ID, Fingerprint, and Face ID will not transfer. To change these settings, tap Menu and then App Settings.
- This wizard can be accessed by primary account logins and any secondary logins given Master Control permission by the primary login.
- Transfer of Alarm.com Places location settings on iPads is not available.
- The wizard works even if the user switches app stores (i.e., Android to iPhone or the other way around).
To transfer app settings to a new device:
- Log in to the Alarm.com app on the new device. The Alarm.com app will trigger the Alarm.com app settings migration process.
- Tap to select Copy settings from another device on iOS or Copy settings from an existing device on Android.
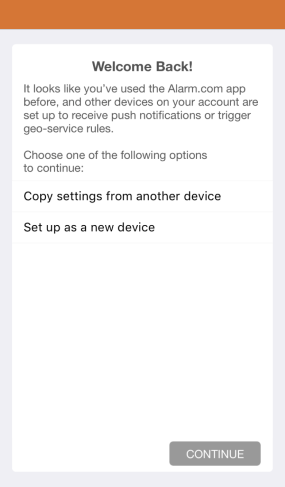
Copy settings
- Tap Continue.
- Tap the device you would like to copy.
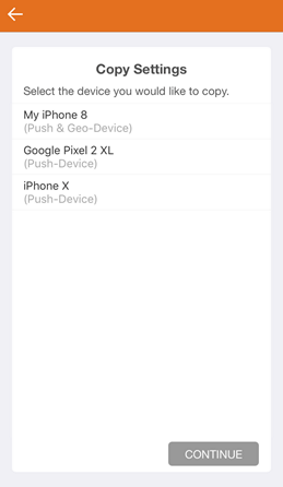
Copy settings 2
- Tap Continue. This process steps through turning on each option available for the device requested to copy settings from.
- For each option, tap Turn On or No Thanks depending on preference.
- If Turn On is selected, tap OK to allow the settings to take effect.
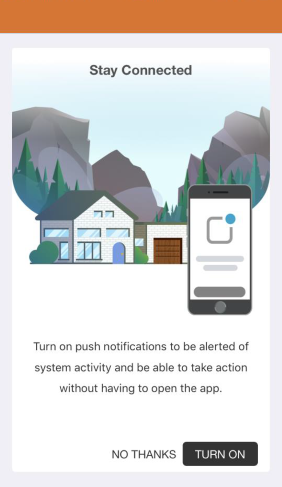
Stay connected 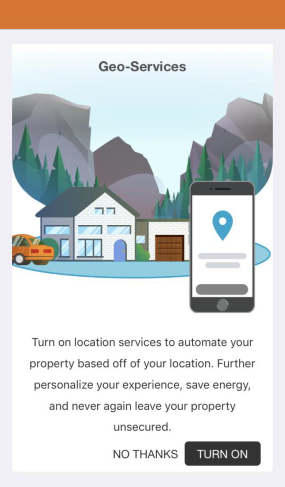
Geo services
- If Turn On is selected, tap OK to allow the settings to take effect.
- Once copying the settings from the old device is completed, select either to remove the old device from the push notifications and Alarm.com Places or keep it active.
Note: If the device is no longer in use, it is recommended to remove the old device to avoid confusion. If the old instance is not deleted, it will still appear under Push Devices, notifications previously set up with the old push device, and as a Geo-Device.- To remove the device, select Remove my old device from this account after my settings have been copied.
- To keep the device, select I want to keep using my old device in addition to the new device, then click Ok.
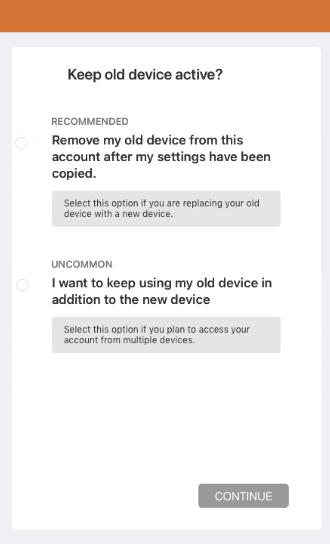
Keep old device active
- Tap Continue.
- Tap Finish.
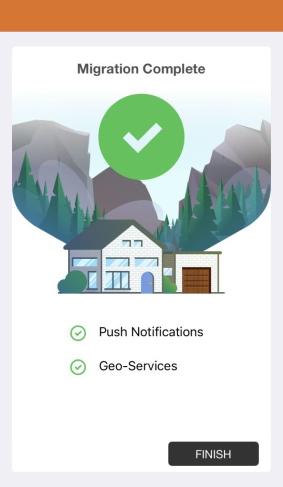
Migration complete
Once the Apps Settings Migration is complete, the initial setup screen will appear.
Important: The Passcode, Touch ID, Fingerprint, and Face ID will not transfer. To change these settings, tap Menu and then App Settings.
Source and support
For GoSafer Security assistance, visit gosafersecurity.com.
Original Alarm.com reference: https://answers.alarm.com/Customer/Website_and_App/User_Management/Web_App_Users/App_settings_transfer
Always verify safety, installation, compatibility, and current UI details against the original manufacturer documentation before operational use.
Best practices when changing phones
GoSafer Security Knowledge Base
This operational reference is organized for GoSafer Security customers and staff. Alarm.com product names are retained where required for technical accuracy.
Overview
When switching to a different phone for any reason, there are a few things to be aware of to ensure minimal disruption of your service. The following are suggestions for information and features that …
| Platform | General / Device |
|---|---|
| Content type | Troubleshooting |
| Source last updated | 2023-10-31 |
Procedure
Primary phone contact
When swapping to a different phone that was associated with the primary login, the primary phone contact on the account should be updated if the number is different. This ensures that the primary contact is up to date in case the primary contact needs to be reached for any reason.
For more information about how to update the primary phone contact, see Change a phone number.
Rules and notifications
The rules and notifications on the account should be updated to reflect any phone swaps that are performed. The new phone should be added to the contact recipients for any desired rules and notifications, and the old phone should be removed from any rules or notifications. This ensures minimal disruption in system usage and notifications.
For more information about how to configure notification recipients, see the following articles
- Add/Configure notification recipients
How can a device start receiving Push Notifications?
How can I create text (SMS) notifications if my cell carrier isn't an option?
Alarm.com Places
When swapping to a different phone, update the list of Geo-Devices that are attached to the account. In this case, delete the old phone from the Geo-Devices list on the account and add the new phone to the list.
For more information about how to configure Alarm.com Places, see Configure Alarm.com Places.
For more information about how to delete a Geo-Device, see Troubleshooting Alarm.com Places.
Two Factor Authentication
When changing phones, the contact information associated with Two Factor Authentication needs to be updated if the feature is enabled for the user's account. To update the contact information that the Two Factor Authentication feature is associated with, disable and then re-enable the feature.
For more information about how to enable and disable Two Factor Authentication, see What is Two Factor Authentication?.
Source and support
For GoSafer Security assistance, visit gosafersecurity.com.
Original Alarm.com reference: https://answers.alarm.com/Customer/Website_and_App/User_Management/Web_App_Users/Best_practices_when_changing_phones
Always verify safety, installation, compatibility, and current UI details against the original manufacturer documentation before operational use.
Can I create multiple logins for my account?
GoSafer Security Knowledge Base
This operational reference is organized for GoSafer Security customers and staff. Alarm.com product names are retained where required for technical accuracy.
Overview
Yes. You can create multiple logins for your account using your GoSafer Security customer portal (powered by Alarm.com) login. There is no limit to the number of logins that can be created for an account. For information about creating a new login, see Create a new login. A system-generated password is sent to the email address that you assigned to the user. They are prompted to update the password upon their initial login to the GoSafer Security customer portal (powered by Alarm.com).
| Platform | Customer Website |
|---|---|
| Content type | How-to / Configuration |
| Source last updated | 2023-11-13 |
Procedure
Yes. You can create multiple logins for your account using your GoSafer Security customer portal (powered by Alarm.com) login. There is no limit to the number of logins that can be created for an account.
For information about creating a new login, see Create a new login.
A system-generated password is sent to the email address that you assigned to the user. They are prompted to update the password upon their initial login to the GoSafer Security customer portal (powered by Alarm.com).
Source and support
For GoSafer Security assistance, visit gosafersecurity.com.
Original Alarm.com reference: https://answers.alarm.com/Customer/Website_and_App/User_Management/Web_App_Users/Can_I_create_multiple_logins_for_my_account
Always verify safety, installation, compatibility, and current UI details against the original manufacturer documentation before operational use.
Can logins have access to only specific system partitions?
GoSafer Security Knowledge Base
This operational reference is organized for GoSafer Security customers and staff. Alarm.com product names are retained where required for technical accuracy.
Overview
Access to specific system partitions can be configured using the GoSafer Security customer portal (powered by Alarm.com). The permission to limit access to specific system partitions can be added to existing logins or when creating a new login. Note: If a login is given access to a partition, it only gains control at the partition level. Full control at the system level (e.g., view History or User Code Management) must be granted with separate login permissions. For more information about managing login permissions, see Manage login permissions for secondary logins.
| Platform | Customer Website |
|---|---|
| Content type | How-to / Configuration |
| Source last updated | 2025-06-04 |
Procedure
To restrict system partition access for an existing system user
- Log in to the GoSafer Security customer portal (powered by Alarm.com).
- Click Users.
- Click the desired user to be edited.
- Click Panels.
In Security Panels, click to toggle the desired system partitions for access.
- Click Save.
To restrict system partition access for an existing login
- Log in to the GoSafer Security customer portal (powered by Alarm.com).
- Click Users.
- Click Manage Logins.
- Click the login name to be edited.
- Click to select Limited Device Access.
- Click to select Remote Arming.
Using the Remote Arming dropdown menu, select the partitions to be controlled.
- Click Save.
Source and support
For GoSafer Security assistance, visit gosafersecurity.com.
Original Alarm.com reference: https://answers.alarm.com/Customer/Website_and_App/User_Management/Web_App_Users/Can_logins_have_access_to_only_specific_system_partitions
Always verify safety, installation, compatibility, and current UI details against the original manufacturer documentation before operational use.
Change a login name
GoSafer Security Knowledge Base
This operational reference is organized for GoSafer Security customers and staff. Alarm.com product names are retained where required for technical accuracy.
Overview
Login names can be changed on the website and app.
| Platform | App + Web |
|---|---|
| Content type | Reference |
| Source last updated | 2025-06-04 |
Procedure
To change a login name using the Alarm.com app
Note: The only login name that can be changed is for the login used to access the Alarm.com app.
- Log in to the Alarm.com app.
- Tap [Menu].
- Tap Login Information.
- Tap Login Name.
- Enter the new login name in the Login Name field.
In the Current Password field, enter your current password.
- Tap Save.
Note: If unable to change the login name, contact your service provider.
To change a login name using the GoSafer Security customer portal (powered by Alarm.com)
Note: The only login name that can be changed is for the login used to access the GoSafer Security customer portal (powered by Alarm.com).
- Log in to the GoSafer Security customer portal (powered by Alarm.com).
- Click Settings.
- Click Login Information.
- Click Login Name.
- Enter the new login name in the Login Name field.
In the Current Password field, enter your current password.
- Click Save.
Note: If unable to change the login name, contact your service provider.
Source and support
For GoSafer Security assistance, visit gosafersecurity.com.
Original Alarm.com reference: https://answers.alarm.com/Customer/Website_and_App/User_Management/Web_App_Users/Change_a_login_name
Always verify safety, installation, compatibility, and current UI details against the original manufacturer documentation before operational use.
Change a phone number
GoSafer Security Knowledge Base
This operational reference is organized for GoSafer Security customers and staff. Alarm.com product names are retained where required for technical accuracy.
Overview
The primary phone number associated with the property location can be changed on the website.
| Platform | App + Web |
|---|---|
| Content type | How-to / Configuration |
| Source last updated | 2025-06-04 |
Procedure
To change the primary account phone number using the Alarm.com app
- Log in to the Alarm.com app.
- Tap [Menu].
- Tap Account Management.
- Tap Account Information.
- Tap Edit.
Note: If unable to edit this information, contact your service provider.
- Enter the new phone number in the Phone Number field.
Note: Updating the primary phone number from an international number requires the country code format and number to be entered before the number (e.g., +1 612-555-1234).
- Tap Update.
To change the primary account phone number using the GoSafer Security customer portal (powered by Alarm.com)
- Log in to the GoSafer Security customer portal (powered by Alarm.com).
- Click Settings.
- Click Account Management.
In Account Information, click Update Account Information.
Note: If unable to edit this information, contact your service provider.
- Enter the new phone number in the Phone Number field.
Note: Updating the primary phone number from an international number requires the country code format and number to be entered before the number (e.g., +1 612-555-1234).
- Click Save.
Source and support
For GoSafer Security assistance, visit gosafersecurity.com.
Original Alarm.com reference: https://answers.alarm.com/Customer/Website_and_App/User_Management/Web_App_Users/Change_a_phone_number
Always verify safety, installation, compatibility, and current UI details against the original manufacturer documentation before operational use.
Change an email address
GoSafer Security Knowledge Base
This operational reference is organized for GoSafer Security customers and staff. Alarm.com product names are retained where required for technical accuracy.
Overview
Keeping email addresses updated helps keep the system secure.
| Platform | App + Web |
|---|---|
| Content type | Reference |
| Source last updated | 2026-06-10 |
Procedure
To change the account primary email address using the Alarm.com app
- Log in to the Alarm.com app using the primary login of the account.
- Tap [Menu].
- Tap Login Information.
- Tap Email Address.
- Enter the new email address in the Email Address field.
In the Current Password field, enter your current password.
- Tap Save.
To change the account primary email address using the GoSafer Security customer portal (powered by Alarm.com)
- Log in to the GoSafer Security customer portal (powered by Alarm.com) using the primary login of the account.
- Click Settings.
- Click Login Information.
In Login Information, click Email Address.
- Enter the new email address in the Email Address field.
In the Current Password field, enter your current password.
- Click Save.
Source and support
For GoSafer Security assistance, visit gosafersecurity.com.
Original Alarm.com reference: https://answers.alarm.com/Customer/Website_and_App/User_Management/Web_App_Users/Change_an_email_address
Always verify safety, installation, compatibility, and current UI details against the original manufacturer documentation before operational use.
Change how the Welcome card appears on the website
GoSafer Security Knowledge Base
This operational reference is organized for GoSafer Security customers and staff. Alarm.com product names are retained where required for technical accuracy.
Overview
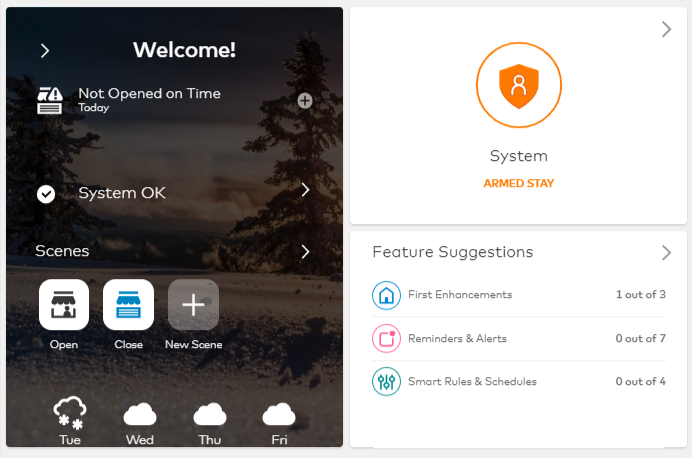
The Welcome card on the GoSafer Security customer portal (powered by Alarm.com) can be collapsed and expanded, but what appears on the card cannot be changed. The following image is an example of how the Welcome card appears by default: Note: If you have video devices, Today's Activity and the weather forecast are replaced by video clips.
| Platform | App + Web |
|---|---|
| Content type | Reference |
| Source last updated | 2025-06-04 |
Procedure
Step-by-step guide: Screenshots and videos are placed with the instruction they illustrate.
The Welcome card on the GoSafer Security customer portal (powered by Alarm.com) can be collapsed and expanded, but what appears on the card cannot be changed.
The following image is an example of how the Welcome card appears by default:
Note: If you have video devices, Today's Activity and the weather forecast are replaced by video clips.
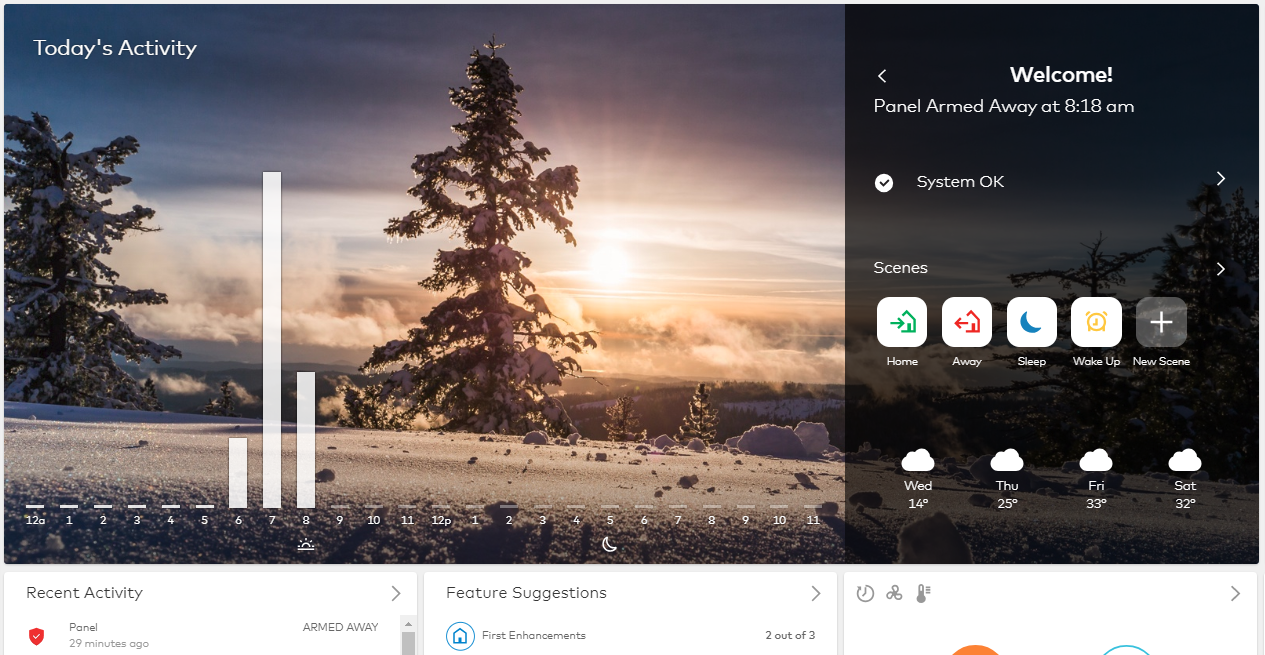
To collapse the Welcome card:
- Log in to the GoSafer Security customer portal (powered by Alarm.com).
- To hide Today's Activity or saved video clips on the Home page, click Collapse on the Welcome card to collapse the section. The system saves the selection for the user's login (e.g., if the user selects to collapse the Welcome card, it stays collapsed when the user logs out and logs back in to view the system).
Note: User logins are not affected by another user login's selection.
The Welcome card can also be hidden. For more information about hiding the Welcome card, see Rearrange Home page of GoSafer Security customer portal (powered by Alarm.com) or Alarm.com app.
Source and support
For GoSafer Security assistance, visit gosafersecurity.com.
Original Alarm.com reference: https://answers.alarm.com/Customer/Website_and_App/User_Management/Web_App_Users/Change_how_the_Welcome_card_appears_on_the_website
Always verify safety, installation, compatibility, and current UI details against the original manufacturer documentation before operational use.
Change language preference
GoSafer Security Knowledge Base
This operational reference is organized for GoSafer Security customers and staff. Alarm.com product names are retained where required for technical accuracy.
Overview
User language preferences change the language of the website and the user's notifications.
| Platform | Customer Website |
|---|---|
| Content type | How-to / Configuration |
| Source last updated | 2025-06-04 |
Procedure
To change the language preference for system users
- Log in to the GoSafer Security customer portal (powered by Alarm.com).
- Click Users.
- Click the desired user name to edit.
- Click Language Preference.
- Click to select the desired language for notifications.
- Click Save.
To change the language preference for a login
- Log in to the GoSafer Security customer portal (powered by Alarm.com) with the login to be edited.
- Click Settings.
- Click Login Information.
- Click Language Preference.
Use the dropdown menu to select the new language preference.
- Click Save.
Source and support
For GoSafer Security assistance, visit gosafersecurity.com.
Original Alarm.com reference: https://answers.alarm.com/Customer/Website_and_App/User_Management/Web_App_Users/Change_language_preference
Always verify safety, installation, compatibility, and current UI details against the original manufacturer documentation before operational use.
Change or reset a password
GoSafer Security Knowledge Base
This operational reference is organized for GoSafer Security customers and staff. Alarm.com product names are retained where required for technical accuracy.
Overview
Updating user passwords for website and app users helps keep the system secure.
| Platform | App + Web |
|---|---|
| Content type | Reference |
| Source last updated | 2025-06-04 |
Procedure
To change your password while logged in using the Alarm.com app
- Log in to the Alarm.com app.
- Tap [Menu].
- Tap Login Information.
- Tap Password.
In the Current Password field, enter the current password.
In the New Password field, enter the new password.
In the Verify Password field, enter the new password again.
- Tap to select Log out all devices if it is desired to log out all devices that are using the current password.
This option is useful when a password change is performed because of a device change or a lost/compromised device.
- Tap Save.
To change your password while logged in using the GoSafer Security customer portal (powered by Alarm.com)
- Log in to the GoSafer Security customer portal (powered by Alarm.com).
- Click Settings.
- Click Login Information.
- Click Password.
In the Current Password field, enter the current password.
In the New Password field, enter the new password.
In the Verify Password field, enter the new password again.
- Click to select Log out all devices if it is desired to log out all devices that are using the current password.
This option is useful when a password change is performed because of a device change or a lost/compromised device.
- Click Save.
To reset your password using the Alarm.com app
- Open the Alarm.com app.
- Tap Forgot username or password.
In Help us recognize you, enter the email address or username associated with the account, then tap Next.
If the information entered is associated with an account, an email is sent with steps to reset your password, or remind you of your username.
Note: If you do not receive the password reset email, check the junk folder and verify that the email address was entered correctly.
- Tap Reset Password.
Note: The password reset email will include any accounts associated with the email address and include the option to reset those account passwords. If there is only one account associated with the email address, the username will be displayed in the email.
Follow the prompts in the email to reset your password.
To reset your password using a web browser
Access the Login Help page.
In Forgot your password?, enter your username, then click Submit.
Note: If you do not know your username, enter your email address in Forgot your username?.
If the information entered is associated with an account, an email is sent with steps to reset your password, or remind you of your username.
Note: If the password reset email is not received, check the junk folder and verify the email address was entered corrected.Click Forgot username password enter your username.
- Click Change Password.
Note: The password reset email will include any accounts associated with the email address and include the option to reset those account passwords. If there is only one account associated with the email address, the username will be displayed in the email.
Follow the prompts in the email to reset your password.
Source and support
For GoSafer Security assistance, visit gosafersecurity.com.
Original Alarm.com reference: https://answers.alarm.com/Customer/Website_and_App/User_Management/Web_App_Users/Change_or_reset_a_password
Always verify safety, installation, compatibility, and current UI details against the original manufacturer documentation before operational use.
Change security questions
GoSafer Security Knowledge Base
This operational reference is organized for GoSafer Security customers and staff. Alarm.com product names are retained where required for technical accuracy.
Overview
Updating security questions and their answers helps keep the system secure.
| Platform | App + Web |
|---|---|
| Content type | How-to / Configuration |
| Source last updated | 2025-06-04 |
Procedure
To update security questions using the Alarm.com app
- Log in to the Alarm.com app.
- Tap [Menu].
- Tap Login Information.
- Tap Security Question.
Using the Security Question dropdown menu, select the security question.
In Answer for Security Question, enter your answer for the selected security question.
In the Current Password field, enter your password.
- Tap Save.
To update security questions using the GoSafer Security customer portal (powered by Alarm.com)
- Log in to the GoSafer Security customer portal (powered by Alarm.com).
- Click Settings.
- Click Login Information.
- Click Security Question.
Using the Security Question dropdown menu, select the security question.
In Answer for Security Question, enter your answer for the selected security question.
In the Current Password field, enter your password.
- Click Save.
Source and support
For GoSafer Security assistance, visit gosafersecurity.com.
Original Alarm.com reference: https://answers.alarm.com/Customer/Website_and_App/User_Management/Web_App_Users/Change_security_questions
Always verify safety, installation, compatibility, and current UI details against the original manufacturer documentation before operational use.
Change the name of a mobile device
GoSafer Security Knowledge Base
This operational reference is organized for GoSafer Security customers and staff. Alarm.com product names are retained where required for technical accuracy.
Overview
The name of a mobile push notification device can be updated using the app or website.
| Platform | App + Web |
|---|---|
| Content type | Reference |
| Source last updated | 2025-11-05 |
Procedure
To change the name of a mobile device using the Alarm.com app
- Log in to the Alarm.com app.
- Tap [Menu].
- Tap App Settings.
- Tap Device Name.
- Enter the desired name for the mobile device.
To change the name of a mobile device using the GoSafer Security customer portal (powered by Alarm.com)
- Log in to the GoSafer Security customer portal (powered by Alarm.com).
- Click Settings.
- Click Manage Devices.
In Mobile Devices, click the desired mobile device.
- Enter the desired name for the mobile device.
- Click OK.
Source and support
For GoSafer Security assistance, visit gosafersecurity.com.
Original Alarm.com reference: https://answers.alarm.com/Customer/Website_and_App/User_Management/Web_App_Users/Change_the_name_of_a_mobile_device
Always verify safety, installation, compatibility, and current UI details against the original manufacturer documentation before operational use.
Configure a number passcode for the app
GoSafer Security Knowledge Base
This operational reference is organized for GoSafer Security customers and staff. Alarm.com product names are retained where required for technical accuracy.
Overview
You can set up an optional passcode lock in the settings of the Alarm.com app. Once enabled, there is a prompt asking for a four-digit code before accessing the Alarm.com app. Note: Enabling the passcode option keeps you logged into the Alarm.com app, but prompts a passcode every time the Alarm.com app is opened.
| Platform | Mobile App |
|---|---|
| Content type | Troubleshooting |
| Source last updated | 2025-08-01 |
Procedure
- Enable the passcode
The passcode for the Alarm.com app can be enabled using the Alarm.com app.
To enable the passcode
- Log in to the Alarm.com app.
- Tap [Menu].
- Tap App Settings.
- Tap Passcode.
- Tap the Passcode Access toggle switch to enable the feature.
Note: If the Keep my logged in option is not enabled when logging in, there is a prompt to enter your password before enabling the desired passcode.
- Enter in the desired four-digit passcode, and then re-enter the passcode to verify it.
Note: The passcode can be any four-digit number.
Passcode access is now enabled, so now any time the Alarm.com app is opened on the device, it prompts to enter the established four-digit passcode to access the Alarm.com app.
Note: The passcode can be updated by disabling it and then re-enabling it.
- Disable the passcode
The passcode can be disabled using the Alarm.com app. It can be disabled using the passcode or without it.
Note: After five failed passcode attempts, the Alarm.com app disables Passcode Access on the device due to too many incorrect attempts and returns the user to the standard login page.
To disable the passcode using the passcode
- Log in to the Alarm.com app.
- Tap [Menu].
- Tap App Settings.
- Tap Passcode.
- Tap the Passcode Access toggle switch to disable the feature.
- Enter the current passcode to disable the feature.
To disable the passcode without the passcode
- Tap to open the Alarm.com app.
On the Enter your passcode page, tap Cancel.
- Tap Log Out to turn off Passcode Access on the device and return to the standard login page.
Source and support
For GoSafer Security assistance, visit gosafersecurity.com.
Original Alarm.com reference: https://answers.alarm.com/Customer/Website_and_App/User_Management/Web_App_Users/Configure_a_number_passcode_for_the_app
Always verify safety, installation, compatibility, and current UI details against the original manufacturer documentation before operational use.
Contact your service provider
GoSafer Security Knowledge Base
This operational reference is organized for GoSafer Security customers and staff. Alarm.com product names are retained where required for technical accuracy.
Overview
If you are unable to find an answer to your question in the Knowledge Base, you can contact your service provider for further assistance.
| Platform | App + Web |
|---|---|
| Content type | Reference |
| Source last updated | 2026-05-21 |
Procedure
To contact your service provider using the Alarm.com app
- Log in to the Alarm.com app.
- Tap [Menu].
- Tap Support.
- Select the desired way to contact your service provider:
Note: Depending on your service provider, all four options may not be available. If you are unable to contact your service provider, tap Help Documentation to access the Knowledge Base and enter a brief description of the device, its behavior, or identifying model number if applicable.
- Tap Phone Number to view the contact information to contact your service provider.
- Tap Email to send an email to your service provider.
- Tap Support Website to visit your service provider's website.
- Tap Support Ticket to provide the requested information in a ticket.
In the Name field, enter your name.
In the Email field, enter your email address.
In the Phone field, enter your phone number.
In the Subject field, enter a subject for the service request.
Using the Category dropdown menu, select the service request category.
Note: Selecting a category is not required, but it is recommended.
- Tap Help Documentation to access a knowledge base for answers to common questions.
To contact your service provider using the GoSafer Security customer portal (powered by Alarm.com)
- Log in to the GoSafer Security customer portal (powered by Alarm.com).
- Click Support.
- Select the desired way to contact your service provider:
Note: Depending on your service provider, all four options may not be available. If you are unable to contact your service provider, click Help Documentation to access the Knowledge Base and enter a brief description of the device, its behavior, or identifying model number if applicable.
- Click Phone Number to view the contact information to contact your service provider.
- Click Email to send an email to your service provider.
- Click Support Website to visit your service provider's website.
- Click Support Ticket to provide the requested information in a ticket.
In the Name field, enter your name.
In the Email field, enter your email address.
In the Phone field, enter your phone number.
In the Subject field, enter a subject for the service request.
Using the Category dropdown menu, select the service request category.
Note: Selecting a category is not required, but it is recommended.
In the Description field, provide details about the service request.
- Click Submit.
Source and support
For GoSafer Security assistance, visit gosafersecurity.com.
Original Alarm.com reference: https://answers.alarm.com/Customer/Website_and_App/User_Management/Web_App_Users/Contact_your_service_provider
Always verify safety, installation, compatibility, and current UI details against the original manufacturer documentation before operational use.
Create a secondary login
GoSafer Security Knowledge Base
This operational reference is organized for GoSafer Security customers and staff. Alarm.com product names are retained where required for technical accuracy.
Overview
Individual logins for each website and app user can be created from the website.
| Platform | App + Web |
|---|---|
| Content type | How-to / Configuration |
| Source last updated | 2025-06-04 |
Procedure
Step-by-step guide: Screenshots and videos are placed with the instruction they illustrate.
Individual logins for GoSafer Security customer portal (powered by Alarm.com) and Alarm.com app users can only be created using the GoSafer Security customer portal (powered by Alarm.com). If the desired login name is not accepted, it may already be in use. For more information about login requirements, see What are the login name and password requirements?.
There is no limit to the number of logins that can be created. For information about creating a login for an Enterprise group, see Create a new group login.
Note: Only logins with Master Control permissions can create new logins. For further assistance, contact the account administrator.
To create a secondary login:
- Log in to the GoSafer Security customer portal (powered by Alarm.com).
- Click Users.
- Click Manage Logins.
- Click Add a Login.
- In the Email Address field, enter the new login's email address.
- In the Login Name field, enter the desired login name.
- Using the Language Preference dropdown menu, select the desired language preference.
- Click Save.
- On the Manage Login Permissions page, select either Master Control, Full Control, Read Only, Limited Device Access, or Custom. This will give the login permission to access various website features. For a description of each permission, see Permissions.
- If no permissions are selected and saved:
- On the GoSafer Security customer portal (powered by Alarm.com), the login is able to view only the welcome card, sensors, and activity. The login is not able to perform any changes except to their Login Information.
- On the Alarm.com app, the login is able to view only trouble alerts, weather, and history. The login is not able to perform any changes except to their App Settings.
- If no permissions are selected and saved:
- Click Save.
Note: New logins receive an email containing their login name, a link to set up a new password, and a link to download the Alarm.com app. If this email is not being received, confirm the email address for the new login is entered correctly and/or have the user check their junk/spam folder. The email link is valid for 24 hours.
Permissions
| Permission | Description |
|---|---|
| Master Control | Logins with Master Control will have all of the permissions of the primary account user, including the ability to manage website logins and change profile information such as the primary email address and phone number for the account. Master Control logins will not receive certain types of account notifications that go only to the primary user (e.g., user code changes and invalid email addresses for secondary contacts). |
| Full Control | Logins with Full Control will have all of the Full Control permissions described in the Custom permissions sections, along with most of the GoSafer Security customer portal (powered by Alarm.com) and mobile app functionality available to the primary account user. They will not have the ability to manage website logins, and they will not receive certain types of account notifications that go only to the primary user (e.g., user code changes and invalid email addresses for secondary contacts). |
| Read Only | Logins with Read Only permissions will be able to see most of the GoSafer Security customer portal (powered by Alarm.com) pages and settings for the account, including the User Codes and Live/Saved Video pages, but will not be able to make any changes to account settings, arming state, device status or view saved video. These logins cannot see the Manage Logins page. |
| Limited Device Access | Logins with limited device access will only be able to control and observe the specified devices. Note: Access to view the account's activity (i.e., Activity, Reports, Wellness, etc.) is restricted on the GoSafer Security customer portal (powered by Alarm.com) and app when the Limited Device Access permission is chosen.
|
| Custom | You can create a Custom role to fit your exact requirements for this login. Use the checkboxes below to include a specific type of permission, and then decide what level of control to provide the login (Read Only or Full Control). You can always come back and change this in the future. Note: You will be able to view additional website and mobile content not listed in the Custom permissions, such as current system status, system history, their own password settings, and the system equipment list.
|
Source and support
For GoSafer Security assistance, visit gosafersecurity.com.
Original Alarm.com reference: https://answers.alarm.com/Customer/Website_and_App/User_Management/Web_App_Users/Create_a_secondary_login
Always verify safety, installation, compatibility, and current UI details against the original manufacturer documentation before operational use.
Delete a login
GoSafer Security Knowledge Base
This operational reference is organized for GoSafer Security customers and staff. Alarm.com product names are retained where required for technical accuracy.
Overview
Deleting unused website and app logins helps keep the system secure.
| Platform | Customer Website |
|---|---|
| Content type | How-to / Configuration |
| Source last updated | 2025-06-04 |
Procedure
To delete a login
Note: Deleting a secondary login that was created through linked logins will remove access to the current account, but it will not delete the login. For more information on linked logins, see How can multiple account systems be linked?.
- Log in to the GoSafer Security customer portal (powered by Alarm.com).
- Click Users.
- Click Manage Logins.
- Click [Delete] for the login name to be deleted.
If the delete option does not display, your login may not have permissions for login management. Contact the user with access to the primary login to remove a login.
Note: The primary login cannot be deleted and deleted logins cannot be recovered. If the primary login name or email address needs to be updated, see Change a login name or Change an email address.
Source and support
For GoSafer Security assistance, visit gosafersecurity.com.
Original Alarm.com reference: https://answers.alarm.com/Customer/Website_and_App/User_Management/Web_App_Users/Delete_a_login
Always verify safety, installation, compatibility, and current UI details against the original manufacturer documentation before operational use.
Do the app and website update in real time?
GoSafer Security Knowledge Base
This operational reference is organized for GoSafer Security customers and staff. Alarm.com product names are retained where required for technical accuracy.
Overview
Yes. The Alarm.com app and GoSafer Security customer portal (powered by Alarm.com) will display updated statuses for various devices in real time (e.g., security panel arming state, access control doors, most energy and automation devices, etc.). The Alarm.com app and GoSafer Security customer portal (powered by Alarm.com) can also be manually refreshed to view updated statuses for other devices. For more information about device types and events that update in real time, see Events that will update in real-time. Note: If a system condition is still present after refreshing, it may still be active and may need to be resolved or dismissed. Contact your service provider for assistance. For help reaching your service provider, see Contact your service provider.
| Platform | App + Web |
|---|---|
| Content type | How-to / Configuration |
| Source last updated | 2023-11-09 |
Procedure
Step-by-step guide: Screenshots and videos are placed with the instruction they illustrate.
Yes. The Alarm.com app and GoSafer Security customer portal (powered by Alarm.com) will display updated statuses for various devices in real time (e.g., security panel arming state, access control doors, most energy and automation devices, etc.). The Alarm.com app and GoSafer Security customer portal (powered by Alarm.com) can also be manually refreshed to view updated statuses for other devices.
Important: The Alarm.com app requires a minimum version of 4.21.26 for Android and 4.21.28 for iOS to update statuses in real time.
For more information about device types and events that update in real time, see Events that will update in real-time.
Note: If a system condition is still present after refreshing, it may still be active and may need to be resolved or dismissed. Contact your service provider for assistance. For help reaching your service provider, see Contact your service provider.
Manually refresh the Alarm.com app or GoSafer Security customer portal (powered by Alarm.com)
To manually refresh the Alarm.com app:Icn Chevron Down
Swipe down on the screen. A refreshing icon will become visible and will spin before refreshing the Alarm.com app.
To manually refresh the GoSafer Security customer portal (powered by Alarm.com):Icn Chevron Down
Click Icn Refresh on any page in the GoSafer Security customer portal (powered by Alarm.com).
Events that will update in real-time
The following device types and events will update in real time:
Note: To view the updated statuses for device types and events not listed below, manually refresh the Alarm.com app or GoSafer Security customer portal (powered by Alarm.com). For more information, see Manually refresh the Alarm.com app or GoSafer Security customer portal (powered by Alarm.com).
| Device Type | Event | State change |
|---|---|---|
|
Access Control |
Door Locked, Door Unlocked, Door Buzzed Open | Door Locked, Door Unlocked |
|
Garage Doors |
Gate Opened, Gate Closed | Gate Opened, Gate Closed |
|
Gates |
Gate Opened, Gate Closed | Gate Opened, Gate Closed |
|
Lights |
Dimmer Change (for dimmer bulbs), Light On, Light Off | Dimmer Change (for dimmer bulbs), Light On, Light Off, Color Change (for color bulbs) |
|
Locks |
Locked, Unlocked | Locked, Unlocked |
|
Partitions |
Armed Away, Armed Stay, Disarmed, Armed Night, Alarm, Police Panic |
Armed Away, Armed Stay, Disarmed, Armed Night Note: An alarm event should generate a banner message on the GoSafer Security customer portal (powered by Alarm.com) in real time if an alarm occurs. |
|
Remote Temperature Sensors |
N/A | Ambient Temperature Value |
|
Sensors (contact sensor, motion sensor) |
Open (contact), Close (contact), Idle (Motion), Active (Motion), Opened/Closed | Open (contact), Close (contact), Idle (Motion), Active (Motion) |
|
Shades |
Closed, Opened | Closed, Opened, Shade level change (% open the shade is) |
|
Sump Pumps |
Idle, Normal Operation, Possible Issue, Pump in Malfunction, Pump Not Running | Idle, Normal Operation, Possible Issue, Pump in Malfunction, Pump Not Running |
|
Thermostat |
Mode changed to Heat, Mode changed to Cool, Mode changed to Auto, Mode changed to Off, Setpoint value changed | Mode changed to Heat, Mode changed to Cool, Mode changed to Auto, Mode changed to Off, Setpoint value changed, Fan mode changed |
|
Water Sensor |
Wet, Dry | Wet, Dry |
|
Water Valve |
Valve Open, Valve Closed | Valve Open, Valve Closed |
Source and support
For GoSafer Security assistance, visit gosafersecurity.com.
Original Alarm.com reference: https://answers.alarm.com/Customer/Website_and_App/User_Management/Web_App_Users/Do_the_app_and_website_update_in_real_time
Always verify safety, installation, compatibility, and current UI details against the original manufacturer documentation before operational use.
Enable Two Factor Authentication
GoSafer Security Knowledge Base
This operational reference is organized for GoSafer Security customers and staff. Alarm.com product names are retained where required for technical accuracy.
Overview
Two Factor Authentication adds an extra layer of security to protect access to your system.
| Platform | App + Web |
|---|---|
| Content type | How-to / Configuration |
| Source last updated | 2025-06-04 |
Procedure
Step-by-step guide: Screenshots and videos are placed with the instruction they illustrate.
Note: Two Factor Authentication can be referred to as 2FA, Multi-Factor Authentication, or MFA.
Two Factor Authentication adds an extra layer of security to protect access to your system. This makes it harder for potential intruders to gain access to your system, so your system and your property are even more secure. Whenever you sign into your system from a new or untrusted device, you will have to enter both your password and a code sent to your mobile phone.
Enable or disable Two Factor Authentication
Two Factor Authentication can be enabled or disabled using the Alarm.com app and GoSafer Security customer portal (powered by Alarm.com).
Note: If Two Factor Authentication is enabled, all active sessions on the Alarm.com app and GoSafer Security customer portal (powered by Alarm.com) will end. Two Factor Authentication will be required to log back in.
To enable or disable Two Factor Authentication for a login using the Alarm.com app: Icn Chevron Down
Note: If you have changed your phone number or email address, see If you change your cell carrier, phone number, or email address.
- Log in to the Alarm.com app.
- Tap Menu.
- Tap Login Information.
- Tap Two Factor Authentication.
- To disable Two Factor Authentication, tap Disable and then tap Confirm.
Note: Two Factor Authentication may be required or suggested by your service provider. For additional assistance, contact your service provider. - To enable Two Factor Authentication, select Text Message, Email, or Authentication app.
Note: It is recommended to set up Two Factor Authentication using multiple methods. If multiple methods cannot be enabled, contact your service provider- To enable Two Factor Authentication for text message:
- Tap Text Message.
- Tap Next.
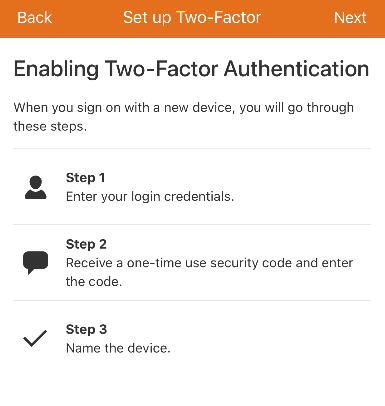
Mobile Two Factor Authentication Enable
- In Mobile Number, enter the mobile number to receive the Two Factor Authentication confirmation code.
- Using the Country dropdown menu, select either USA or Canada.
- Using the Provider dropdown menu, select the cellular carrier of the mobile phone number that will receive the Two Factor Authentication confirmation code.
Note: The Provider dropdown menu displays the full list of Two Factor Authentication compatible cellular carriers.- If the carrier is not listed, select Other.
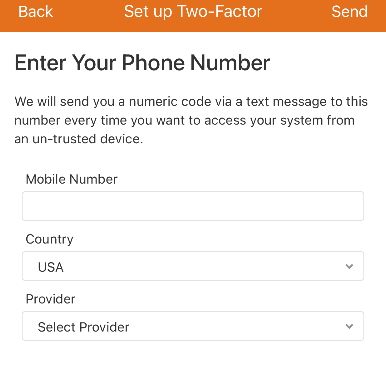
Mobile Two Factor Authentication Phone Number
Note: This displays the full list of Two Factor Authentication compatible cellular carriers.
- If the carrier is not listed, select Other.
- Tap Send to send the verification code to the mobile number entered.
- In Verification Code, enter the code that is provided in a text message to the mobile number entered.
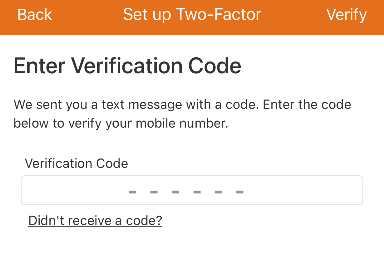
Mobile Two Factor Authentication Verification Code
- Tap Verify.
- To enable Two Factor Authentication for email:
- Tap Email.
- In Send Verification Code, verify the correct email is displayed. For more information about how to update the email address, see Change an email address.
- Tap Send.
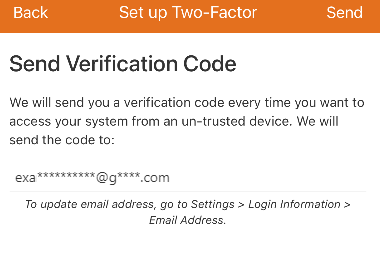
Mobile Two Factor Authentication Email
- In Verification Code, enter the code that is provided in the received email.
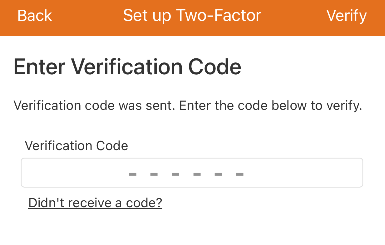
Mobile Two Factor Authentication Email Code
- Tap Verify.
- To enable Two Factor Authentication using an authentication app:
Important: An authenticator app is required to complete this process and the steps may vary based on the authenticator app in use.- Tap Authentication App.
- Generate an authentication code:
Note: The Duo authenticator app may experience unexpected behavior and it is recommended to use an alternative authenticator app.- Use an authenticator app to scan the QR code or manually enter the code provided on the Alarm.com app or GoSafer Security customer portal (powered by Alarm.com) into the authenticator app.
- In the Enter Code field, enter the code that is generated on the authenticator app to verify the device.
- Click Next.
- To enable Two Factor Authentication for text message:
- In Device Name, enter the desired name for the device that will be trusted.
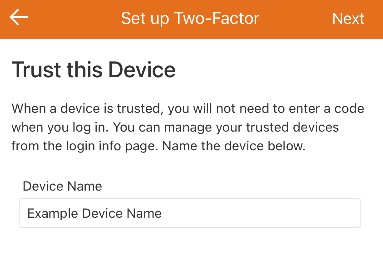
Mobile Two Factor Authentication Trust this Device
- Tap Next.
- In Linked Devices, tap Trust next to any additional devices that can be trusted.
- Tap Done.
To enable or disable Two Factor Authentication for a login using the GoSafer Security customer portal (powered by Alarm.com):Icn Chevron Down
Note: If you have changed your phone number or email address, see If you change your cell carrier, phone number, or email address.
- Log in to the GoSafer Security customer portal (powered by Alarm.com).
- Click Settings.
- Click Login Information.
- Click Two Factor Authentication.
- To disable Two Factor Authentication, click Disable.
Note: Two Factor Authentication may be required or suggested by your service provider. For additional assistance, contact your service provider. - To enable Two Factor Authentication, select Text Message, Email, or Authentication app.
Note: It is recommended to set up Two Factor Authentication using multiple methods. If multiple methods cannot be enabled, contact your service provider.- To enable Two Factor Authentication for text message:
- Click Text Message.
- Click Next.
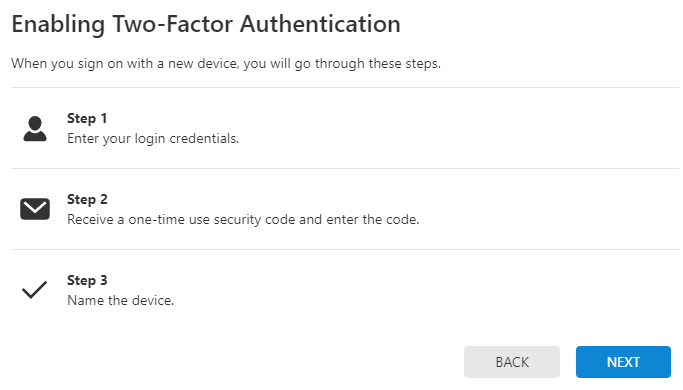
Two Factor Authentication GoSafer Security customer portal
- In Mobile Number, enter the mobile number to receive the Two Factor Authentication confirmation code.
- Using the Country dropdown menu, select either USA or Canada.
- Using the Provider dropdown menu, select the cellular carrier of the mobile phone number that will receive the Two Factor Authentication confirmation code.
Note: The Provider dropdown menu displays the full list of Two Factor Authentication compatible cellular carriers.- If the carrier is not listed, select Other.
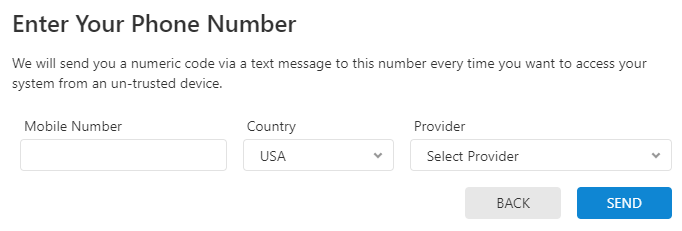
Two Factor Authentication Phone Number
- If the carrier is not listed, select Other.
- Click Send to send a verification code to the mobile number.
- In Verification Code, enter the code that is provided in a text message to the mobile number.
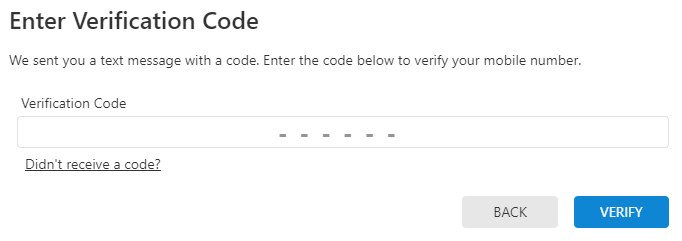
Two Factor Authentication Verification Code
- Click Verify.
- To enable Two Factor Authentication for email:
- Click Email.
- In Send Verification Code, verify the correct email is displayed. For more information about how to update the email address, see Change an email address.
- Click Send.
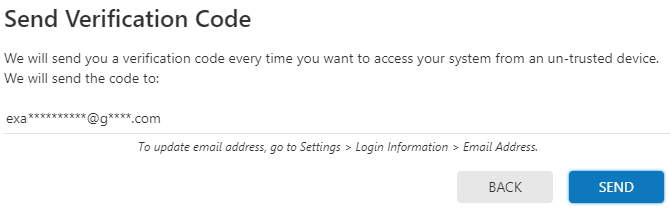
Two Factor Authentication Email Code
- In Verification Code, enter the code that is provided in the received email.
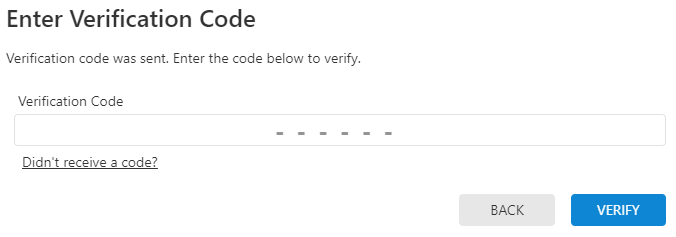
Two Factor Authentication Email Code Sent
- Click Verify.
- To enable Two Factor Authentication using an authentication app:
Important: A mobile device with an authenticator app is required to complete this process and the steps may vary based on the authenticator app in use.- Click Authentication App.
- Generate an authentication code:
Note: The Duo authenticator app may experience unexpected behavior and it is recommended to use an alternative authenticator app.- Use a mobile device with an authenticator app to scan the QR code or manually enter the code provided on the Alarm.com app or GoSafer Security customer portal (powered by Alarm.com) into the authenticator app.
- In the Enter Code field, enter the code that is generated on the authenticator app to verify the device.
- Click Next.
- To enable Two Factor Authentication for text message:
- In Device Name, enter the desired name for the device that is accessing the account.
- If the device is trusted, click to select Trust This Device.
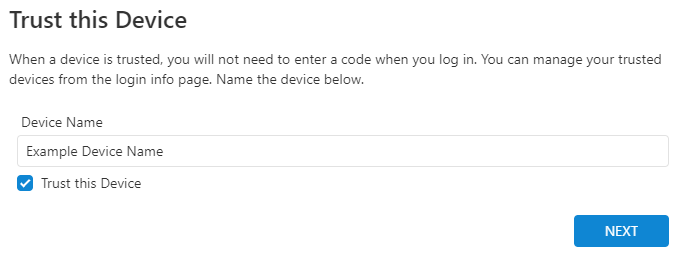
Two Factor Authentication Trust Device
- If the device is trusted, click to select Trust This Device.
- Click Next.
- In Linked Devices, click Trust next to any additional devices that can be trusted.
- Click Done.
Manage trusted devices
To manage trusted devices using the Alarm.com app:Icn Chevron Down
- Log in to the Alarm.com app.
- Tap Menu.
- Tap Login Information.
- Tap Two Factor Authentication.
- Tap Details next to the device name.
- Make the desired changes:
- To rename the device, enter the desired device name, then tap Save.
- To delete the device, click Delete Trusted Device, then tap Confirm.
To manage trusted devices using the GoSafer Security customer portal (powered by Alarm.com):Icn Chevron Down
- Log in to the GoSafer Security customer portal (powered by Alarm.com).
- Click Settings.
- Click Login Information.
- Click Two Factor Authentication.
- Click Details next to the device name.
- Make the desired changes:
- To rename the device, enter the desired device name, then click Save.
- To delete the device, click Delete Trusted Device, then click Confirm.
If you change your cell carrier or no longer have access to the phone number or authenticator app:
If you change your cell carrier or no longer have access to the phone number or authenticator app, Two-Factor Authentication can be reset using email. For more information, see Reset Two-Factor Customer.
If email Two Factor Authentication is set up and you no longer have access to your email address, contact your service provider for assistance with resetting your Two-Factor Authentication configuration.
Reset Two Factor Authentication
Two Factor Authentication can be reset using the Alarm.com app or GoSafer Security customer portal (powered by Alarm.com).
To reset Two Factor Authentication:Icn Chevron Down
- Log in to the Alarm.com app or GoSafer Security customer portal (powered by Alarm.com).
- In Enter Verification Code, click or tap Down next to Don't have access to your device?.
- Select to reset Two-Factor Authentication or to contact your service provider:
- If you have access to your email address associated with the login:
- In Option 1: Reset Two-Factor Authentication, tap or click Reset 2FA to send a reset link to the email address associated with the login.
- If you do not have access to your email address associated with the login:
- In Option 2: Contact your Service Provider, use the contact information listed to contact your service provider.
- If you have access to your email address associated with the login:
Note: The ability to reset your own Two-Factor Authentication configuration is only available to users using SMS or an authenticator application.
Source and support
For GoSafer Security assistance, visit gosafersecurity.com.
Original Alarm.com reference: https://answers.alarm.com/Customer/Website_and_App/User_Management/Web_App_Users/Enable_Two_Factor_Authentication
Always verify safety, installation, compatibility, and current UI details against the original manufacturer documentation before operational use.
Export panel slot numbers for a single location
GoSafer Security Knowledge Base
This operational reference is organized for GoSafer Security customers and staff. Alarm.com product names are retained where required for technical accuracy.
Overview
The panel slot numbers report shows all users and user codes associated with the system at a single location.
| Platform | Customer Website |
|---|---|
| Content type | Reference |
| Source last updated | 2025-06-04 |
Procedure
To export panel slot numbers
- Log in to the GoSafer Security customer portal (powered by Alarm.com).
If using an Enterprise group, select a specific location.
- Click User Access.
- Click Users.
- Click to expand More.
- Click Export Panel Slot Numbers. This downloads a list of all the users on the system as a.csv file to your computer.
Source and support
For GoSafer Security assistance, visit gosafersecurity.com.
Original Alarm.com reference: https://answers.alarm.com/Customer/Website_and_App/User_Management/Web_App_Users/Export_panel_slot_numbers_for_a_single_location
Always verify safety, installation, compatibility, and current UI details against the original manufacturer documentation before operational use.
How can I set up Touch ID or Face ID for iOS?
GoSafer Security Knowledge Base
This operational reference is organized for GoSafer Security customers and staff. Alarm.com product names are retained where required for technical accuracy.
Overview
Touch ID is an alternative for passcode access to the Alarm.com app. This is another method to help with securing access to the Alarm.com app in case the device is lost or stolen.
| Platform | Mobile App |
|---|---|
| Content type | Troubleshooting |
| Source last updated | 2025-06-04 |
Procedure
Compatibility
Touch ID is compatible with the following iOS devices
iPhone 5s or later
iPad Air 2
iPad Mini 3 or later
Face ID is compatible with the following iOS devices
iPhone X or later
To enable the Touch ID or Face ID login feature for the Alarm.com app
- Log in to the app.
- Tap [Menu].
- Tap App Settings.
- Tap Touch ID & Passcode (or Face ID & Passcode, if available).
- Tap the Touch ID (or Face ID, if available) toggle switch to enable the feature. This uses the Touch ID or Face ID that is already set up in the iOS device's settings.
If Touch ID or Face ID is not currently set up in the iOS device's settings
Exit out of the app, then tap to open the device's Settings application.
- Tap Touch ID & Passcode (or Face ID & Passcode, if available).
- Enter the passcode for your iOS device.
- Add the fingerprint for Touch ID or face for Face ID, then navigate back to the app to complete the steps to enable Touch ID or Face ID.
- Enter in the desired four-digit passcode as a backup if the alternate ID fails, and then re-enter the passcode to verify it.
Note: The passcode can be any four-digit number.
- Tap OK.
Touch ID or Face ID access is now enabled, so now any time the app is opened on the device, it prompts to scan your finger or face. You must use one of the fingers that was used to set up Touch ID on the device itself.
Note: If Touch ID (or Face ID) is disabled through the iOS Settings and the app is opened, the app asks for the four-digit passcode that was set up as the backup.
To disable Touch ID or Face ID for the Alarm.com app
- Log in to the app.
- Tap [Menu].
- Tap App Settings.
- Tap Touch ID & Passcode (or Face ID & Passcode, if available).
- Tap the Touch ID (or Face ID, if available) toggle switch to disable the feature.
If you also want to disable the passcode, tap the Passcode Access toggle switch and then enter the current passcode to disable it.
If the Touch ID of Face ID fails and you do not remember the passcode
- Tap to open the app.
On the Enter your passcode page, tap Cancel.
- Tap Log Out to turn off Passcode Access on the device and return to the standard login page.
Otherwise, after five failed passcode attempts, the app turns off Touch ID & Passcode Access on the device due to too many incorrect attempts and returns to the standard login page.
Source and support
For GoSafer Security assistance, visit gosafersecurity.com.
Original Alarm.com reference: https://answers.alarm.com/Customer/Website_and_App/User_Management/Web_App_Users/How_can_I_set_up_Touch_ID_for_iOS
Always verify safety, installation, compatibility, and current UI details against the original manufacturer documentation before operational use.
How can I set up fingerprint scanning on Android?
GoSafer Security Knowledge Base
This operational reference is organized for GoSafer Security customers and staff. Alarm.com product names are retained where required for technical accuracy.
Overview
As of app version 4.0, the app now supports fingerprint scanning on Android as an alternative for passcode access. This is another method to help with securing access to the app in case the device is lost or stolen.
| Platform | Mobile App |
|---|---|
| Content type | How-to / Configuration |
| Source last updated | 2025-06-04 |
Procedure
Step-by-step guide: Screenshots and videos are placed with the instruction they illustrate.
As of app version 4.0, the app now supports fingerprint scanning on Android as an alternative for passcode access. This is another method to help with securing access to the app in case the device is lost or stolen.
Compatibility
Android fingerprint scanning is compatible with the following Android devices running Android OS version 6.0+ with the app version 4.0+:
- Nexus 5X
- Nexus 6P
- Google Pixel
- Samsung Galaxy S7 (all versions)
Android fingerprint scanning may be compatible with other Android phones that have a fingerprint scanner. It is likely that an Android phone that was launched on Android 6 (Marshmallow) would be able to support this feature.
The determining factor is whether or not the device's firmware allows the fingerprint scanner to be accessed by apps. The previously listed devices all allow the fingerprint scanner to be accessed by apps, but older devices may not. It's possible that a device that once did not allow the fingerprint scanner to be accessed by apps may start allowing the fingerprint scanner to be accessed by apps after an Android OS update.
To verify if the device meets these requirements, test the fingerprint scanning functionality or contact the device manufacturer.
To set up Fingerprint Scanning on the Alarm.com app:
- Log in to the Alarm.com app.
- Tap Icn Menu.
- Tap App Settings.
- In App Settings, tap Passcode & Fingerprint.
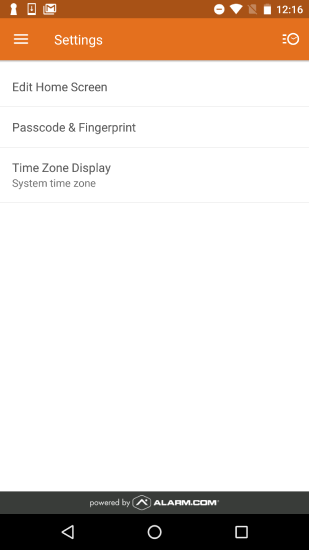
Settings
- In Passcode & Fingerprint, tap the fingerprint toggle to turn on Fingerprint Scanning.
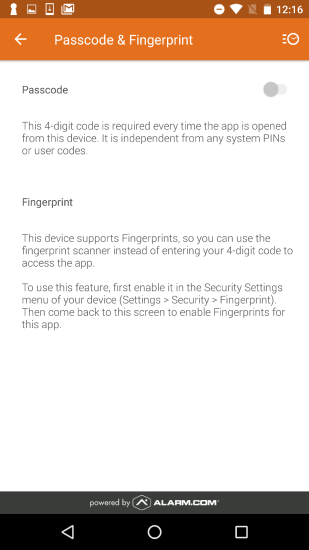
Passcode Off No Fingerprint
- Fingerprints can be added into Android phones by going to performing the following:
- Navigate to the device's Settings.
- Tap Security.
- Tap Fingerprint. Swipe the button to the right to enable.
- Fingerprints can be added into Android phones by going to performing the following:
- Enter in the desired four-digit passcode as a backup if the fingerprint fails, and then re-enter the passcode to verify it.
Note: The passcode can be any four-digit number.
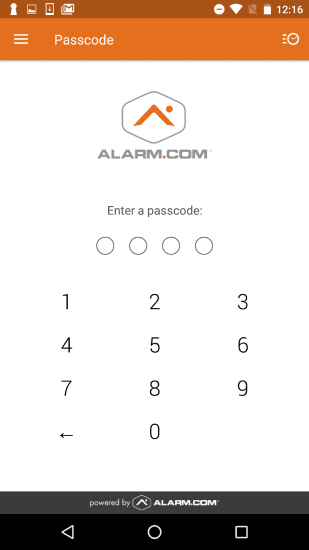
Enter Passcode
- Once passcode access is enabled and a fingerprint has been added to the phone, tap the fingerprint toggle to turn on Fingerprint Scanning.
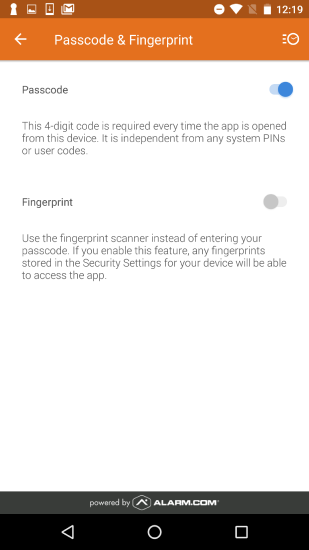
Only Passcode On
- To disable the feature, go back to the Passcode & Fingerprint page in the app and tap the fingerprint toggle to the left position. You will have to enter your passcode to disable the feature.
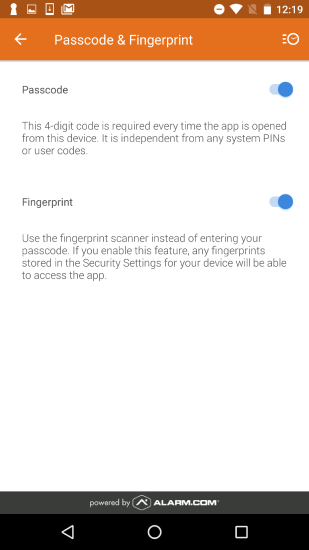
Both On
Source and support
For GoSafer Security assistance, visit gosafersecurity.com.
Original Alarm.com reference: https://answers.alarm.com/Customer/Website_and_App/User_Management/Web_App_Users/How_can_I_set_up_fingerprint_scanning_on_Android
Always verify safety, installation, compatibility, and current UI details against the original manufacturer documentation before operational use.
How do I change the language of the customer app?
GoSafer Security Knowledge Base
This operational reference is organized for GoSafer Security customers and staff. Alarm.com product names are retained where required for technical accuracy.
Overview
The language of the Alarm.com app is determined by the system language setting of the mobile device. Example: If the device is an iPhone with a system language of French, the Alarm.com app will display in French.
| Platform | App + Web |
|---|---|
| Content type | How-to / Configuration |
| Source last updated | 2025-07-28 |
Procedure
The following languages are available for the Alarm.com app
English
Spanish
Portuguese
French
Hebrew
Turkish
Icelandic
Dutch
Norwegian
Swedish
Japanese
Finnish
Danish
Italian
Thai
German
Polish
Arabic
Bahasa
For more information about changing the system language of the device, contact the device manufacturer.
For more information about how to change the language preferences of the GoSafer Security customer portal (powered by Alarm.com), see Change language preference.
For more information about how to change the language preferences for notifications, see How can the language of customer notifications be changed?.
Source and support
For GoSafer Security assistance, visit gosafersecurity.com.
Original Alarm.com reference: https://answers.alarm.com/Customer/Website_and_App/User_Management/Web_App_Users/How_do_I_change_the_language_of_the_customer_app
Always verify safety, installation, compatibility, and current UI details against the original manufacturer documentation before operational use.
How do I change the language of the website?
GoSafer Security Knowledge Base
This operational reference is organized for GoSafer Security customers and staff. Alarm.com product names are retained where required for technical accuracy.
Overview
The language of the GoSafer Security customer portal (powered by Alarm.com) can be changed in your login information using the GoSafer Security customer portal (powered by Alarm.com).
| Platform | Customer Website |
|---|---|
| Content type | Reference |
| Source last updated | 2025-06-04 |
Procedure
Step-by-step guide: Screenshots and videos are placed with the instruction they illustrate.
The language of the GoSafer Security customer portal (powered by Alarm.com) can be changed in your login information using the GoSafer Security customer portal (powered by Alarm.com).
The following languages are available:
- English
- Danish
- Spanish
- French
- Icelandic
- Italian
- Dutch
- Norwegian
- Portuguese
- Finnish
- Swedish
- Turkish
- Hebrew
- Thai
- Japanese
To change the language:
- Log in to the GoSafer Security customer portal (powered by Alarm.com).
- Click Settings.
- Click Login Information.
- In Login Information, click Language Preference.
- Using the dropdown menu, select the desired language.

Change Language
- Click Save.
Source and support
For GoSafer Security assistance, visit gosafersecurity.com.
Original Alarm.com reference: https://answers.alarm.com/Customer/Website_and_App/User_Management/Web_App_Users/How_do_I_change_the_language_of_the_website
Always verify safety, installation, compatibility, and current UI details against the original manufacturer documentation before operational use.
How do I find mobile app version on my device?
GoSafer Security Knowledge Base
This operational reference is organized for GoSafer Security customers and staff. Alarm.com product names are retained where required for technical accuracy.
Overview
This is primarily a video or reference page. Open the original article link below for the current content.
| Platform | Mobile App |
|---|---|
| Content type | Reference |
| Source last updated | 2025-06-04 |
Procedure
Step-by-step guide: Screenshots and videos are placed with the instruction they illustrate.
Find the mobile app version
The mobile app version can be found on Android and iOS devices.
For more information about the device and version compatibility, see Which devices can the Alarm.com app work with?.
To find the mobile app version on an Android device:
- Log in to the Alarm.com app.
- Tap Menu.
- Tap What's New.
In the following image, the app version is 4.3.1.
appversiona
To find the mobile app version on an iOS device:
- Log in to the Alarm.com app.
- Tap Menu.
- Tap About.
In the following image, the app version is 4.3.0.
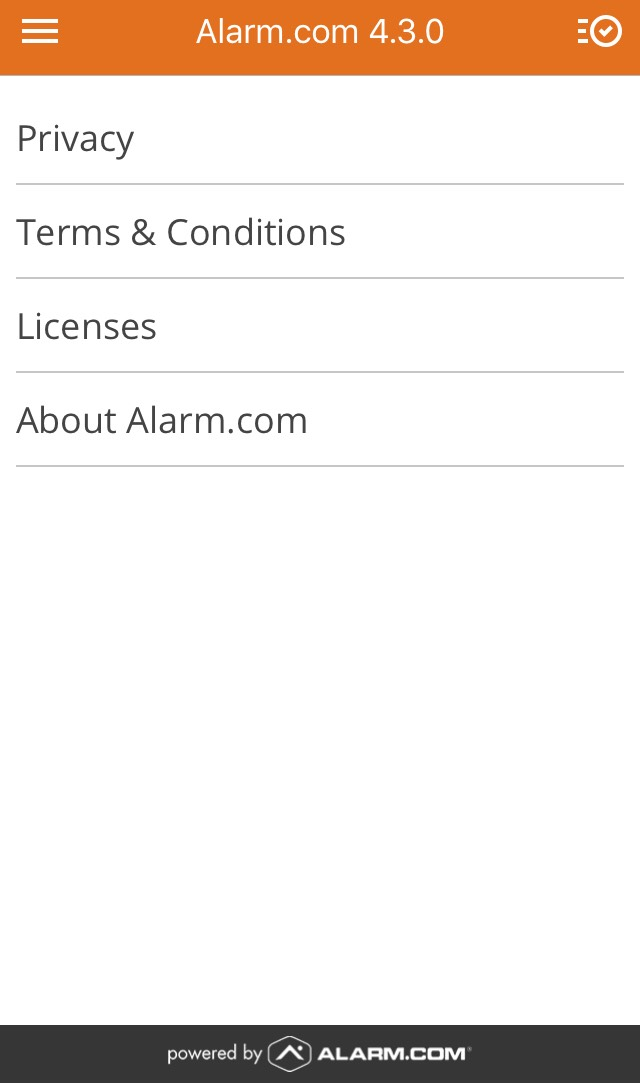
appversioni
Source and support
For GoSafer Security assistance, visit gosafersecurity.com.
Original Alarm.com reference: https://answers.alarm.com/Customer/Website_and_App/User_Management/Web_App_Users/How_do_I_find_mobile_app_version_on_my_device
Always verify safety, installation, compatibility, and current UI details against the original manufacturer documentation before operational use.
Is the Alarm.com iOS Today View Widget a supported feature?
GoSafer Security Knowledge Base
This operational reference is organized for GoSafer Security customers and staff. Alarm.com product names are retained where required for technical accuracy.
Overview
No. With the release of iOS 18, legacy widgets such as the Alarm.com iOS Today View widget are no longer supported for both new and existing customers. Available widgets include the Saved Clips, Safety Button, and iOS Alarm.com System Control widgets. For more information about the Saved Clips widget, see Saved Clips widget for iOS.
| Platform | General / Device |
|---|---|
| Content type | Reference |
| Source last updated | 2024-10-14 |
Procedure
No. With the release of iOS 18, legacy widgets such as the Alarm.com iOS Today View widget are no longer supported for both new and existing customers.
Available widgets include the Saved Clips, Safety Button, and iOS Alarm.com System Control widgets.
For more information about the Saved Clips widget, see Saved Clips widget for iOS.
For more information about the Safety Button widget, see Safety Button widget.
For more information about the iOS Alarm.com System Control widget, see iOS Alarm.com System Control widget.
Source and support
For GoSafer Security assistance, visit gosafersecurity.com.
Original Alarm.com reference: https://answers.alarm.com/Customer/Website_and_App/User_Management/Web_App_Users/Is_the_Alarm.com_iOS_Today_View_Widget_a_supported_feature
Always verify safety, installation, compatibility, and current UI details against the original manufacturer documentation before operational use.
Is there a limit to how many logins can be created for a customer account?
GoSafer Security Knowledge Base
This operational reference is organized for GoSafer Security customers and staff. Alarm.com product names are retained where required for technical accuracy.
Overview
There is no limit to how many logins you can create for your account to access the Customer app or GoSafer Security customer portal.
| Platform | App + Web |
|---|---|
| Content type | How-to / Configuration |
| Source last updated | 2022-01-26 |
Procedure
No. There is no limit to how many logins you can create for your account to access the Alarm.com app or GoSafer Security customer portal (powered by Alarm.com).
For more information about creating logins, see Create a new login.
Source and support
For GoSafer Security assistance, visit gosafersecurity.com.
Original Alarm.com reference: https://answers.alarm.com/Customer/Website_and_App/User_Management/Web_App_Users/Is_there_a_limit_to_how_many_logins_can_be_created_for_a_customer_account
Always verify safety, installation, compatibility, and current UI details against the original manufacturer documentation before operational use.
Launch the app or website tour
GoSafer Security Knowledge Base
This operational reference is organized for GoSafer Security customers and staff. Alarm.com product names are retained where required for technical accuracy.
Overview
If you would you like to learn more about how to navigate the website or app, you can launch the interactive tour.
| Platform | App + Web |
|---|---|
| Content type | Reference |
| Source last updated | 2025-06-04 |
Procedure
To launch the Alarm.com app tour
- Log in to the Alarm.com app.
- Tap [Menu].
- Tap App Tour.
Swipe left to progress through the tour.
- Tap Close to exit the Alarm.com app tour.
To launch the GoSafer Security customer portal (powered by Alarm.com) tour
- Log in to the GoSafer Security customer portal (powered by Alarm.com).
- Click Support.
- Click Launch Website Tour.
- Click Get Started.
- Click Learn More to progress through the tour.
Source and support
For GoSafer Security assistance, visit gosafersecurity.com.
Original Alarm.com reference: https://answers.alarm.com/Customer/Website_and_App/User_Management/Web_App_Users/Launch_the_app_or_website_tour
Always verify safety, installation, compatibility, and current UI details against the original manufacturer documentation before operational use.
Log all devices out of the website and app
GoSafer Security Knowledge Base
This operational reference is organized for GoSafer Security customers and staff. Alarm.com product names are retained where required for technical accuracy.
Overview
Users who have lost their phone, or need to disable a login, can log out all devices so others can no longer access the app, including those who use the Keep me logged in feature without re-entering …
| Platform | App + Web |
|---|---|
| Content type | Reference |
| Source last updated | 2025-06-04 |
Procedure
To disable automatic login for a device using the Alarm.com app
- Log in to the Alarm.com app.
- Tap [Menu].
- Tap Login Information.
- Tap Lost Device.
Using the Disable Automatic Login to this Account for dropdown menu, select the login to be disabled.
- Tap Save.
To disable automatic login for a device using the GoSafer Security customer portal (powered by Alarm.com)
- Log in to the GoSafer Security customer portal (powered by Alarm.com).
- Click Settings.
- Click Login Information.
- Click Lost Device.
Using the Disable Automatic Login to this Account for dropdown menu, select the login to be disabled.
- Click Save.
To log out all devices using the Alarm.com app
Important: It is required to change your password for this method.
- Log in to the Alarm.com app.
- Tap [Menu].
- Tap Login Information.
- Tap Password.
- Enter information in the Current Password, New Password, and Confirm Password fields.
- Tap to select Log out all devices.
- Tap Save.
To log out all devices using the GoSafer Security customer portal (powered by Alarm.com)
Important: It is required to change your password for this method.
- Log in to the GoSafer Security customer portal (powered by Alarm.com).
- Click Settings.
- Click Login Information.
- Click Password.
- Enter information in the Current Password, New Password, and Confirm Password fields.
- Click to select Log out all devices.
- Click Save.
Source and support
For GoSafer Security assistance, visit gosafersecurity.com.
Original Alarm.com reference: https://answers.alarm.com/Customer/Website_and_App/User_Management/Web_App_Users/Disable_automatic_login
Always verify safety, installation, compatibility, and current UI details against the original manufacturer documentation before operational use.
Manage login permissions for secondary logins
GoSafer Security Knowledge Base
This operational reference is organized for GoSafer Security customers and staff. Alarm.com product names are retained where required for technical accuracy.
Overview
Login permissions for new or existing secondary accounts can be managed using the website.
| Platform | App + Web |
|---|---|
| Content type | How-to / Configuration |
| Source last updated | 2026-02-18 |
Procedure
Step-by-step guide: Screenshots and videos are placed with the instruction they illustrate.
Login permissions for new or existing secondary accounts can be managed using the GoSafer Security customer portal (powered by Alarm.com).
To manage login permissions for secondary logins:
- Log in to the GoSafer Security customer portal (powered by Alarm.com).
- Click Users.
- Click Manage Logins.
- In Login Name, click the desired login to change permissions for.
Note: Login names that are underlined can be edited. - Select which permission the login should be granted.
- Click Save.
Permission Description Master Control Users with Master Control will have all of the permissions of the primary account user, including the ability to manage website logins and change profile information such as the primary email address and phone number for the account.
Master Control users will not receive certain types of account notifications that go only to the primary user (e.g., user code changes and invalid email addresses for secondary contacts).Full Control Users with Full Control will have all of the Full Control permissions described in the Custom permissions sections, along with most of the website and mobile app functionality available to the primary account user.
Full Control users will not have the ability to manage website logins, and they will not receive certain types of account notifications that go only to the primary user (e.g., user code changes and invalid email addresses for secondary contacts).Read Only Users with Read Only permissions will be able to see most of the website pages and settings for the account, including the User Codes and Live/Saved Video pages, but will not be able to make any changes to account settings, arming state, or device status. Read Only users cannot view saved video or SVR Timeline footage, and are unable to see the Manage Logins page. Limited Device Access Users with limited device access will only be able to control and observe the specified devices.
Note: Access to view the account's activity (i.e., Activity, Reports, Wellness, etc.) is restricted on the website and app when the Limited Device Access permission is chosen.Custom Create a custom role to fit the exact requirements for the user. Use checkboxes to include a specific type of permission and then decide what level of control to provide the user (i.e., Read Only or Full Control). These settings can be adjusted after the login is created.
Note: Custom users are able to view additional website and mobile content not listed in the Custom permissions, such as current system status, system history, their own password settings, and the system equipment list.
Source and support
For GoSafer Security assistance, visit gosafersecurity.com.
Original Alarm.com reference: https://answers.alarm.com/Customer/Website_and_App/User_Management/Web_App_Users/Manage_login_permissions_for_secondary_logins
Always verify safety, installation, compatibility, and current UI details against the original manufacturer documentation before operational use.
Rearrange Home page of website or app
GoSafer Security Knowledge Base
This operational reference is organized for GoSafer Security customers and staff. Alarm.com product names are retained where required for technical accuracy.
Overview
Cards displayed on the GoSafer Security customer portal and app, such as Panel, Sensors, and Recent Activity, can be rearranged based on your preferences.
| Platform | App + Web |
|---|---|
| Content type | How-to / Configuration |
| Source last updated | 2025-06-04 |
Procedure
Step-by-step guide: Screenshots and videos are placed with the instruction they illustrate.
Cards displayed on the Alarm.com app and GoSafer Security customer portal (powered by Alarm.com), such as Panel, Sensors, and Recent Activity, can be rearranged based on your preferences.
To rearrange cards on the Android app:
- Log in to the Alarm.com app on an Android device.
- In Home, flick to scroll to the bottom, then tap Edit Dashboard.
- Tap Edit Home Screen.
- Tap and drag Icn Reorder on the cards to move into the desired order.
Note: In Dashboard Cards, tap Icn Circle Dash to hide a card. In Hidden Cards, tap Icn Circle Add to add a card. - Tap Icn Check to apply all changes.
To rearrange cards on the iOS app:
- Log in to the Alarm.com app on an iOS device.
- In Home, flick to scroll to the bottom, then tap Edit Dashboard.
- Tap Edit Home Screen.
- Tap and drag Icn Reorder on the cards to move into the desired order.
Note: In Dashboard Cards, tap Icn Circle Dash to hide a card. In Hidden Cards, tap Icn Circle Add to add a card. - Tap Save to apply all changes.
To rearrange cards on the GoSafer Security customer portal (powered by Alarm.com):
- Log in to the GoSafer Security customer portal (powered by Alarm.com).
- In Home, click Settings.
Home Configure Icon (Customer Site)
- Drag the cards into the desired order, or click Hide to hide a card from the Home page if applicable.
.png?revision=1)
Customize cards (Customer site)
- Click Save.
Note: If you do not see cards on your home page for devices you have, contact your service provider.
Source and support
For GoSafer Security assistance, visit gosafersecurity.com.
Original Alarm.com reference: https://answers.alarm.com/Customer/Website_and_App/User_Management/Web_App_Users/Rearrange_Home_page_of_website_or_app
Always verify safety, installation, compatibility, and current UI details against the original manufacturer documentation before operational use.
Safety Button widget
GoSafer Security Knowledge Base
This operational reference is organized for GoSafer Security customers and staff. Alarm.com product names are retained where required for technical accuracy.
Overview
| Platform | Mobile App |
|---|---|
| Content type | How-to / Configuration |
| Source last updated | 2025-02-24 |
Procedure
Step-by-step guide: Screenshots and videos are placed with the instruction they illustrate.
The Safety Button widget enables customers to press the Safety Button to connect to police, fire, or emergency medical help from their phones’ Home screen. Once activated, users will be connected directly to a trained operator who will promptly dispatch responders to their precise location.
For more information about the Safety Button feature, see Safety Button.
Requirements
- The In-App Safety Button service package add-on
- Android:
- Alarm.com Android app version 5.7.3+
- iOS:
- Alarm.com iOS app version 5.7.0+
- iOS version 17+
Important: iOS 17+ is required for the widget to display in the Apple widget gallery.
- Customers must use Keep Me Logged In to use the widget feature
Add the Safety Button widget to the Home screen
The Safety Button widget can be added to the Home screen for iOS and Android devices.
To add the Safety Button widget to the Home screen for iOS devices:Icn Chevron Up
- On the Home screen, press and hold an empty area until the apps begin to move.
- Tap Add or Edit.
- Select the Alarm.com widget.
- Swipe to the Safety Button widget.
- Tap Add Widget.
- Tap and drag the widget to the desired location, then tap Done.
To add the Safety Button widget to the Home screen for Android devices:Icn Chevron Up
- On the Home screen, press and hold an empty area until the modal appears.
- Tap Widgets.
- Find and select the Alarm.com widget.
- Press and hold the Safety Button option to place the widget onto the Home Screen.
To use the Safety Button widget:
- Locate the Safety Button widget on the Home screen.
- Tap the Safety Button if you are in need of help.
- The app will launch, allowing you to enter your PIN to cancel if desired.

Frequently asked questions
Can I cancel a call for help placed through the Safety Button widget?Icn Chevron Up
Yes. Upon tapping the Safety Button, the app will launch, allowing you to enter your PIN within 10 seconds to cancel your call. You can also cancel by providing their PIN to the trained operator by text or phone call.
Can I use the Safety Button widget in conjunction with other widgets?Icn Chevron Up
Yes. Additional widgets are available on both Android and iOS and can be used in conjunction with the Safety Button widget.
iOS devices
iOS users can configure the System Control widget and Saved Clips widget alongside the Safety Button Widget.
For more information about the System Control widget, see iOS Alarm.com System Control widget.
For more information about the Saved Clips widget, see Saved Clips widget for iOS.
Android devices
Android users can configure widgets to trigger scenes. For more information on the Alarm.com widget for Android, see Add the Alarm.com widget for Android.
Can the widget be used in conjunction with iOS Face ID or Passcode lock for the Alarm.com app?Icn Chevron Up
Yes. The Safety Button widget is configurable when Face ID or Passcode protection has been enabled. Users are still required to confirm their identity via biometrics or passcode in order to cancel the alarm.
Source and support
For GoSafer Security assistance, visit gosafersecurity.com.
Original Alarm.com reference: https://answers.alarm.com/Customer/Website_and_App/User_Management/Web_App_Users/Safety_Button_Widget
Always verify safety, installation, compatibility, and current UI details against the original manufacturer documentation before operational use.
Saved Clips widget for iOS
GoSafer Security Knowledge Base
This operational reference is organized for GoSafer Security customers and staff. Alarm.com product names are retained where required for technical accuracy.
Overview
iOS customers can now create a Saved Clips widget and keep tabs on the activity at home without having to open the Alarm.com app. From the Home or Today View screens of their iPhones or iPads, they can view four to 12 thumbnails of saved video, depending on the widget size they select. To view recorded footage, they can tap the thumbnail of interest.
| Platform | Mobile App |
|---|---|
| Content type | How-to / Configuration |
| Source last updated | 2024-12-11 |
Procedure
Will the widget show clips captured without video analytics?
No. Currently, the Saved Clips Widget is only able to display clips captured using video analytics.
Does the saved clips widget work with linked logins?
Yes. The Saved Clips widget displays clips from the logged-in user's default system by default. However, when editing the widget, the user can pick camera views from all systems their login has been added to.
Can multiple Saved Clips widgets be added to my Home screen or Today View?
Yes. You can add multiple Saved Clips widgets with different configurations to customize your experience.
Can the saved clips widget be used with other Alarm.com widgets?
Yes. The Saved Clips widget can be used alongside the Safety Button Widget and System Control Widget to place all desired actions within easy reach.
For more information about the Safety Button widget, see Safety Button widget.
For more information about the System Control widget, see iOS Alarm.com System Control widget.
Why do I see blank thumbnails on the widget?
If you see a blank thumbnail on your widget, it is possible the clip that would have populated in that location has been manually deleted. As more clips are recorded, the blank thumbnail will eventually filter out.
Can the widget be used in conjunction with Face ID or Passcode lock for the Alarm.com app?
No. As this setting helps protect unwanted access to the app, these widgets are not configurable when Face ID or Passcode protection has been enabled.
Source and support
For GoSafer Security assistance, visit gosafersecurity.com.
Original Alarm.com reference: https://answers.alarm.com/Customer/Website_and_App/User_Management/Web_App_Users/Saved_Clips_widget_for_iOS
Always verify safety, installation, compatibility, and current UI details against the original manufacturer documentation before operational use.
Transfer app settings from a previously connected device to a new device
GoSafer Security Knowledge Base
This operational reference is organized for GoSafer Security customers and staff. Alarm.com product names are retained where required for technical accuracy.
Overview
App Settings Migration allows end users who have either switched phones or deleted and re-downloaded the mobile app to avoid creating multiple instances of the same device under the User - Push …
| Platform | App + Web |
|---|---|
| Content type | How-to / Configuration |
| Source last updated | 2025-06-04 |
Procedure
Step-by-step guide: Screenshots and videos are placed with the instruction they illustrate.
App Settings Migration allows users who have either switched phones or deleted and re-downloaded the Alarm.com app to avoid creating multiple instances of the same device for Push Devices or Geo-Devices listed on the GoSafer Security customer portal (powered by Alarm.com).
The process will trigger automatically when the Alarm.com app registers if it was previously downloaded in the Google Play Store or Apple App Store from your account.
Note: This will work even if you switch app stores (i.e., Android to iPhone or vice versa).
To transfer app settings from a device previously connected to the Alarm.com account to a new device:
- Log in to the Alarm.com app.
Note: After logging in with your username and password, the app triggers the App Settings Migration process. - Tap Copy settings from another device on iOS, or Copy settings from an existing device on Android.
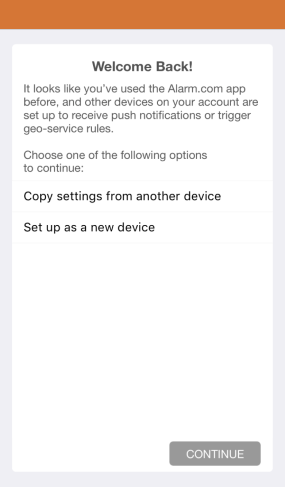
Copy settings
- Tap Continue.
- Tap the device you would like to copy.
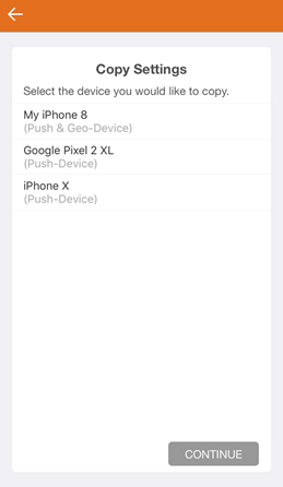
Copy settings 2
- Tap Continue. This process then takes you through turning on each option available for the device they requested to copy settings from.
- For each option, tap Turn On or No Thanks depending on your preference.
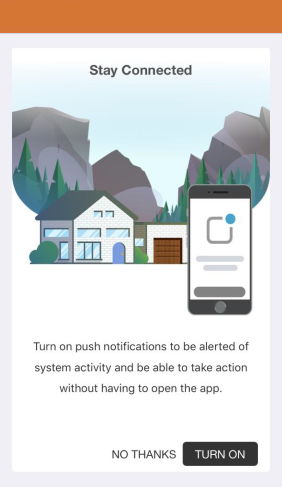
Stay connected 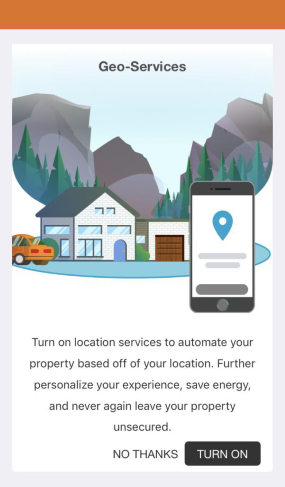
Geo services
- Once you have completed copying the settings from the old device, you can select to remove the old device from the push notifications and Alarm.com Places or keep it active.
Note: If the device is no longer in use, it is recommended to remove the old device to avoid confusion. If you choose not to delete the old device, it will still appear in your Users profile as a Push Device, with notifications previously set up with the old push device and Geo-Devices.- To remove the device, select Remove my old device from this account after my settings have been copied.
- To keep the device, select I want to keep using my old device in addition to the new device, then click Ok.
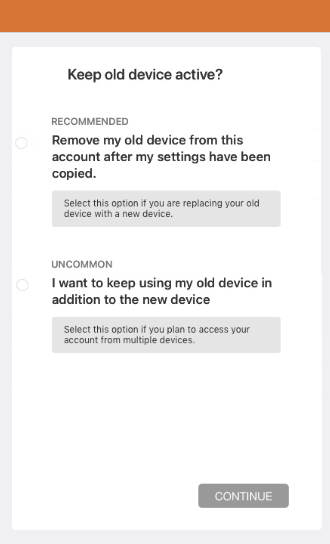
Keep old device active
- Tap Continue.
- Tap Finish.
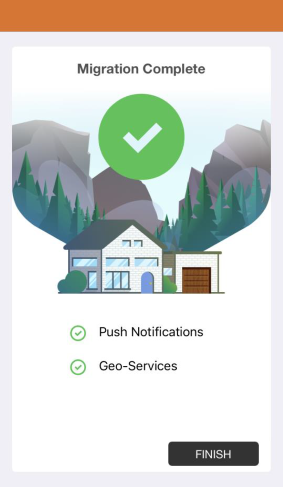
Migration complete
Once the Apps Settings Migration is complete, the initial setup screen will appear.
Important: The Passcode, Touch ID, Fingerprint, and Face ID do not transfer. On iOS, you are prompted to set these up. These settings can also be set up in App Settings through the Alarm.com app's menu.
Source and support
For GoSafer Security assistance, visit gosafersecurity.com.
Original Alarm.com reference: https://answers.alarm.com/Customer/Website_and_App/User_Management/Web_App_Users/Transfer_app_settings_from_a_previously-connected_device_to_a_new_device
Always verify safety, installation, compatibility, and current UI details against the original manufacturer documentation before operational use.
Unable to log in to the Customer Website or app
GoSafer Security Knowledge Base
This operational reference is organized for GoSafer Security customers and staff. Alarm.com product names are retained where required for technical accuracy.
Overview
If you are unable to log in to the GoSafer Security customer portal (powered by Alarm.com) or Alarm.com app, verify the username being used and reset the password.
| Platform | App + Web |
|---|---|
| Content type | Reference |
| Source last updated | 2025-06-24 |
Procedure
To verify the username using the GoSafer Security customer portal (powered by Alarm.com)
- Go to the GoSafer Security customer portal (powered by Alarm.com) login page at www.alarm.com/login.
- Click Login Help.
In Forgot your username?, enter the email address associated with the account.
- Click Submit.
Check the email inbox (or other folders) for an email from Alarm.com containing the username associated with that email address.
To verify the username using the Alarm.com app
- Go to the Alarm.com app.
- Tap Forgot username or password.
In the Email or username field, enter the email address associated with the account.
- Tap Next.
Check the email inbox (or other folders) for an email from Alarm.com containing the username associated with that email address.
To reset the password using the GoSafer Security customer portal (powered by Alarm.com)
- Go to the GoSafer Security customer portal (powered by Alarm.com) login page at www.alarm.com/login.
- Click Login Help.
In Forgot your password?, enter the username for the account.
- Click Submit. A password reset link is emailed to the email address associated with the login.
To reset the password using the Alarm.com app
- Go to the Alarm.com app.
- Tap Forgot username or password.
In the Email or username field, enter the username or email address associated with the account.
- Tap Next.
A password reset link is emailed to the email address associated with the login.
Source and support
For GoSafer Security assistance, visit gosafersecurity.com.
Original Alarm.com reference: https://answers.alarm.com/Customer/Website_and_App/User_Management/Web_App_Users/Unable_to_log_in_to_the_Customer_Website_or_app
Always verify safety, installation, compatibility, and current UI details against the original manufacturer documentation before operational use.
View upcoming appointments
GoSafer Security Knowledge Base
This operational reference is organized for GoSafer Security customers and staff. Alarm.com product names are retained where required for technical accuracy.
Overview
After a service appointment is scheduled with your service provider, upcoming appointments can be viewed using the Alarm.com app or GoSafer Security customer portal (powered by Alarm.com). Appointment details (e.g., date, time, estimated duration, etc.) can be viewed and your service provider's email address and phone number will be available in case the appointment needs to be adjusted or canceled. An upcoming appointment reminder will also appear on the Home screen of the Alarm.com app and GoSafer Security customer portal (powered by Alarm.com).
| Platform | App + Web |
|---|---|
| Content type | Reference |
| Source last updated | 2026-06-09 |
Procedure
Step-by-step guide: Screenshots and videos are placed with the instruction they illustrate.
After a service appointment is scheduled with your service provider, upcoming appointments can be viewed using the Alarm.com app or GoSafer Security customer portal (powered by Alarm.com).
Appointment details (e.g., date, time, estimated duration, etc.) can be viewed and your service provider's email address and phone number will be available in case the appointment needs to be adjusted or canceled.
An upcoming appointment reminder will also appear on the Home screen of the Alarm.com app and GoSafer Security customer portal (powered by Alarm.com).
View an upcoming appointment
To view an upcoming appointment using the Alarm.com app:Icn Chevron Up
Important: An appointment must be within 3 days of the scheduled time to view details using the Alarm.com app. New appointments scheduled within the 3-day window may take a few hours to display the appointment details on the Alarm.com app.
- Log in to the Alarm.com app.
- In the Top Recommendations card, find the Appointment Reminder notification.
- Tap Learn More.

Appointment Reminder Notifcation
To view upcoming appointments using the GoSafer Security customer portal (powered by Alarm.com):Icn Chevron Up
- Log in to the GoSafer Security customer portal (powered by Alarm.com).
- Click Support.
- Click Upcoming Appointments.
- View details of the appointment, including the start time, estimated duration, and location.
.png?revision=1)
Upcoming appointments (GoSafer Security customer portal)
Source and support
For GoSafer Security assistance, visit gosafersecurity.com.
Original Alarm.com reference: https://answers.alarm.com/Customer/Website_and_App/User_Management/Web_App_Users/Schedule_an_appointment
Always verify safety, installation, compatibility, and current UI details against the original manufacturer documentation before operational use.
Web/App Users
GoSafer Security Knowledge Base
This operational reference is organized for GoSafer Security customers and staff. Alarm.com product names are retained where required for technical accuracy.
Overview
Web/App Users Landing Page
| Platform | App + Web |
|---|---|
| Content type | How-to / Configuration |
| Source last updated | 2026-02-17 |
Procedure
User guides
- Add a mobile phone number to receive SMS notificationsMobile phone numbers can be added to a user's contact information so that they can receive SMS notifications.Android Quick Access Device ControlsApp settings transferBest practices when changing phonesWhen switching to a different phone for any reason, there are a few things to be aware of to ensure minimal disruption of your service. The following are suggestions for information and features that should be verified when the swapping to a different phone.Change a login nameLogin names can be changed on the website and app.Change a phone numberThe primary phone number associated with the property location can be changed on the website.Change an email addressKeeping email addresses updated helps keep the system secure.Change how the Welcome card appears on the websiteChange language preferenceUser language preferences change the language of the website and the user's notifications.Change or reset a passwordUpdating user passwords for website and app users helps keep the system secure.Change security questionsUpdating security questions and their answers helps keep the system secure.Change the name of a mobile deviceThe name of a mobile push notification device can be updated using the app or website.Configure a number passcode for the appContact your service providerIf you are unable to find an answer to your question in the Knowledge Base, you can contact your service provider for further assistance.Create a secondary loginIndividual logins for each website and app user can be created from the website.Delete a loginDeleting unused website and app logins helps keep the system secure.Log all devices out of the website and appUsers who have lost their phone, or need to disable a login, can log out all devices so others can no longer access the app, including those who use the Keep me logged in feature without re-entering the password.Enable Two Factor AuthenticationTwo Factor Authentication adds an extra layer of security to protect access to your system.Export panel slot numbers for a single locationThe panel slot numbers report shows all users and user codes associated with the system at a single location.iOS Alarm.com System Control widgetiOS Live Activities for In-Progress Device CommandsiOS Quick ControlsiPhone's Home Screen Quick Actions feature for the Alarm.com appLaunch the app or website tourIf you would you like to learn more about how to navigate the website or app, you can launch the interactive tour.Manage login permissions for secondary loginsLogin permissions for new or existing secondary accounts can be managed using the website.Rearrange Home page of website or appCards displayed on the GoSafer Security customer portal and app, such as Panel, Sensors, and Recent Activity, can be rearranged based on your preferences.Safety Button widgetSaved Clips widget for iOSTransfer app settings from a previously connected device to a new deviceApp Settings Migration allows end users who have either switched phones or deleted and re-downloaded the mobile app to avoid creating multiple instances of the same device under the User - Push Devices as well as the Geo-Services Device list on the website.Unable to log in to the GoSafer Security customer portal or app
Frequently asked questions
Can I create multiple logins for my account?Can logins have access to only specific system partitions?Do the app and website update in real time?How can I set up fingerprint scanning on Android?How can I set up Touch ID or Face ID for iOS?How do I change the language of the customer app?How do I change the language of the website?How do I find mobile app version on my device?Is the Alarm.com iOS Today View Widget a supported feature?Is there a limit to how many logins can be created for a customer account?There is no limit to how many logins you can create for your account to access the Customer app or GoSafer Security customer portal.What are the login name and password requirements?There are various requirements when changing a login name or password.What can I do if I can't find the password reset email?What is Two Factor Authentication?
Source and support
For GoSafer Security assistance, visit gosafersecurity.com.
Original Alarm.com reference: https://answers.alarm.com/Customer/Website_and_App/User_Management/Web_App_Users
Always verify safety, installation, compatibility, and current UI details against the original manufacturer documentation before operational use.
What are the login name and password requirements?
GoSafer Security Knowledge Base
This operational reference is organized for GoSafer Security customers and staff. Alarm.com product names are retained where required for technical accuracy.
Overview
There are various requirements when changing a login name or password.
| Platform | General / Device |
|---|---|
| Content type | FAQ / Explanation |
| Source last updated | 2023-10-31 |
Procedure
Login name requirements
Login names must contain less than 50 alphanumeric characters and cannot be taken by another user. Login names are not case-sensitive.
Password requirements
New passwords must contain a minimum of 10 characters and must include at least one number, letter, and special character.
Source and support
For GoSafer Security assistance, visit gosafersecurity.com.
Original Alarm.com reference: https://answers.alarm.com/Customer/Website_and_App/User_Management/Web_App_Users/What_are_the_login_name_and_password_requirements
Always verify safety, installation, compatibility, and current UI details against the original manufacturer documentation before operational use.
What can I do if I can't find the password reset email?
GoSafer Security Knowledge Base
This operational reference is organized for GoSafer Security customers and staff. Alarm.com product names are retained where required for technical accuracy.
Overview
When resetting your password, a temporary password reset link will be emailed to the email address associated with the login. For more information about how to reset your password, see Change or reset a password.
| Platform | General / Device |
|---|---|
| Content type | Troubleshooting |
| Source last updated | 2024-07-26 |
Procedure
If the password reset email cannot be found after resetting the password
- Verify the correct login name is being used.
To do this, request the login name by entering the associated email address on the Login Help, then checking the Login Name recovery email.
- Verify the correct email address is being used.
If your email address needs to be updated, contact your service provider.
- Verify the email was not placed into a folder other than the inbox (e.g., spam, junk, promotions, receipts, etc.).
Perform a search in the spam/junk folder (as these results do not populate during inbox searches) for words like password, reset, or notifications@alarm.com (or service provider's custom from address).
- Verify the email was not placed into another folder using a filter or rule.
Rules and filters may not be able to be viewed or managed using a mobile device. To avoid this issue, access the email account using a computer.
- Verify the blocked sender list does not include the Alarm.com domain.
- Verify the inbox is not full, and other emails can be received.
If the email account is a private email address (i.e., not public like Gmail or Yahoo), verify there is no firewall or email filtering.
For more information, contact the email host's IT professional. Additional tests can be conducted by changing the email address to a more popular email service like Hotmail, Gmail, Yahoo, etc., then requesting the password reset again.
Contact the email provider for more troubleshooting steps regarding missing emails.
Source and support
For GoSafer Security assistance, visit gosafersecurity.com.
Original Alarm.com reference: https://answers.alarm.com/Customer/Website_and_App/User_Management/Web_App_Users/What_can_I_do_if_I_cant_find_the_password_reset_email
Always verify safety, installation, compatibility, and current UI details against the original manufacturer documentation before operational use.
What is Two Factor Authentication?
GoSafer Security Knowledge Base
This operational reference is organized for GoSafer Security customers and staff. Alarm.com product names are retained where required for technical accuracy.
Overview
Two Factor Authentication is an optional security measure for an account that requires the entry of an additional code, received as an SMS text message or email, after logging into an account with a login name and password. The code can also be generated using an authenticator app. Note: It is recommended to create separate logins for additional users as Two Factor Authentication associates a username with a specific phone number or email address. For more information, see Create a new login.
| Platform | App + Web |
|---|---|
| Content type | How-to / Configuration |
| Source last updated | 2025-06-04 |
Procedure
Step-by-step guide: Screenshots and videos are placed with the instruction they illustrate.
Note: Two Factor Authentication can be referred to as 2FA, Multi-Factor Authentication, or MFA.
Two Factor Authentication adds an extra layer of security to protect access to your system. This makes it harder for potential intruders to gain access to your system, so your system and your property are even more secure. Whenever you sign into your system from a new or untrusted device, you will have to enter both your password and a code sent to your mobile phone.
Enable or disable Two Factor Authentication
Two Factor Authentication can be enabled or disabled using the Alarm.com app and GoSafer Security customer portal (powered by Alarm.com).
Note: If Two Factor Authentication is enabled, all active sessions on the Alarm.com app and GoSafer Security customer portal (powered by Alarm.com) will end. Two Factor Authentication will be required to log back in.
To enable or disable Two Factor Authentication for a login using the Alarm.com app: Icn Chevron Down
Note: If you have changed your phone number or email address, see If you change your cell carrier, phone number, or email address.
- Log in to the Alarm.com app.
- Tap Menu.
- Tap Login Information.
- Tap Two Factor Authentication.
- To disable Two Factor Authentication, tap Disable and then tap Confirm.
Note: Two Factor Authentication may be required or suggested by your service provider. For additional assistance, contact your service provider. - To enable Two Factor Authentication, select Text Message, Email, or Authentication app.
Note: It is recommended to set up Two Factor Authentication using multiple methods. If multiple methods cannot be enabled, contact your service provider- To enable Two Factor Authentication for text message:
- Tap Text Message.
- Tap Next.
Mobile Two Factor Authentication Enable
- In Mobile Number, enter the mobile number to receive the Two Factor Authentication confirmation code.
- Using the Country dropdown menu, select either USA or Canada.
- Using the Provider dropdown menu, select the cellular carrier of the mobile phone number that will receive the Two Factor Authentication confirmation code.
Note: The Provider dropdown menu displays the full list of Two Factor Authentication compatible cellular carriers.- If the carrier is not listed, select Other.
Mobile Two Factor Authentication Phone Number
Note: This displays the full list of Two Factor Authentication compatible cellular carriers.
- If the carrier is not listed, select Other.
- Tap Send to send the verification code to the mobile number entered.
- In Verification Code, enter the code that is provided in a text message to the mobile number entered.
Mobile Two Factor Authentication Verification Code
- Tap Verify.
- To enable Two Factor Authentication for email:
- Tap Email.
- In Send Verification Code, verify the correct email is displayed. For more information about how to update the email address, see Change an email address.
- Tap Send.
Mobile Two Factor Authentication Email
- In Verification Code, enter the code that is provided in the received email.
Mobile Two Factor Authentication Email Code
- Tap Verify.
- To enable Two Factor Authentication using an authentication app:
Important: An authenticator app is required to complete this process and the steps may vary based on the authenticator app in use.- Tap Authentication App.
- Generate an authentication code:
Note: The Duo authenticator app may experience unexpected behavior and it is recommended to use an alternative authenticator app.- Use an authenticator app to scan the QR code or manually enter the code provided on the Alarm.com app or GoSafer Security customer portal (powered by Alarm.com) into the authenticator app.
- In the Enter Code field, enter the code that is generated on the authenticator app to verify the device.
- Click Next.
- To enable Two Factor Authentication for text message:
- In Device Name, enter the desired name for the device that will be trusted.
Mobile Two Factor Authentication Trust this Device
- Tap Next.
- In Linked Devices, tap Trust next to any additional devices that can be trusted.
- Tap Done.
To enable or disable Two Factor Authentication for a login using the GoSafer Security customer portal (powered by Alarm.com):Icn Chevron Down
Note: If you have changed your phone number or email address, see If you change your cell carrier, phone number, or email address.
- Log in to the GoSafer Security customer portal (powered by Alarm.com).
- Click Settings.
- Click Login Information.
- Click Two Factor Authentication.
- To disable Two Factor Authentication, click Disable.
Note: Two Factor Authentication may be required or suggested by your service provider. For additional assistance, contact your service provider. - To enable Two Factor Authentication, select Text Message, Email, or Authentication app.
Note: It is recommended to set up Two Factor Authentication using multiple methods. If multiple methods cannot be enabled, contact your service provider.- To enable Two Factor Authentication for text message:
- Click Text Message.
- Click Next.
Two Factor Authentication GoSafer Security customer portal
- In Mobile Number, enter the mobile number to receive the Two Factor Authentication confirmation code.
- Using the Country dropdown menu, select either USA or Canada.
- Using the Provider dropdown menu, select the cellular carrier of the mobile phone number that will receive the Two Factor Authentication confirmation code.
Note: The Provider dropdown menu displays the full list of Two Factor Authentication compatible cellular carriers.- If the carrier is not listed, select Other.
Two Factor Authentication Phone Number
- If the carrier is not listed, select Other.
- Click Send to send a verification code to the mobile number.
- In Verification Code, enter the code that is provided in a text message to the mobile number.
Two Factor Authentication Verification Code
- Click Verify.
- To enable Two Factor Authentication for email:
- Click Email.
- In Send Verification Code, verify the correct email is displayed. For more information about how to update the email address, see Change an email address.
- Click Send.
Two Factor Authentication Email Code
- In Verification Code, enter the code that is provided in the received email.
Two Factor Authentication Email Code Sent
- Click Verify.
- To enable Two Factor Authentication using an authentication app:
Important: A mobile device with an authenticator app is required to complete this process and the steps may vary based on the authenticator app in use.- Click Authentication App.
- Generate an authentication code:
Note: The Duo authenticator app may experience unexpected behavior and it is recommended to use an alternative authenticator app.- Use a mobile device with an authenticator app to scan the QR code or manually enter the code provided on the Alarm.com app or GoSafer Security customer portal (powered by Alarm.com) into the authenticator app.
- In the Enter Code field, enter the code that is generated on the authenticator app to verify the device.
- Click Next.
- To enable Two Factor Authentication for text message:
- In Device Name, enter the desired name for the device that is accessing the account.
- If the device is trusted, click to select Trust This Device.
Two Factor Authentication Trust Device
- If the device is trusted, click to select Trust This Device.
- Click Next.
- In Linked Devices, click Trust next to any additional devices that can be trusted.
- Click Done.
Manage trusted devices
To manage trusted devices using the Alarm.com app:Icn Chevron Down
- Log in to the Alarm.com app.
- Tap Menu.
- Tap Login Information.
- Tap Two Factor Authentication.
- Tap Details next to the device name.
- Make the desired changes:
- To rename the device, enter the desired device name, then tap Save.
- To delete the device, click Delete Trusted Device, then tap Confirm.
To manage trusted devices using the GoSafer Security customer portal (powered by Alarm.com):Icn Chevron Down
- Log in to the GoSafer Security customer portal (powered by Alarm.com).
- Click Settings.
- Click Login Information.
- Click Two Factor Authentication.
- Click Details next to the device name.
- Make the desired changes:
- To rename the device, enter the desired device name, then click Save.
- To delete the device, click Delete Trusted Device, then click Confirm.
If you change your cell carrier or no longer have access to the phone number or authenticator app:
If you change your cell carrier or no longer have access to the phone number or authenticator app, Two-Factor Authentication can be reset using email. For more information, see Reset Two-Factor Customer.
If email Two Factor Authentication is set up and you no longer have access to your email address, contact your service provider for assistance with resetting your Two-Factor Authentication configuration.
Reset Two Factor Authentication
Two Factor Authentication can be reset using the Alarm.com app or GoSafer Security customer portal (powered by Alarm.com).
To reset Two Factor Authentication:Icn Chevron Down
- Log in to the Alarm.com app or GoSafer Security customer portal (powered by Alarm.com).
- In Enter Verification Code, click or tap Down next to Don't have access to your device?.
- Select to reset Two-Factor Authentication or to contact your service provider:
- If you have access to your email address associated with the login:
- In Option 1: Reset Two-Factor Authentication, tap or click Reset 2FA to send a reset link to the email address associated with the login.
- If you do not have access to your email address associated with the login:
- In Option 2: Contact your Service Provider, use the contact information listed to contact your service provider.
- If you have access to your email address associated with the login:
Note: The ability to reset your own Two-Factor Authentication configuration is only available to users using SMS or an authenticator application.
Source and support
For GoSafer Security assistance, visit gosafersecurity.com.
Original Alarm.com reference: https://answers.alarm.com/Customer/Website_and_App/User_Management/Web_App_Users/What_is_Two_Factor_Authentication
Always verify safety, installation, compatibility, and current UI details against the original manufacturer documentation before operational use.
iOS Alarm.com System Control widget
GoSafer Security Knowledge Base
This operational reference is organized for GoSafer Security customers and staff. Alarm.com product names are retained where required for technical accuracy.
Overview
The Alarm.com System Control widget is customizable and provides quick access and one-touch commands for smart security systems. Small or medium widget sizes can be placed on the Home screen or Today View enabling you to control your lights, locks, garage doors, gates, and security panels from anywhere. Additionally, Scenes can be activated for easy whole-home automation and the statuses of connected devices can be viewed at a glance.
| Platform | Mobile App |
|---|---|
| Content type | How-to / Configuration |
| Source last updated | 2025-06-04 |
Procedure
To add widgets to the Home Screen
On the Home screen, press and hold an empty area until the apps begin to move.
- Tap [Add] or tap Edit.
- Select the Alarm.com widget.
- Select a widget and choose a widget size.
- Tap Add Widget.
- Tap and drag the widget to the desired location, then tap Done.
To add widgets to the Today View
Swipe right from the Home Screen or Lock Screen.
- Press and hold an empty area in Today View until the apps begin to move.
- Tap [Add] or Edit.
- Scroll down to select a widget, then choose a widget size.
- Tap Add Widget.
- Tap and drag the widget to the desired location, then tap Done.
To edit widgets from the Home screen
Touch and hold a widget to open the quick actions menu.
- Tap Edit Widget.
Make the desired changes, then tap outside of the widget to exit.
To edit widgets from Today View
Swipe right from the Home Screen or Lock Screen
- Tap and hold a widget to open the quick actions menu.
- Tap Edit Widget.
Make the desired changes, then tap outside of the widget to exit.
Are multiple systems supported with the widget?
Yes. The widget supports multi-system accounts. During configuration, all devices from all systems are listed, and customers can add devices from multiple systems to a single widget.
Note: System names are not included in the widget. Therefore it is recommended to create unique names for Scenes to indicate which system the command is used for.
Will all devices in a Scene be automated when using the widget?
Yes. Triggering a Scene using the widget allows any device in the Scene to be automated, even if it is not individually supported by the System Control widget (e.g., Alarm.com-supported smart thermostats).
If I delete the Alarm.com app, will the widget be removed?
Yes. If you delete the Alarm.com app from your device, the widget is also removed.
Does the System Control Widget refresh automatically?
No. The System Control Widget automatically updates every 30 minutes or manually updates when you open up the Alarm.com app. Due to this, commands sent to security devices may display as Sent until the app has been opened or an automated update occurs. It is recommended to use the System control widget in conjunction with push notifications to ensure a seamless experience.
Can the widget be used in conjunction with Face ID or Passcode lock for the Alarm.com app?
By default, the system control widget is not available when Face ID or Passcode protection has been enabled in order to protect from unwanted access to the Alarm.com app. However, this setting can be bypassed.
To bypass Face ID or Passcode authentication for widgets
- Log in to the Alarm.com app.
- Tap [More Options].
- Tap App Settings.
- Tap Widget Settings.
- Tap to enable the Bypass Face ID to use widget toggle switch.
Source and support
For GoSafer Security assistance, visit gosafersecurity.com.
Original Alarm.com reference: https://answers.alarm.com/Customer/Website_and_App/User_Management/Web_App_Users/iOS_Alarm.com_System_Control_Widget
Always verify safety, installation, compatibility, and current UI details against the original manufacturer documentation before operational use.
iOS Live Activities for In-Progress Device Commands
GoSafer Security Knowledge Base
This operational reference is organized for GoSafer Security customers and staff. Alarm.com product names are retained where required for technical accuracy.
Overview
iOS Live Activities for In-Progress Device Commands provides frequent information updates that appear in locations such as the Lock Screen, Notification Center, Standby Mode, and Dynamic Island. Live Activities offers a more flexible way to keep you updated about live events, activities, or tasks on your system. Requirements
| Platform | Mobile App |
|---|---|
| Content type | How-to / Configuration |
| Source last updated | 2025-01-14 |
Procedure
To enable or disable Live Activities on the iOS device
Note: The general setting for Live Activities is on by default.
On the iOS device, go to Settings.
- Tap Face ID & Passcode.
In Allow Access When Locked, tap the Live Activities toggle switch to enable or disable the feature.
- Enable or disable Alarm.com-supported Live Activities:
On the iOS device, go to Settings.
- Tap Apps.
- Tap Alarm.com.
- Tap Live Activities.
- Tap the Allow Live Activities toggle switch to enable or disable the feature.
Note: The first time Live Activities for the Alarm.com Alarm.com app is initiated, a prompt will appear for you to confirm permission to allow Live Activities.
To set up Live Activities to update more frequently
On the iOS device, go to Settings.
- Tap Apps.
- Tap Alarm.com.
Note: This setting can be adjusted other apps on the iOS device.
- Tap Live Activities.
In Update Rate, tap the More Frequent Updates toggle switch to enable the feature.
Which actions will trigger a Live Activity?
An action conducted directly in the app (e.g., arming the panel, unlocking a lock, opening a garage door, etc.) triggers a Live Activity. Automation features such as rules, schedules, and Smart Arming will not trigger Live Activities since they are initiated without direct actions.
How many devices can be displayed at once?
Multiple devices can be displayed at once. If more than one device is polling at a given time, the Live Activities will stack on the lock screen similar to how notifications stack. On the Dynamic Island, up to two in-progress device command actions may be displayed at a given time. The time for completion varies from a few seconds to a few minutes depending on the device being used.
Is Live Activities supported on other devices?
Yes. It is also available and supported on iPad with OS17+ and Apple Watch with OS 11+.
Source and support
For GoSafer Security assistance, visit gosafersecurity.com.
Original Alarm.com reference: https://answers.alarm.com/Customer/Website_and_App/User_Management/Web_App_Users/iOS_Live_Activities_for_In-Progress_Device_Commands
Always verify safety, installation, compatibility, and current UI details against the original manufacturer documentation before operational use.
iPhone's Home Screen Quick Actions feature for the Alarm.com app
GoSafer Security Knowledge Base
This operational reference is organized for GoSafer Security customers and staff. Alarm.com product names are retained where required for technical accuracy.
Overview
The Alarm.com app takes advantage of Apple's Home Screen Quick Actions and gives you access to various Quick Actions right from the home screen. Important: Home Screen Quick Actions are only available on iPhones with iOS version 13.0+.
| Platform | Mobile App |
|---|---|
| Content type | How-to / Configuration |
| Source last updated | 2025-06-04 |
Procedure
Step-by-step guide: Screenshots and videos are placed with the instruction they illustrate.
The Alarm.com app takes advantage of Apple's Home Screen Quick Actions and gives you access to various Quick Actions right from the home screen.
Important: Home Screen Quick Actions are only available on iPhones with iOS version 13.0+.
Quick Actions available
- Arm Away
- Arm Stay
- Disarm
- Lock or Unlock Locks
- Open or Close Garage Doors
- View Cameras
- View Thermostats
- View Lights
- View Doorbells
How to configure Home Screen Quick Actions:
Note: Up to four items can be added to the Home Screen Quick Actions.
- Log in to the Alarm.com app.
- Tap Menu.
- Tap App Settings.
- Tap Home Screen Quick Actions.
- Tap Edit.
- A prompt to enter your password may appear if Keep me logged in was not selected at login. This is required for Home Screen Quick Actions features to work.
- In More Items, perform any of the following:
- Tap Add to add items to the Home Screen Quick Actions list.
- Tap Remove to remove items from the Home Screen Quick Actions list.
- Drag Menu on the right side of the Home Screen Quick Actions list to reorder items.
Note: To configure arming settings, tap Settings on the desired arming setting.
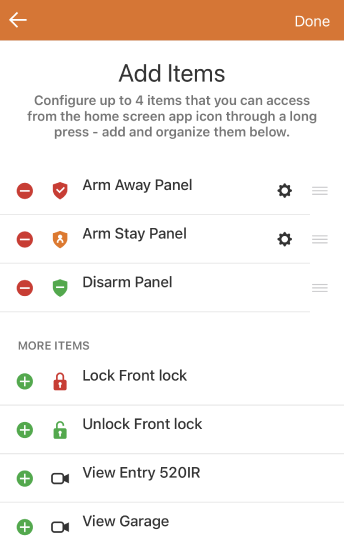
Home Screen Quick Actions
- When finished, tap Done.
How to use Home Screen Quick Actions:
- From the home screen, press and hold the Alarm.com app icon to reveal the Quick Actions.
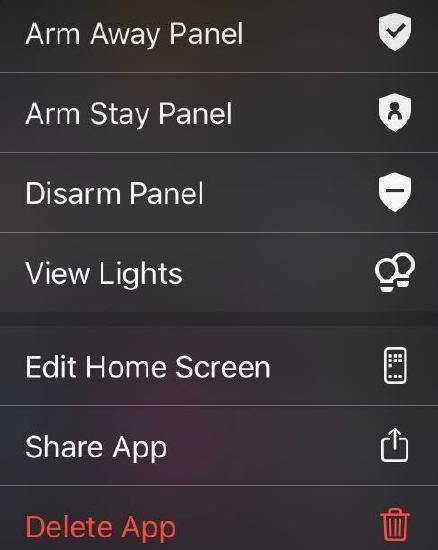
Quick Action Menu
- Tap the desired Quick Action.
- There may be a prompt to enter an app PIN or provide a Touch ID, if applicable.
Important: The Thermostat, Light, Doorbells, and Camera Quick Actions will open the app to the corresponding view, where it is possible to view or control the desired item.
Source and support
For GoSafer Security assistance, visit gosafersecurity.com.
Original Alarm.com reference: https://answers.alarm.com/Customer/Website_and_App/User_Management/Web_App_Users/iPhone's_Home_Screen_Quick_Actions_feature_for_the_Alarm.com_app
Always verify safety, installation, compatibility, and current UI details against the original manufacturer documentation before operational use.