This operational reference is organized for GoSafer Security customers and staff. Alarm.com product names are retained where required for technical accuracy.
Overview
This GoSafer Security section brings together resources for Mobile Features, including setup, configuration, everyday use, and troubleshooting. Choose the related page that matches your device, feature, or task, and follow the current manufacturer guidance linked on that page.
Platform
General / Device
Content type
Troubleshooting
Source last updated
2024-07-26
Procedure
Browse the related pages in this chapter to open the specific procedure, configuration guide, or troubleshooting article you need.
Always verify safety, installation, compatibility, and current UI details against the original manufacturer documentation before operational use.
Alarm.com Places
GoSafer Security Knowledge Base
This operational reference is organized for GoSafer Security customers and staff. Alarm.com product names are retained where required for technical accuracy.
Overview
This GoSafer Security section brings together resources for Alarm.com Places, including setup, configuration, everyday use, and troubleshooting. Choose the related page that matches your device, feature, or task, and follow the current manufacturer guidance linked on that page.
Platform
Customer Website
Content type
Troubleshooting
Source last updated
2022-01-14
Procedure
Browse the related pages in this chapter to open the specific procedure, configuration guide, or troubleshooting article you need.
Always verify safety, installation, compatibility, and current UI details against the original manufacturer documentation before operational use.
Create/edit an Alarm.com Places light automation rule
GoSafer Security Knowledge Base
This operational reference is organized for GoSafer Security customers and staff. Alarm.com product names are retained where required for technical accuracy.
Overview
Light Automation rules are used to turn on/off lights automatically at all times of day, on a set schedule, or based on your phone’s location. These location-based alerts can be configured from …
Platform
Customer Website
Content type
How-to / Configuration
Source last updated
2025-06-04
Procedure
To create an Alarm.com Places light automation rule
Log in to the GoSafer Security customer portal (powered by Alarm.com).
Click Settings.
Click Places.
In Set up Geo-Features, click Light Automation Rules.
Enter a name for the new rule.
In Automate My, click to select Lights.
In When this even occurs, click to select People cross a Geo-Fence.
Use the Geo-Device dropdown menu to select the desired Geo-Device.
Use the Enters/Exits dropdown menu to select Enters or Exits.
Use the Geo-Fence dropdown menu to select the desired Geo-Fence.
If you need to update any Alarm.com Places information, click [Edit].
In the Perform this action, use the dropdown menus to select the desired light action and duration.
In Selected Devices, click to select the lights to be automated.
In During these time frames, click to select the time frame the rule is active
At All Times triggers the rule any time based on your Geo-Location.
Only During the Following Times allows you to define specific hours and days of the week you would like to apply the light automation rule.
Only after sunset activates the light automation rule if your Geo-Device crosses the Geo-Fence only after sunset.
Verify the rule is configured with the correct settings.
Click Save.
To edit an Alarm.com Places light automation rule
Log in to the GoSafer Security customer portal (powered by Alarm.com).
Click Automation.
Click [Edit] for the automation rule to be updated.
In When this even occurs, verify People cross a Geo-Fence is selected.
Use the Geo-Device dropdown menu to select the desired Geo-Device.
Use the Enters/Exits dropdown menu to select the Enters or Exits.
Use the Geo-Fence dropdown menu to select the desired Geo-Fence.
If you need to update any Alarm.com Places information, click [Edit].
In Perform this action, use the dropdown menus to select the desired light action and duration.
In Selected Devices, click to select the lights to be automated.
In During these time frames, click to select the time frame the rule is active
At All Times triggers the rule any time of day based on your Geo-Location.
Only During the Following Times allows you to define specific hours and days of the week you would like to apply the light automation rule.
Only after sunset activates the light automation rule if your Geo-Device crosses the Geo-Fence only after sunset.
Verify the rule is updated with the correct settings.
Always verify safety, installation, compatibility, and current UI details against the original manufacturer documentation before operational use.
Create/edit an Alarm.com Places lock reminder
GoSafer Security Knowledge Base
This operational reference is organized for GoSafer Security customers and staff. Alarm.com product names are retained where required for technical accuracy.
Overview
Lock Reminders allow you to receive an alert when any of your locks are left unlocked for too long. These location-based alerts can be configured from the website to notify you at all times of day, …
Platform
App + Web
Content type
How-to / Configuration
Source last updated
2025-06-04
Procedure
To create an Alarm.com Places lock reminder using the Alarm.com app
Log in to the Alarm.com app.
Tap .
Tap Notifications.
Tap .
Tap .
Tap Lock Left Unlocked.
Name the new notification rule.
In When any of these locks, tap to select the locks to be monitored.
In Is Left Unlocked, tap to select either of the following
For this duration to specify how long a lock must be open before sending a notification.
When selected people cross a Geo-Fence to specify what Geo-Devices and Geo-Fences trigger a notification.
Note: If multiple devices are selected, the rule will be triggered when the last of these devices enters or exists the Geo-Fence.
In During this time frame, tap to select either of the following
At All Times will cause the rule to trigger any time of day based on your Geo-Location.
Only During the Following Times will allow you to define specific hours and days of the week you would like to receive the lock reminder.
To choose notification recipients, tap Add.
Tap the entries in the Address book that are to be notified, or tap Add Contact to add a new Address Book entry.
Tap Close.
Verify the notification is configured with the correct settings.
Tap Save.
To create an Alarm.com Places lock reminder using the GoSafer Security customer portal (powered by Alarm.com)
Log in to the GoSafer Security customer portal (powered by Alarm.com).
Click Settings.
Click Places.
Click Lock Reminders.
Name the new notification rule.
In When any of these locks, select the locks to be monitored.
In Is Left Unlocked, click to select either of the following
For this duration to specify how long a lock must be open before sending a notification.
When selected people cross a Geo-Fence to specify what Geo-Devices and Geo-Fences trigger a notification.
Note: If multiple devices are selected, the rule will be triggered when the last of these devices enters or exists the Geo-Fence.
In During this time frame, click to select either of the following
At All Times will cause the rule to trigger anytime of day based on your Geo-Location.
Only During the Following Times will allow you to define specific hours and days of the week you would like to receive the lock reminder.
To choose notification recipients, click Add.
Click the entries in the Address book that are to be notified, or click New to add a new Address Book entry.
Click Close.
Verify the notification is configured with the correct settings.
Always verify safety, installation, compatibility, and current UI details against the original manufacturer documentation before operational use.
Create/edit an Alarm.com Places pause video recording rule
GoSafer Security Knowledge Base
This operational reference is organized for GoSafer Security customers and staff. Alarm.com product names are retained where required for technical accuracy.
Overview
Pause video recording rules are used to pause Video Recording Rules based on your phone’s location or security system status (Armed Stay or Disarmed), preventing video clips from being captured.…
Platform
Customer Website
Content type
How-to / Configuration
Source last updated
2025-06-04
Procedure
To create/edit an Alarm.com Places pause video recording rule
Log in to the GoSafer Security customer portal (powered by Alarm.com).
Click Settings.
Click Places.
Click Pause Video Recordings.
Click [Edit] on the video recording rule to apply a pause rule to it.
In At home settings
Click to select Do not record when any of the Geo-Devices.
Use the Geo-Devices dropdown menu to select the Geo-Devices to trigger the rule.
Important: If multiple Geo-Devices are selected, it will require the last of these devices to enter or exit the Geo-Fence before the rule is triggered.
Use the Geo-Fence dropdown menu to select the Geo-Fence to trigger the rule.
Verify the recording rule is set up with the correct settings.
Always verify safety, installation, compatibility, and current UI details against the original manufacturer documentation before operational use.
Create/edit an Alarm.com Places sensor reminder
GoSafer Security Knowledge Base
This operational reference is organized for GoSafer Security customers and staff. Alarm.com product names are retained where required for technical accuracy.
Overview
Alarm.com Places Sensor reminders allow you to receive an alert when any door, cabinet or window sensor is left open for too long. These location-based alerts can be configured from the website to …
Platform
App + Web
Content type
How-to / Configuration
Source last updated
2025-06-04
Procedure
To create an Alarm.com Places sensor reminder using the Alarm.com app
Log in to the Alarm.com app.
Tap [Menu].
Tap Notifications.
Tap [Settings].
Tap [Add] to create a new notification.
Tap Sensor Left Open.
Name the new notification.
In When any of these sensors, tap to select the sensors that will send notifications.
In Is Left Open, tap to select one of the following
For this duration to select the amount of time the sensor must remain open before sending the notification.
When selected people cross a Geo-Fence to select the Geo Device.
Note: If multiple devices are selected, the rule will be triggered when the last of these devices enters or exits the Geo-Fence.
To choose notification recipients, tap Add.
Tap the entries in the Address Book that are to be notified, or tap Add Contact to add a new Address Book entry.
Tap Close.
Verify the notification is configured with the correct settings.
Tap Save.
To create an Alarm.com Places sensor reminder using the GoSafer Security customer portal (powered by Alarm.com)
Log in to the GoSafer Security customer portal (powered by Alarm.com).
Click Settings.
Click Places.
In Set-up Rules & Reminders, click Sensor Reminders.
Name the new notification.
In When any of these sensors, click to select the sensors that will send notifications.
In Is Left Open, click to select one of the following
For this duration to select the amount of time the sensor must remain open before sending the notification.
When selected people cross a Geo-Fence to select the Geo Device.
Note: If multiple devices are selected, the rule will be triggered when the last of these devices enters or exits the Geo-Fence.
In During this time frame, click to select when the sensor reminder rule will be active.
At all times will cause the rule to trigger any time of day based on your location.
Only during the following times will allow you to define specific hours and days of the week you would like to receive the sensor reminder.
To choose notification recipients, click Add.
Click the entries in the Address Book that are to be notified, or click New to add a new Address Book entry.
Click Close.
Verify the notification is configured with the correct settings.
Always verify safety, installation, compatibility, and current UI details against the original manufacturer documentation before operational use.
Create/edit an Alarm.com Places thermostat override rule
GoSafer Security Knowledge Base
This operational reference is organized for GoSafer Security customers and staff. Alarm.com product names are retained where required for technical accuracy.
Overview
Alarm.com Places Thermostat Override rules work with your Thermostat Schedule to automatically control the temperature in your home or business based on your phone’s location to help save on …
Platform
Customer Website
Content type
How-to / Configuration
Source last updated
2025-06-04
Procedure
Step-by-step guide: Screenshots and videos are placed with the instruction they illustrate.
Alarm.com Places Thermostat Override rules work with your Thermostat Schedule to automatically control the temperature in your home or business based on your phone’s location to help save on energy costs. Your thermostat schedule resumes as soon as the system is disarmed or when your mobile devices enter the Geo-Fence. Thermostat Override rules can be set up on the GoSafer Security customer portal (powered by Alarm.com).
To create/edit an Alarm.com Places thermostat override rule:
Log in to the GoSafer Security customer portal (powered by Alarm.com).
Click Settings.
Click Places.
In Set up Rules & Reminders, click Smart Away Thermostat Override.
Click the thermostat override toggle switch to enable the rule. The following image is an example of the thermostat override rule successfully enabled:
Smart Away Toggle Switch
Click to select All of the selected Geo-Devices.
Using the Geo-Devicesdropdown menu, select which Geo-Devices will trigger the thermostat override.
Important: If multiple Geo-Devices are selected, it will require the last of these devices to enter or exit the Geo-Fence before the rule is triggered.
Using the Geo-Fence dropdown menu, select which Geo-Fence to apply to the thermostat override rule.
Always verify safety, installation, compatibility, and current UI details against the original manufacturer documentation before operational use.
Geo-Service device is malfunctioning
GoSafer Security Knowledge Base
This operational reference is organized for GoSafer Security customers and staff. Alarm.com product names are retained where required for technical accuracy.
Overview
One common cause for a Geo-Service device malfunctioning is that the device may have been deleted but not completely removed from the account. The best way to clear a Geo-Service device malfunction is to completely remove the device from the account before attempting to reattach the device to the account.
It is recommended to remove Geo-Devices that are not active or currently in use on the account in order to avoid Geo-Service device malfunctions. For more information about how to remove a Geo-Device, see Delete a Geo-Device.
For more information about how to manage the Geo-Devices on an account, see Geo-Devices.
Platform
App + Web
Content type
Troubleshooting
Source last updated
2025-06-04
Procedure
To clear a Geo-Service device malfunction
Note: Clearing the Geo-Service device in malfunction trouble condition only clears the trouble condition once. The following steps need to be used each time the trouble condition occurs.
Complete the following steps for all Geo-Devices that are in malfunction or no longer in use on the account
Log in to the Alarm.com app on the device in malfunction.
Tap [Menu].
Tap App Settings.
Tap Location Services.
Tap the toggle to turn Location Services off.
Log out of the Alarm.com app.
Log in to the GoSafer Security customer portal (powered by Alarm.com). Refresh the page if you were already logged in.
Click Settings.
Click Places.
If the malfunctioning/not in use device is listed in Geo-Devices
Click the desired device.
Click [Delete] to remove the Geo-Device from the account.
Click Ok.
While staying logged into the GoSafer Security customer portal (powered by Alarm.com), log in to the Alarm.com app once again on the Geo-Service device.
Tap [Menu].
Tap App Settings.
Tap Location Services.
Tap the toggle to turn Location Services on.
On the GoSafer Security customer portal (powered by Alarm.com), refresh the page or log in if necessary.
Make sure the device is showing in the Geo-Devices.
If the trouble condition persists after troubleshooting, contact your service provider.
To disable the malfunction report
If you do not want a malfunction report, you can turn off the report using the GoSafer Security customer portal (powered by Alarm.com).
Important: This only applies to Android devices.
Log in to the GoSafer Security customer portal (powered by Alarm.com).
Click Settings.
Click Geo-Services
Click the name of the Geo-Device to be edited.
Click to deselect Report Malfunction if Device fails to check in for 24 hours.
Always verify safety, installation, compatibility, and current UI details against the original manufacturer documentation before operational use.
Troubleshooting Alarm.com Places
GoSafer Security Knowledge Base
This operational reference is organized for GoSafer Security customers and staff. Alarm.com product names are retained where required for technical accuracy.
Overview
By enabling Location Services on mobile devices, the device is allowed to check-in and relay its location relative to the radio tower or router the device connected to. For this feature, enable Alarm.com Places on your mobile devices and ensure that you have a data connection (e.g., 3G, 4G LTE, Wi-Fi).
Platform
App + Web
Content type
Troubleshooting
Source last updated
2025-06-04
Procedure
Step-by-step guide: Screenshots and videos are placed with the instruction they illustrate.
By enabling Location Services on mobile devices, the device is allowed to check-in and relay its location relative to the radio tower or router the device connected to. For this feature, enable Alarm.com Places on your mobile devices and ensure that you have a data connection (e.g., 3G, 4G LTE, Wi-Fi).
Alarm.com Places tips
The lower the data connection and/or coverage in the area, the less accurate Alarm.com Places will be. The more data connection and/or coverage in the areas, the more accurate Alarm.com Places will be.
Staying close to Geo-Fences, or only barely crossing it can mean that the Geo-Device will never triangulate outside of the Geo-Fence. This can cause notifications or actions to incorrectly trigger or not trigger occur at all.
Increasing the Geo-Fence radius provides more accurate notifications based on location.
Wi-Fi can be used as data connection for triangulation. The device does not need to be connected for triangulation to occur.
The more accurate Geo-Fence radius sizes are around or larger than 2 to 2.5 miles radius. The minimum radius can be one mile but is not recommended.
Note: If the customer account is in Canada, the minimum distance is 1.5 kilometers for a Geo-Fence.
To manage Alarm.com Places using the GoSafer Security customer portal (powered by Alarm.com):
Log in to the GoSafer Security customer portal (powered by Alarm.com).
Click Settings.
Click Places.
Important: Only the login permissions of Master Control, Full Control, and Custom with Notification settings enabled can manage Alarm.com Places on a customer account.
Troubleshooting Alarm.com Places:
Verify Alarm.com Places is set up properly
Verify you have the proper Alarm.com Places notifications and rules set up on your account. For more information, see Configure Alarm.com Places.
Verify Location Services is turned on
Verify Location Services is turned on for the device and also for the Alarm.com app. For more information on enabling Alarm.com Places in the app, see Add a new Geo-Device.
Important: iPhones and Android phones also require Location Services to be turned on specifically for the Alarm.com app through phone settings.
To enable Location Services on an Android phone:
Note: These steps may vary depending on the model of the Android phone.
Tap to open the Settings application.
Tap Connections.
Tap the Location toggle switch to enable Location Services.
To enable Location Services on an iPhone:
Important: In order for this option to appear, Alarm.com Places needs to be enabled on the app.
Tap to open the iPhone's Settings application.
Tap Alarm.com.
Tap Location.
In Allow Location Access, tap Always.
Verify the correct device is enabled for Alarm.com Places
The user can verify the correct device is enabled by turning Alarm.com Places off in the app, then log in to the website to verify a correlating device was paused. A device that is paused will be grayed out.
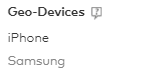
In the following image, the Geo-Device named iPhone is enabled and the Geo-Device named Samsung is disabled.
Geo Device Samsung is disabled
Important: Remember to re-enable the Geo-Device in the Alarm.com app after this test.
Increase the Geo-Fence size
Increase the Geo-Fence size to a minimum of 2 to 2.5-mile radius. If it is already set to a 2.5-mile radius, increase the Geo-Fence radius to 5 miles.
Enable Wi-Fi on the Geo-Device
Enable Wi-Fi on the phone that is a Geo-Device on the account. This may help with triangulation if there are not many towers in that area. Turning on Bluetooth can also help.
Note: The Geo-Device is not required to be connected to a Wi-Fi or Bluetooth network to function.
Verify settings that can affect Alarm.com Places on Android devices
For Android phones, there are several settings that can affect consistent Alarm.com Places functionality. The Alarm.com app also displays possible settings that are affecting functionality.
To verify Alarm.com app settings on an Android device:
Log in to the Alarm.com app.
Tap Menu.
Tap Places.
Tap Manage my location settings.
In Location Services, tap Resolve detected issues.
Android Places1
In Resolve Issues, tap Details next to an existing issue to resolve it.
Android Places2
Verify the Android device settings have the best corresponding values:
Note: The names of settings may vary on Android devices.
Location or Location services should be toggled on.
Locating method or Location mode should be set to high accuracy.
Wi-Fi scanning and Bluetooth scanning, which may be in the Improve accuracy setting, should both be toggled on.
Power saving mode and Ultra power saving mode should both be toggled off.
Battery optimization or Optimize battery usage, which may be in the menu option of the Battery setting, should be toggled off for the Alarm.com app, Google Play Services, Wi-Fi, and Bluetooth.
When selecting the option to Turn Battery Optimization for this AppOff from the Alarm.com app, the phone displays the devices that do not have optimization on. Tap the arrow under Battery optimization to select All Apps, then tap Alarm.com to verify that Don't Optimize is selected.
The following image is an example of turning off battery optimization on an Android device:
Important: Perform the following steps in this order:
Disable Alarm.com Places in the Alarm.com app.
To disable Alarm.com Places:
Log in to the Alarm.com app.
Tap Menu.
Tap Places.
Tap Manage my location settings.
Tap the Location Services toggle switch to disable it.
Delete the Geo-Device on the GoSafer Security customer portal (powered by Alarm.com).
Force close the Alarm.com app.
Re-enable Alarm.com Places in the Alarm.com app.
Add the device back to the Geo-Fence rules or notifications.
Sync the Geo-Device by crossing in and out of the Geo-Fence.
Test by crossing the fence again.
Note: Alarm.com Places uses triangulation to conserve battery power. The device should pass a significant distance over the Geo-Fence in either direction to register crossing the Geo-Fence.
Always verify safety, installation, compatibility, and current UI details against the original manufacturer documentation before operational use.
Edit a Geo-Device
GoSafer Security Knowledge Base
This operational reference is organized for GoSafer Security customers and staff. Alarm.com product names are retained where required for technical accuracy.
Overview
A Geo-Device is a geographically aware iPhone or Android device that can be configured to automate your devices and initiate notifications based on the location of the Geo-Device relative to your …
Platform
App + Web
Content type
How-to / Configuration
Source last updated
2025-11-05
Procedure
To edit a Geo-Device using the Alarm.com app
Log in to the Alarm.com app.
Tap [Menu].
Tap App Settings.
Tap Device Name.
Enter the desired name for the mobile device.
To edit a Geo-Device using the GoSafer Security customer portal (powered by Alarm.com)
Log in to the GoSafer Security customer portal (powered by Alarm.com).
Click Settings.
Click Places.
In Manage Devices, click the name of the Geo-Device to be edited.
In the Edit Device Name field, enter the desired name for the Geo-Device.
Always verify safety, installation, compatibility, and current UI details against the original manufacturer documentation before operational use.
Geo-Devices
GoSafer Security Knowledge Base
This operational reference is organized for GoSafer Security customers and staff. Alarm.com product names are retained where required for technical accuracy.
Overview
This GoSafer Security section brings together resources for Geo-Devices, including setup, configuration, everyday use, and troubleshooting. Choose the related page that matches your device, feature, or task, and follow the current manufacturer guidance linked on that page.
Platform
General / Device
Content type
How-to / Configuration
Source last updated
2022-01-14
Procedure
Browse the related pages in this chapter to open the specific procedure, configuration guide, or troubleshooting article you need.
Always verify safety, installation, compatibility, and current UI details against the original manufacturer documentation before operational use.
What login permissions does a secondary user login need to use Alarm.com Places?
GoSafer Security Knowledge Base
This operational reference is organized for GoSafer Security customers and staff. Alarm.com product names are retained where required for technical accuracy.
Overview
By default, Master Control and Full Control permissions have Alarm.com Places capability enabled.
Platform
General / Device
Content type
How-to / Configuration
Source last updated
2023-02-15
Procedure
For Custom permissions, the Notification Settings feature must be selected to enable Alarm.com Places capability.
Full Control allows the user to enable Alarm.com Places and also make changes to the account's notifications.
Read Only allows the user to enable Alarm.com Places on their app, but they are not able to make changes to notifications.
For Read Only or Limited Device Access permissions, the user is able to view Alarm.com Places but is not capable of enabling it on their mobile device.
For more information about how to configure permissions for a secondary user, see Manage login permissions for secondary logins.
Always verify safety, installation, compatibility, and current UI details against the original manufacturer documentation before operational use.
Create/edit a Geo-Fence
GoSafer Security Knowledge Base
This operational reference is organized for GoSafer Security customers and staff. Alarm.com product names are retained where required for technical accuracy.
Overview
A Geo-Fence is a virtual geographic boundary that by default, is set up around your installation address and lets you create location-based alerts and rules based on the location of one or more …
Platform
App + Web
Content type
How-to / Configuration
Source last updated
2025-06-04
Procedure
Step-by-step guide: Screenshots and videos are placed with the instruction they illustrate.
A Geo-Fence is a virtual geographic boundary that by default, is set up around your installation address and lets you create location-based alerts and rules. Geo-Fence alerts and rules are based on the location of one or more mobile devices, also known as Geo-Devices. Using the GoSafer Security customer portal (powered by Alarm.com), you can edit the Geo-Fence location, name, and radius.
The center of the fence defaults to the system's installation address. To move the fence location, perform either of the following:
Tap and drag the map to move the location marker.
Enter a specific address.
To adjust the radius, either pinch the Geo-Fence, enter the desired radius in the Adjust Radius field (in miles), or tap AddorMinus to adjust the distance.
Note: The minimum Geo-Fence radius is 1 mile (1.6 kilometers), and the maximum is 100 miles (160 kilometers). If the account is in Canada, the minimum radius is 1.5 kilometers and the maximum is 150 kilometers.
In the Name field, enter a name for the Geo-Fence.
Tap Save.
To create a Geo-Fence using the GoSafer Security customer portal (powered by Alarm.com):
Log in to the GoSafer Security customer portal (powered by Alarm.com).
Click Settings.
Click Places.
In Manage Places, click Add a Fence.
The center of the fence defaults to the system's installation address. To move the fence location, perform either of the following:
Click and drag the location marker on the map.
Enter a specific address in the Move fence location to field and click Geofence enter.
In the Fence Name field, enter a name for the Geo-Fence.
To adjust the radius, either click and drag the Geo-Fence anchors on the map overlay, or enter the desired radius in the Geo-Fence Radius field (in miles).
Note: The minimum Geo-Fence radius is 1 mile (1.6 kilometers), and the maximum is 100 miles (160 kilometers). If the account is in Canada, the minimum radius is 1.5 kilometers and the maximum is 150 kilometers.
Click Save.
Edit a Geo-FenceIcn Chevron Up
To edit a Geo-Fence using the Alarm.com app:
Log in to the Alarm.com app.
Tap Menu.
Tap Places.
In Places, tap the desired Geo-Fence to edit.
Tap Edit Place.
To move the fence location, perform either of the following:
Tap and drag the map to move the location marker.
Enter a specific address.
To adjust the radius, either pinch the Geo-Fence, enter the desired radius in the Adjust Radius field (in miles), or tap AddorMinus to adjust the distance.
Note: The minimum Geo-Fence radius is 1 mile (1.6 kilometers), and the maximum is 100 miles (160 kilometers). If the account is in Canada, the minimum radius is 1.5 kilometers and the maximum is 150 kilometers.
In the Name field, enter a name for the Geo-Fence.
Note: The default Geo-Fence cannot be renamed or deleted.
Click Save.
To edit a Geo-Fence using the GoSafer Security customer portal (powered by Alarm.com):
Log in to the GoSafer Security customer portal (powered by Alarm.com).
Click Settings.
Click Places.
In Manage Places, click the desired Geo-Fence to edit.
To move the fence location, perform either of the following:
Click and drag the location marker on the map.
Enter a specific address in the Move fence location to field and click Geofence enter.
In the Fence Name field, enter a name for the Geo-Fence.
To adjust the radius, either click and drag the Geo-Fence anchors on the map overlay, or enter the desired radius in the Geo-FenceRadius field (in miles).
Note: The minimum Geo-Fence radius is 1 mile (1.6 kilometers), and the maximum is 100 miles (160 kilometers). If the account is in Canada, the minimum radius is 1.5 kilometers and the maximum is 150 kilometers.
Click Save.
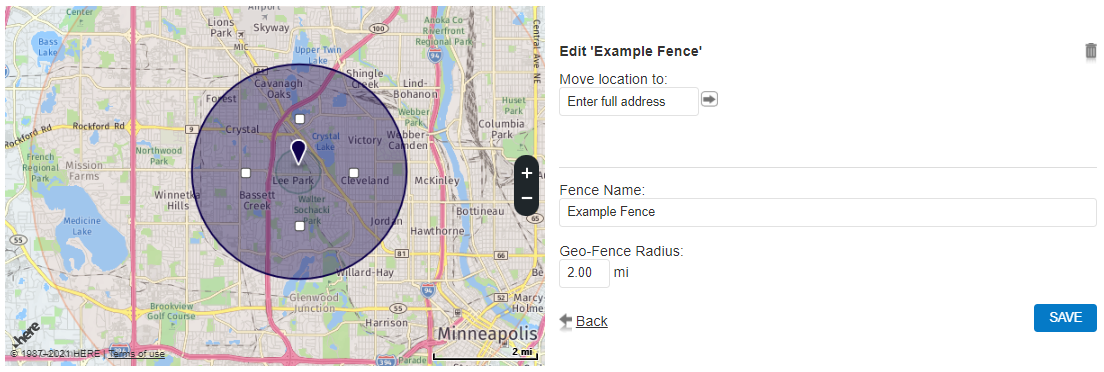
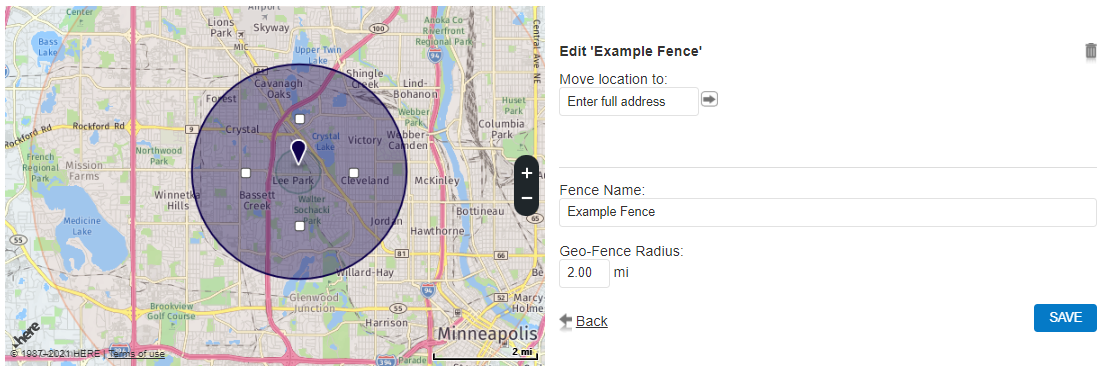
The following image is an example of the map that appears to edit the Geo-Fence:
Geo Fence Edit
Delete a Geo-FenceIcn Chevron Up
To delete a Geo-Fence using the Alarm.com app:
Note: The default Geo-Fence cannot be renamed or deleted.
Log in to the Alarm.com app.
Tap Menu.
Tap Places.
In Places, tap the desired Geo-Fence.
Tap Edit Place.
Tap Delete Place.
Tap Delete Place when prompted to confirm that you want to delete the Geo-Fence.
To delete a Geo-Fence using the GoSafer Security customer portal (powered by Alarm.com):
Note: The default Geo-Fence can be edited, but not deleted.
Log in to the GoSafer Security customer portal (powered by Alarm.com).
Click Settings.
Click Places.
In Manage Places, click thename of the Geo-Fence to be deleted.
Click Delete.
Click Ok when prompted to confirm that you want to delete the Geo-Fence.
Always verify safety, installation, compatibility, and current UI details against the original manufacturer documentation before operational use.
Delete a Geo-Fence
GoSafer Security Knowledge Base
This operational reference is organized for GoSafer Security customers and staff. Alarm.com product names are retained where required for technical accuracy.
Overview
Geo-Fences can be managed or deleted from the website.
Platform
App + Web
Content type
How-to / Configuration
Source last updated
2025-06-04
Procedure
Step-by-step guide: Screenshots and videos are placed with the instruction they illustrate.
A Geo-Fence is a virtual geographic boundary that by default, is set up around your installation address. This feature allows you to create location-based alerts and rules based on the location of one or more phones (Geo-Devices). A Geo-Fence can only be deleted using the GoSafer Security customer portal (powered by Alarm.com).
Always verify safety, installation, compatibility, and current UI details against the original manufacturer documentation before operational use.
Geo-Fences
GoSafer Security Knowledge Base
This operational reference is organized for GoSafer Security customers and staff. Alarm.com product names are retained where required for technical accuracy.
Overview
This GoSafer Security section brings together resources for Geo-Fences, including setup, configuration, everyday use, and troubleshooting. Choose the related page that matches your device, feature, or task, and follow the current manufacturer guidance linked on that page.
Platform
Customer Website
Content type
How-to / Configuration
Source last updated
2022-01-14
Procedure
Browse the related pages in this chapter to open the specific procedure, configuration guide, or troubleshooting article you need.
Always verify safety, installation, compatibility, and current UI details against the original manufacturer documentation before operational use.
What is a Geo-Fence?
GoSafer Security Knowledge Base
This operational reference is organized for GoSafer Security customers and staff. Alarm.com product names are retained where required for technical accuracy.
Overview
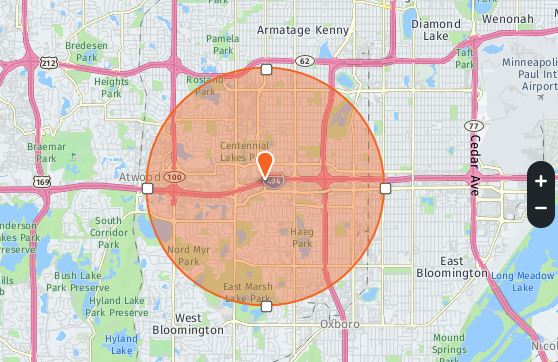
A Geo-Fence is a circular area defined by the user. This area is used as a reference to determine if a Geo-Device (e.g., a mobile device associated with the account) is inside or outside this area. Based on this, it is possible to create automation rules, reminders, and notifications.
For example, a thermostat can be set to specific temperatures based on whether the Geo-Device is inside or outside the radius of the Geo-Fence.
[Geo Fence]
Platform
General / Device
Content type
How-to / Configuration
Source last updated
2023-10-31
Procedure
Step-by-step guide: Screenshots and videos are placed with the instruction they illustrate.
A Geo-Fence is a virtual geographic boundary that by default, is set up around your installation address. This feature allows you to create location-based alerts and rules based on the location of one or more phones (Geo-Devices). A Geo-Fence can only be deleted using the GoSafer Security customer portal (powered by Alarm.com).
Always verify safety, installation, compatibility, and current UI details against the original manufacturer documentation before operational use.
What is the minimum and maximum size of a Geo-Fence?
GoSafer Security Knowledge Base
This operational reference is organized for GoSafer Security customers and staff. Alarm.com product names are retained where required for technical accuracy.
Overview
The size of a Geo-Fence refers to its radius. The minimum radius is 1.6 kilometers (or one mile), and the maximum radius is 160 kilometers (or 100 miles). However, it is not recommended to use an excessively wide radius.
Note: If using an account in Canada, the minimum distance is 1.5 kilometers for a Geo-Fence.
Platform
General / Device
Content type
FAQ / Explanation
Source last updated
2022-07-11
Procedure
The size of a Geo-Fence refers to its radius. The minimum radius is 1.6 kilometers (or one mile), and the maximum radius is 160 kilometers (or 100 miles). However, it is not recommended to use an excessively wide radius.
Note: If using an account in Canada, the minimum distance is 1.5 kilometers for a Geo-Fence.
 .
. .
. .
.