Image Sensor
GoSafer Security procedures and references for Image Sensor.
- Image Sensor
- Create an Image Sensor Activity Alert rule
- Create an Image Sensor Daily View rule
- Create an Image Sensor alarm rule
- Enable/edit Background Capture for an Image Sensor
- Image Sensor Rules and Alerts
- Delete an image from the Image Sensor Gallery
- Download an image from the Image Sensor Gallery
- How long are Image Sensor images stored online once they are uploaded?
- How many Image Sensor images can be uploaded per month?
- Image Sensor Usage
- Take an Image Sensor image (Peek-In)
- View the Images Event Gallery
Image Sensor
GoSafer Security Knowledge Base
This operational reference is organized for GoSafer Security customers and staff. Alarm.com product names are retained where required for technical accuracy.
Overview
This GoSafer Security section brings together resources for Image Sensor, including setup, configuration, everyday use, and troubleshooting. Choose the related page that matches your device, feature, or task, and follow the current manufacturer guidance linked on that page.
| Platform | General / Device |
|---|---|
| Content type | How-to / Configuration |
| Source last updated | 2026-03-26 |
Procedure
Source and support
For GoSafer Security assistance, visit gosafersecurity.com.
Original Alarm.com reference: https://answers.alarm.com/Customer/Website_and_App/Image_Sensor
Always verify safety, installation, compatibility, and current UI details against the original manufacturer documentation before operational use.
Create an Image Sensor Activity Alert rule
GoSafer Security Knowledge Base
This operational reference is organized for GoSafer Security customers and staff. Alarm.com product names are retained where required for technical accuracy.
Overview
Image Sensor Activity Alert rules can capture and automatically upload images from the first motion events after a specified period of inactivity.
| Platform | Customer Website |
|---|---|
| Content type | How-to / Configuration |
| Source last updated | 2025-06-04 |
Procedure
To create an Image Sensor Activity Alert rule
- Log in to the GoSafer Security customer portal (powered by Alarm.com).
- Click Automation.
- Click Add New Rule.
- Click Image Sensor Rule.
- Click Activity Alert.
- Enter the name of the new Image Sensor Activity Alert rule.
Using the When no activity is detected for dropdown menu, select the desired period of inactivity.
Using the Capture first motion event on dropdown menu, select the Image Sensor you would like to capture the image.
In During this time frame, click to select either of the following
At All Times to have the rule trigger every time motion is detected after the specified amount of time.
Only During the Following Times to specify the days and times the rule can be triggered.
In Recipients, click Add to add notification recipients.
- Click to select the desired recipients from the Address book, or add an unlisted recipient by clicking New.
- Click Close.
- Verify the rule is configured with the correct settings.
- Click Save.
Source and support
For GoSafer Security assistance, visit gosafersecurity.com.
Original Alarm.com reference: https://answers.alarm.com/Customer/Website_and_App/Image_Sensor/Image_Sensor_Rules_and_Alerts/Create_an_Image_Sensor_Activity_Alert_rule
Always verify safety, installation, compatibility, and current UI details against the original manufacturer documentation before operational use.
Create an Image Sensor Daily View rule
GoSafer Security Knowledge Base
This operational reference is organized for GoSafer Security customers and staff. Alarm.com product names are retained where required for technical accuracy.
Overview
Image sensor Daily View rules can capture the first motion event detected during a specified timeframe.
| Platform | Customer Website |
|---|---|
| Content type | How-to / Configuration |
| Source last updated | 2025-06-04 |
Procedure
To create an Image Sensor Daily View rule
- Log in to the GoSafer Security customer portal (powered by Alarm.com).
- Click Automation.
- Click Add New Rule.
- Click Image Sensor Rule.
- Click Daily View.
- Enter the desired name for the new Image Sensor Daily View rule.
In When motion is reported by, click to select the motion sensors that the rule applies to.
Note: If multiple sensors are selected, only the first image sensor to detect motion uploads an image.
In During this time frame, click to select either of the following
At All Times to have the rule trigger every time the first motion event is detected.
Only During the Following Times to specify the days and times the rule can be triggered.
In Recipients, click Add to choose notification recipients.
- Click to select the desired recipients from the Address book, or add an unlisted recipient by clicking New.
- Click Close.
- Verify the rule is configured with the correct settings.
- Click Save.
Source and support
For GoSafer Security assistance, visit gosafersecurity.com.
Original Alarm.com reference: https://answers.alarm.com/Customer/Website_and_App/Image_Sensor/Image_Sensor_Rules_and_Alerts/Create_an_Image_Sensor_Daily_View_rule
Always verify safety, installation, compatibility, and current UI details against the original manufacturer documentation before operational use.
Create an Image Sensor alarm rule
GoSafer Security Knowledge Base
This operational reference is organized for GoSafer Security customers and staff. Alarm.com product names are retained where required for technical accuracy.
Overview
By default, Image Sensors will capture motion events during system alarm events.
| Platform | Customer Website |
|---|---|
| Content type | How-to / Configuration |
| Source last updated | 2025-06-04 |
Procedure
To add notification recipients to an Image Sensor alarm rule
- Log in to the GoSafer Security customer portal (powered by Alarm.com).
- Click Automation.
- Click Rules.
In Capture Images During Alarms, click [Edit].
In Recipients, click Add.
In the Address Book, select the desired recipients.
To add an unlisted recipient, click New.
- Click Close.
- Verify all desired recipients are included.
- Click Save.
Source and support
For GoSafer Security assistance, visit gosafersecurity.com.
Original Alarm.com reference: https://answers.alarm.com/Customer/Website_and_App/Image_Sensor/Image_Sensor_Rules_and_Alerts/Create_an_Image_Sensor_alarm_rule
Always verify safety, installation, compatibility, and current UI details against the original manufacturer documentation before operational use.
Enable/edit Background Capture for an Image Sensor
GoSafer Security Knowledge Base
This operational reference is organized for GoSafer Security customers and staff. Alarm.com product names are retained where required for technical accuracy.
Overview
The Background Capture rule can be enabled/disabled using the GoSafer Security customer portal.
| Platform | Customer Website |
|---|---|
| Content type | How-to / Configuration |
| Source last updated | 2025-06-04 |
Procedure
Step-by-step guide: Screenshots and videos are placed with the instruction they illustrate.
Background Capture is designed to give a collection of images that covers occurrences that are not scheduled events. It can be used to capture images of first motion events periodically after sensor inactivity. The Background Capture rule for an Image Sensor can be enabled and edited using the GoSafer Security customer portal (powered by Alarm.com).
Note: To view Background Capture images, captured images need to be specifically requested for them to upload to the Event Gallery. For more information, see Upload captured images to the Image Sensor Gallery.
To enable Background Capture for an Image Sensor:
- Log in to the GoSafer Security customer portal (powered by Alarm.com).
- In the Image Sensor card, click Icn Chevron Right.
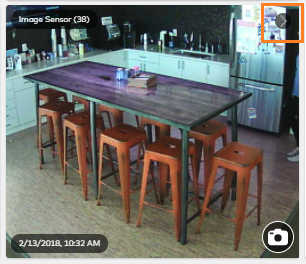
View Gallery button outlined - Click Rules.
- On the Background Capture rule, click the toggle switch to enable/disable the rule. The following image shows an enabled Background Capture rule:
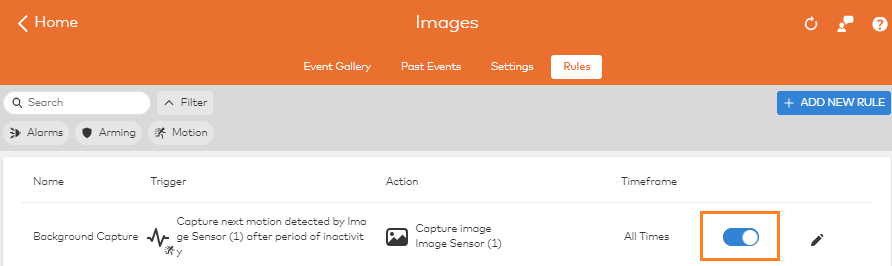
Enabled Background Capture rule
Note: If Background Capture is unable to be enabled on an Image Sensor, contact your service provider.
To edit Background Capture for an Image Sensor:
- Log in to the GoSafer Security customer portal (powered by Alarm.com).
- In the Image Sensor card, click Icn Chevron Right.
- Click Rules.
- Click Icn Editon the Background Capture rule.
- Click to select which Image Sensors will trigger the Background Capture rule.
- Click to select desired conditions when Background Capture will not capture images.
- For Arming State, you have the option to select for the system to not capture images when the system is Disarmed and when it is Armed Stay.
- For Alarm.com Places, you have the option to select for the system to not capture images when selected Geo-Devices are inside a selected Geo-Fence.
- For Time frame, you have the option to select hours of each day of the week that Background Capture will not be enabled to capture images.
- Verify all desired settings are selected.
- Click Save.
Source and support
For GoSafer Security assistance, visit gosafersecurity.com.
Original Alarm.com reference: https://answers.alarm.com/Customer/Website_and_App/Image_Sensor/Image_Sensor_Rules_and_Alerts/Enable_edit_Background_Capture_for_an_Image_Sensor
Always verify safety, installation, compatibility, and current UI details against the original manufacturer documentation before operational use.
Image Sensor Rules and Alerts
GoSafer Security Knowledge Base
This operational reference is organized for GoSafer Security customers and staff. Alarm.com product names are retained where required for technical accuracy.
Overview
This GoSafer Security section brings together resources for Image Sensor Rules and Alerts, including setup, configuration, everyday use, and troubleshooting. Choose the related page that matches your device, feature, or task, and follow the current manufacturer guidance linked on that page.
| Platform | Customer Website |
|---|---|
| Content type | How-to / Configuration |
| Source last updated | 2026-03-26 |
Procedure
Source and support
For GoSafer Security assistance, visit gosafersecurity.com.
Original Alarm.com reference: https://answers.alarm.com/Customer/Website_and_App/Image_Sensor/Image_Sensor_Rules_and_Alerts
Always verify safety, installation, compatibility, and current UI details against the original manufacturer documentation before operational use.
Delete an image from the Image Sensor Gallery
GoSafer Security Knowledge Base
This operational reference is organized for GoSafer Security customers and staff. Alarm.com product names are retained where required for technical accuracy.
Overview
Image Sensor Gallery images can be deleted from the website and the app.
| Platform | App + Web |
|---|---|
| Content type | How-to / Configuration |
| Source last updated | 2025-06-04 |
Procedure
To delete an image from the Image Sensor Gallery using the Alarm.com app
- Log in to the Alarm.com app.
- Tap Images.
- Tap the image you would like to delete.
- Tap [Delete].
- Tap Delete Image.
To delete an image from the Image Sensor Gallery using the GoSafer Security customer portal (powered by Alarm.com)
- Log in to the GoSafer Security customer portal (powered by Alarm.com).
In the Image Sensor card, click [Details].
- Click the thumbnail of the image to be deleted.
- Click [Delete] to delete the image.
- Click Yes.
Source and support
For GoSafer Security assistance, visit gosafersecurity.com.
Original Alarm.com reference: https://answers.alarm.com/Customer/Website_and_App/Image_Sensor/Image_Sensor_Usage/Delete_an_image_from_the_Image_Sensor_Gallery
Always verify safety, installation, compatibility, and current UI details against the original manufacturer documentation before operational use.
Download an image from the Image Sensor Gallery
GoSafer Security Knowledge Base
This operational reference is organized for GoSafer Security customers and staff. Alarm.com product names are retained where required for technical accuracy.
Overview
Image Sensor Gallery images can be downloaded from the website.
| Platform | App + Web |
|---|---|
| Content type | Reference |
| Source last updated | 2025-06-04 |
Procedure
To download an image from the Image Sensor Gallery using the Alarm.com app
- Log in to the Alarm.com app.
- Tap Images.
- Tap the image you would like to download from the Gallery.
- Tap [Download].
To download an image from the Image Sensor Gallery using the GoSafer Security customer portal (powered by Alarm.com)
- Log in to the GoSafer Security customer portal (powered by Alarm.com).
In the Image Sensor card, click [Details].
- Click the thumbnail of the image to be downloaded.
- Click [Download].
Source and support
For GoSafer Security assistance, visit gosafersecurity.com.
Original Alarm.com reference: https://answers.alarm.com/Customer/Website_and_App/Image_Sensor/Image_Sensor_Usage/Download_an_image_from_the_Image_Sensor_Gallery
Always verify safety, installation, compatibility, and current UI details against the original manufacturer documentation before operational use.
How long are Image Sensor images stored online once they are uploaded?
GoSafer Security Knowledge Base
This operational reference is organized for GoSafer Security customers and staff. Alarm.com product names are retained where required for technical accuracy.
Overview
Once uploaded to your Gallery, images are stored for up to 60 days.
| Platform | App + Web |
|---|---|
| Content type | Reference |
| Source last updated | 2026-03-26 |
Procedure
Once uploaded to your Gallery, images are stored for up to 60 days.
During this time, you can download images from the Alarm.com app or GoSafer Security customer portal (powered by Alarm.com) to your computer or mobile device for permanent storage.
For more information about downloading Image Sensor Gallery images, see Download an image from the Image Sensor Gallery.
Source and support
For GoSafer Security assistance, visit gosafersecurity.com.
Original Alarm.com reference: https://answers.alarm.com/Customer/Website_and_App/Image_Sensor/Image_Sensor_Usage/How_long_are_Image_Sensor_images_stored_online_once_they_are_uploaded
Always verify safety, installation, compatibility, and current UI details against the original manufacturer documentation before operational use.
How many Image Sensor images can be uploaded per month?
GoSafer Security Knowledge Base
This operational reference is organized for GoSafer Security customers and staff. Alarm.com product names are retained where required for technical accuracy.
Overview
The number of Image Sensor images that can be uploaded per month can be viewed when you log in to the Alarm.com app or GoSafer Security customer portal (powered by Alarm.com). For more information about updating your monthly upload limit, contact your service provider. Note: Unused Image Sensor uploads do not carry over from month to month. The upload limit is reset on the first day of each month. If the upload limit is reached in the previous month, the Image Sensor will resume uploading images according to its capture rules the following month.
| Platform | App + Web |
|---|---|
| Content type | Reference |
| Source last updated | 2025-06-04 |
Procedure
Step-by-step guide: Screenshots and videos are placed with the instruction they illustrate.
The number of Image Sensor images that can be uploaded per month can be viewed when you log in to the Alarm.com app or GoSafer Security customer portal (powered by Alarm.com).
For more information about updating your monthly upload limit, contact your service provider.
Note: Unused Image Sensor uploads do not carry over from month to month. The upload limit is reset on the first day of each month. If the upload limit is reached in the previous month, the Image Sensor will resume uploading images according to its capture rules the following month.
View your current upload limit
A customer's current Image Sensor upload limit for the month can be viewed using the Alarm.com app or GoSafer Security customer portal (powered by Alarm.com).
To view the Image Sensor upload limit for the month using the Alarm.com app:
Note: The Alarm.com app only displays the number of uploads remaining. To view the number of image uploads used and the total monthly upload limit use the GoSafer Security customer portal (powered by Alarm.com).
- Log in to the Alarm.com app.
- Tap Images.
- Tap Upload. This page displays the number of image uploads remaining for the current month.
The following image displays that the user has 15 image uploads remaining for the current month.
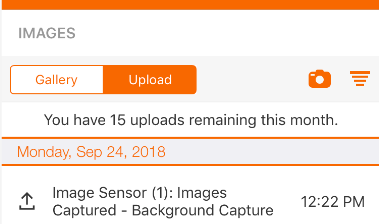
To view the Image Sensor upload limit for the month using the GoSafer Security customer portal (powered by Alarm.com):
- Log in to the GoSafer Security customer portal (powered by Alarm.com).
- On the Image Sensor card, click Details.
- Click Past Events. This page displays how many uploads have been used for the month, how many uploads are remaining for the month, and the total number of uploads available per month.
In the following image, the user has used 25 image uploads, has 15 images left, and their total monthly upload limit is 40 image uploads.
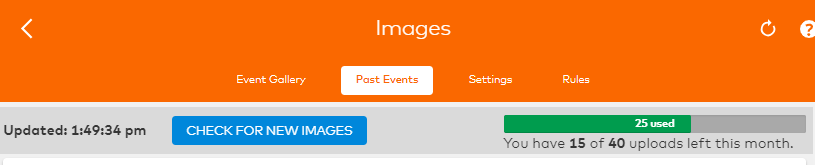
Source and support
For GoSafer Security assistance, visit gosafersecurity.com.
Original Alarm.com reference: https://answers.alarm.com/Customer/Website_and_App/Image_Sensor/Image_Sensor_Usage/How_many_Image_Sensor_images_can_be_uploaded_per_month
Always verify safety, installation, compatibility, and current UI details against the original manufacturer documentation before operational use.
Image Sensor Usage
GoSafer Security Knowledge Base
This operational reference is organized for GoSafer Security customers and staff. Alarm.com product names are retained where required for technical accuracy.
Overview
This GoSafer Security section brings together resources for Image Sensor Usage, including setup, configuration, everyday use, and troubleshooting. Choose the related page that matches your device, feature, or task, and follow the current manufacturer guidance linked on that page.
| Platform | Customer Website |
|---|---|
| Content type | How-to / Configuration |
| Source last updated | 2022-01-14 |
Procedure
Source and support
For GoSafer Security assistance, visit gosafersecurity.com.
Original Alarm.com reference: https://answers.alarm.com/Customer/Website_and_App/Image_Sensor/Image_Sensor_Usage
Always verify safety, installation, compatibility, and current UI details against the original manufacturer documentation before operational use.
Take an Image Sensor image (Peek-In)
GoSafer Security Knowledge Base
This operational reference is organized for GoSafer Security customers and staff. Alarm.com product names are retained where required for technical accuracy.
Overview
Image Sensor Peek-Ins allow users to take on demand Image Sensor snapshots from the app and website.
| Platform | App + Web |
|---|---|
| Content type | How-to / Configuration |
| Source last updated | 2025-06-04 |
Procedure
To request an Image Sensor Peek-In using the Alarm.com app
- Log in to the Alarm.com app.
- Tap Images.
- Tap [Peek In].
- Tap Peek-In Now to have the Image Sensor capture an image immediately.
- Tap Peek-In Next Motion to have the Image Sensor capture an image the next time the Image Sensor detects motion.
The image will be uploaded to the Image Sensor Event Gallery. When the image is available for viewing a notification will be sent to all Peek-In notification recipients.
To request an Image Sensor Peek-In using the GoSafer Security customer portal (powered by Alarm.com)
- Log in to the GoSafer Security customer portal (powered by Alarm.com).
In the Image Sensor card, click [Peek In].
Next to the desired Image Sensor, click either
[Peek In Next Motion] to have the Image Sensor capture an image the next time the Image Sensor detects motion.
[Peek In Now] to have the Image Sensor capture an image immediately.
The image will be uploaded to the Image Sensor Event Gallery. When the image is available for viewing a notification will be sent to all Peek-In notification recipients.
To configure Peek-In recipients using the GoSafer Security customer portal (powered by Alarm.com)
- Log in to the GoSafer Security customer portal (powered by Alarm.com).
- Click Automation.
On the Peek-Ins & Manual Image Uploads rule, click [Edit].
To choose notification recipients, click Add.
- Click to select your desired recipients from the Address book, or add an unlisted recipient by clicking New.
- Click Close.
- Verify the rule is configured with the correct settings.
- Click Save.
Source and support
For GoSafer Security assistance, visit gosafersecurity.com.
Original Alarm.com reference: https://answers.alarm.com/Customer/Website_and_App/Image_Sensor/Image_Sensor_Usage/Take_an_Image_Sensor_image_Peek-In
Always verify safety, installation, compatibility, and current UI details against the original manufacturer documentation before operational use.
View the Images Event Gallery
GoSafer Security Knowledge Base
This operational reference is organized for GoSafer Security customers and staff. Alarm.com product names are retained where required for technical accuracy.
Overview
The Image Sensor Gallery can be viewed from the website and the app.
| Platform | App + Web |
|---|---|
| Content type | Reference |
| Source last updated | 2025-06-04 |
Procedure
Step-by-step guide: Screenshots and videos are placed with the instruction they illustrate.
The Images Event Gallery displays the images uploaded by your devices (i.e., Image Sensor). Images are taken according to the rules that are set for the image devices on your account and are available on the Alarm.com app and GoSafer Security customer portal (powered by Alarm.com).
For more information about how to create rules, see Upload captured images to the Image Sensor Gallery.
To view the Images Event Gallery using the Alarm.com app:
- Log in to the Alarm.com app.
- Tap Images.
- In the Gallery, view all saved images and tap on any image to enlarge it. Search parameters can also be applied to find specific events:
- Tap Filter.
- In Show, tap to select a specific time frame.
- In Events, tap to select and type of events to search for.
- Tap Apply.
To view the Images Event Gallery using the GoSafer Security customer portal (powered by Alarm.com):
- Log in to the GoSafer Security customer portal (powered by Alarm.com).
- On the Images card, click Details as outlined in the following example image.
View Gallery button outlined
- In the Event Gallery, view all images. Search parameters can also be applied to find specific events:
- Select a specific date/time by clicking Calendar.
- Select the specific events to search for using the All Reasons dropdown menu.
- Click Go.
Source and support
For GoSafer Security assistance, visit gosafersecurity.com.
Original Alarm.com reference: https://answers.alarm.com/Customer/Website_and_App/Image_Sensor/Image_Sensor_Usage/View_the_Images_Event_Gallery
Always verify safety, installation, compatibility, and current UI details against the original manufacturer documentation before operational use.